If you needed Windows installation 7 from a flash drive via BIOS, then our article will be a great help to you.
Installing a new operating system on a computer is enough common problem, which may occur due to the slightest malfunction of the system or the actions of an inept PC user.
This issue also became relevant in connection with the statement of the official representatives of the Windows company about the suspension technical support XP operating system.
To date, almost all users have completely switched to the so-called seven.
Our step-by-step instructions will help you quickly and easily bring your computer back to life.
Preparing your computer to reinstall Windows
Before you start working on new software, you need to properly prepare your PC. First you need to remember what important information stored on your computer and save it to a portable storage device.
Particular attention should be paid local disk C, it is on it that the largest amount of information is stored. Almost all users store their media files (photos, videos) in the My Documents folder or directly on the desktop.
These files are often located on the disk along with the already installed OS. You can also use the free space of another local drive to save information.
very important before reinstalling Windows check if the PC has drivers for network card.
If you install new system via USB, and then it turns out that the distribution does not have drivers for the network card, then you will not be able to configure the drivers and the Internet connection.
For your own confidence, it is better to once again make sure that the drivers are available. Also, be sure to check if you have drivers for your sound card, audio card, video card, etc.
Preparing a flash drive for software installation
To install the operating system from a flash drive, we recommend that you adhere to the following rules:
- The minimum size of the flash drive must be 4 GB. This is the amount of space required to store all important components and files
- Mandatory training Windows distribution 7 to record and save its image (*iso format);
- Choosing a program to create a disk image.
Advice! One of the best utilities UltralSO is considered to create a disk image. latest version located on the developer's site
Install and run the utility on the PC, and then select the pre-selected disk image in it. Step-by-step instruction using the program will help you quickly understand all the subtleties.
- launch
2. Now the main working window opens in front of you
3. Let's move on to recording the image hard drive
4. Now you need to connect the flash memory and enable formatting. When the process of formatting the flash drive is completed, you can start recording.
5. At the end of the recording, there will be Windows on the space of your flash drive, with the help of which you will reinstall.
Comment! To create a flash drive to install the system through the BIOS, you can use the toolsWindows.
Configuring Bios to work with a bootable USB flash drive
One connection of the installation flash drive to a PC is not enough to install new software, it is required presetting computer so that it starts booting from it when it is turned on.
All settings are made in BIOS. Any laptop or computer has a BIOS that stores important settings, including the order in which devices should boot. It is this setting that we now need for further fruitful work.
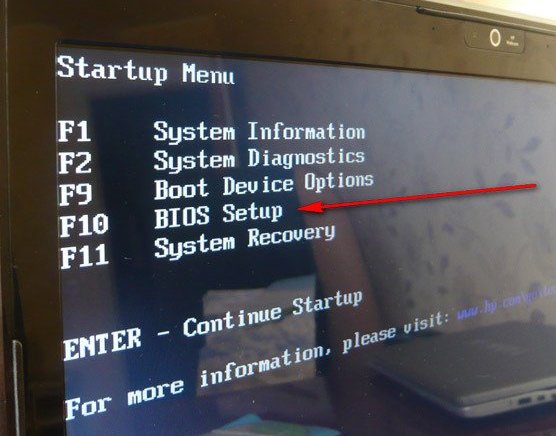
To start the BIOS, you must hold or press a certain key on the keyboard when you turn on the computer.
You can find out which key we need from the information on the monitor. Typically, these keys are Esc, Delete, F2. If you entered BIOS, then one of the following screens will appear in front of you:
If the login attempt fails, restart the computer again and try to start the BIOS again. To make it easier for you, we have posted a table with the main options for enabling Bios.
Keyboard shortcuts to enterBIOS depending on manufacturerBIOS
Basic keyboard shortcuts for launchingBIOS depending on laptop and computer manufacturers
After you get into BIOS, you need to find the option that is responsible for loading devices. Usually it is in the menu and the word BOOT is present in its name. Other options are not excluded, you may even have to look.
Here are some examples:
As a rule, the choice of the main device for loading occurs by pressing the arrows on the keyboard, although sometimes there are other ways to control it. If you can’t figure it out on your own, then refer to the help that glows in the BIOS.
In our case, the USB-HDD (there may be another name) acts as the first boot device. After selecting it, you must exit the BIOS with saving all settings using the Save and Exit Setup item.
After this step, the computer should restart and we will move on to the main stage for which we are here.
Installing Windows 7 using a bootable flash drive
If everything was correctly written to the space of the flash drive, and the correct settings were made in the BIOS, then you will see the following message on the monitor screen in front of you, which says that you should press any key to activate the download.
If there is no such inscription, then you will have to check your actions. To do this, go to BIOS and make sure that the boot from USB flash drive setting is saved. If there are no errors in the BIOS, then most likely you were unable to create a bootable USB flash drive and you need to repeat the whole process again.
If there is an inscription, then congratulations, your installation Windows new versions through the bios started. Some installation images, in addition to the operating system itself, also contain various additional programs, then you will have to select the required item from the menu.
It is also worth saying that some of the disks by default perform most of the settings described below. You should not worry about this, since all settings can be changed after the software installation process is completed.
A welcome screen appears in front of you, on which you select the desired data. After the configuration is done, you should click on the "Next" button, and then "Install".
In a new window, conditions appear in front of us license agreement, which you, of course, read very carefully, and then agree by checking the box in the designated box and pressing the "Next" button.
The final stage of installation
In the new window, you will have to choose which type of installation we want. We need a complete type. Next, you will have to work a little with the disk, on the space of which it will be written a new version software.
To do this, select the required disk partition in the menu and click on the "Disk Settings" button, after which we start formatting.
We have already described how this is done above. Here you just need to change from USB-HDD to the name of your drive. This is a very easy action that should not cause you any difficulties.
Once the reboot is complete, Windows Setup will continue.
- We enter names for the computer, laptop and for users.
- Set a password if needed.
- We enter the name license key, if it exists (you can skip this step).
- Select security settings ("Recommended settings").
- Set date, time.
- We are setting up the network.
Thanks to these simple steps, you can install Windows 7 through BIOS using a USB flash drive.
Today I will tell you how to enable booting from a USB flash drive in the BIOS of various manufacturers. It doesn't matter which version you have, the order of gestures will be as follows:
1. We insert our bootable USB flash drive into the USB port of your computer. I recommend inserting it into the port located directly on the motherboard, i.e. from the back of the system unit.
2. Turn on the computer and press the key Delete(or F2) to get into the BIOS. Depending on the manufacturer and BIOS version, other keys (Esc, F1, Tab) may also be used, so you need to carefully read the prompts on the screen.
In BIOS, we can only navigate through the tabs using the keyboard.
Below I will detail this process on the example of the most used BIOS versions.
Attention! Remember that if you are installing the operating system from a USB flash drive or CD and have selected a boot device in the BIOS, and not in the boot menu, then after the first automatic Windows restart you need to enter the BIOS again and return to boot from the hard drive. If this is not done, autoload from a USB flash drive or CD will work again, and Windows will again begin the first stage of the procedure. installation.
Configuring Award Bios to boot from a USB flash drive
Award Bios:
First, let's check if the USB controller is enabled. We go to "Integrated Peripherals". We go down with the arrow on the keyboard to the item “USB Controller”. Press the “Enter” key and in the window that appears, select “Enable” (also using “Enter”). Opposite “USB Controller 2.0” should also be “Enable”.
 Exit this tab by pressing Esc.
Then we go to "Advanced BIOS Features" - "Hard Disk Boot Priority".Now in my example, the hard drive is in the first place, and the flash drive should be.
 We stand on the line with the name of our flash drive (Patriot Memory) and raise it to the very top using the “+” key on the keyboard.
 Exit here by pressing "Esc".
Configuring AMI Bios to boot from a USB flash drive
If, upon entering BIOS, you see such a screen, then you have AMI Bios:
 First, let's check if the USB controller is enabled. Go to the tab "Advanced" - "USB Configuration".
 Opposite the items “USB Function” and “USB 2.0 Controller” should be “Enabled”.
 If this is not the case, we stand on this line and press the “Enter” key. From the list that appears, select “Enabled” (also using “Enter”).
Then exit this tab by pressing “Esc”.
Go to tab "Boot" - "Hard Disk Drives".
 Now I have a hard drive in the first place, but I need to put a USB flash drive here. We become on the first line, press “Enter” and in the window that appears, select our Patriot Memory flash drive.
 It should be like this:
 We leave from here through "Esc".
Select "Boot Device Priority". Here first boot device must have a flash drive.
 Press Esc.
Then we exit the BIOS, saving all the settings made. To do this, go to "Exit" - "Exit & Save Changes" - "OK".

Setting up Phoenix-Award Bios to boot from a USB flash drive
If, upon entering BIOS, you see such a screen, then you have Phoenix Award BIOS :
 First, let's check if the USB controller is enabled. We go to the “Peripherals” tab - opposite the items “USB Controller” and “USB 2.0 Controller” should be “Enabled”.
 Then we go to the “Advanced” tab and opposite “First Boot Device” we set “USB-HDD”.
 After that, exit the BIOS, saving the changes. To do this, go to "Exit" - "Save & Exit Setup" - press the key "Y" - "Enter"
 That's practically everything you need to know in order to boot from a USB flash drive. In my article, I described the process of setting up the Bios of the most popular versions: Award And AMI. The third example shows Phoenix Award Bios, which is much rarer.
IN different versions BIOS described procedure may be slightly different. But the main thing is that you understand the principle of tuning itself.
By the way, I would also like to add: in order to choose which device to boot your computer from, it is not necessary to change the settings in the BIOS. You can call up a special menu immediately after turning on the computer to select boot devices (this can be done by pressing F8, F10, F11, F12 or Esc). In order not to guess with the keys, we look carefully at the monitor immediately after turning it on. We need to have time to see an inscription like this: “Press Esc to selest boot device”. In my case, it was necessary to press “Esc”.
Surely you have noticed that now in many articles on fixing various errors in Windows or restoring it, it is almost always recommended to use a bootable USB flash drive with operating system installation files or from a LiveCD. And only then they remember the use of the installation CD.
In principle, this is not surprising, since DVD drives have already faded into the background, and CD / DVD discs naturally followed them. For example, when assembling a new computer, few people additionally buy and install a DVD drive, by the way, in many PCs that are sold already assembled, the drive is also not installed. Well, I generally keep quiet about modern laptops or netbooks, in most models the drive has disappeared for a long time.
Just in this instruction, several examples of how to set the boot from a USB flash drive to various versions BIOS. In this article, you can find examples for both the earliest BIOS versions and some modern UEFI versions from various manufacturers.
The procedure for installing boot from a USB flash drive in BIOS
Installing a boot from a USB flash drive in different BIOS versions may differ slightly, but in principle the algorithm itself is the same for everyone.
- We write down or with;
- We connect the prepared usb-drive to the computer. If you are going to install Windows, I recommend connecting the drive to USB 2.0, that is, to the ports that are colored black (blue is USB3.0). So, sometimes the system may refuse to start the installation due to the lack of drivers for the USB3.0 to which the device was connected;
- We turn on or restart the computer and enter the BIOS using the keys " Del" or " F2". If not one of these keys does not work, you can find options that can help you here;
- In BIOS, open the “Boot” section, where in the list of boot devices we move the USB flash drive to the first place;
- By pressing the "F10" key and saving the changed parameters, we try to boot from the device we connected;
In general terms, it looks something like this. Well, now let's specifically go through each BIOS version.
Booting from USB to Pheonix AwardBIOS
AwardBIOS is pretty old version BIOS, and today they come across very rarely, but still sometimes it happens.
So, having entered the BIOS, we need to go to the "" tab.


Initially, in the first positions will be HDD, well, or if you have several of them, then all hard drives will be displayed first and only then the connected usb device. Here you need to use the key " + » move the flash drive to the very first line.

Then we return to the previous menu by using the " Esc” and in the parameter “ Firs Boot Device» choose value « USB-HDD". (By the way, some versions of this BIOS may not have such a line, so you can try to select either USB-FDD or USB-CDROM).

Well, in the parameter " SecondBootdevice » expose « hard disk».
By pressing F10, save the settings and restart the computer.
Booting from a flash drive in another version of Pheonix AwardBIOS
Also, there are several more versions of Pheonix AwardBIOS, in which the principle of installing a boot from a USB flash drive is similar, but the menu itself is slightly different.
We'll start by checking if the USB controller itself is enabled:

Installing boot from usb flash drive:

By the way, I want to draw your attention to the fact that in this BIOS version there may be several more options for installing boot from a USB flash drive, for example:
- In some cases, it is enough just in the “Boot” section to select “USB-HDD” as the first device from which the computer will boot.
- Sometimes the flash drive can be found not in the settings hard drives, and in the "Removable Drives" subsection;
How to set boot from usb drive in AMI BIOS
AMIBIOS is another BIOS version that is often found on not the most recent mats. boards. In general, if once in BIOS it appearance will be the same as in the screenshot below, then to install the flash drive as a boot device, you need to follow these steps:

In this BIOS version, also, a flash drive can be found not only in " Removable Drives", but also in "", so be careful.
We set the boot from a USB flash drive in the UEFI BIOS Gigabyte
Now, let's move on to more modern species BIOS, which can be found on later models of motherboards from various manufacturers.
Well, right now we will start with the UEFI BIOS on the Gigabyte motherboard.
So, going into the BIOS using all the same keys " Delete", " F2" or " Esc", Go to the tab" BIOS Features". Here you can see that booting from a flash drive will initially be available only in UEFI mode.
Well, since this option is not suitable for most, because the usual Legacy mode is more priority, we need to change the ego. To do this, go to the line " Hard Drive BBS Priorities.

IN " Boot Option #1"We set instead of a hard disk, a bootable USB flash drive, respectively, in" Boot Option #2”, the HDD must be installed.

After that, in the previous menu you can select a USB flash drive as a boot device, but without the UEFI prefix.
There is another boot option, which, it seems to me, is much easier to use, but its trick is that it serves as a one-time boot from a usb drive, that is, the next time you reboot, you will again have to choose to boot from it in the same way.
In order to use it, you need to move to the tab " Save & Exit" and in " Boot Override»Select the required device to boot the computer.

The beauty of this option is that it does not require any additional changes in the BIOS settings, and later you simply do not have to bother with returning the boot settings to initial position. By the way, this option is very similar to the same Boot menu, although in this case we will have to go directly into the BIOS.
Booting from a flash drive on ASUS motherboards
In BIOS on ASUS motherboards, there are also several options for starting a computer from a bootable USB flash drive with Windows.

On more modern motherboards, the principle is the same. Below I will show an example on the same ASUS.
After entering the BIOS, on the initial screen, we again need to use the mouse to move the priority device to the very top. Up because this menu moved to the right side and became vertical.

You can also use the boot menu, as I showed in the previous example.
Going into " AdvancedMode( F7)' and going to the tab ' Boot", you can change the download priority manually in the " Boot Option Priorities ».

Or just choose desired device start downloading from it in the section " Boot Override", which is still in the same "Boot" tab.

Booting from a flash drive in BIOS on an MSI motherboard
With regards to motherboard in MSI, then here we can set the boot from a USB flash drive in two ways.

In general, I hope that you will find an option that suits you, and that you will be able to set boot from a USB flash drive in your BIOS without any problems.
How to set boot from a flash drive in old and modern versions of BIOS
Friends, in this article we will find this most boot menu for laptops Acer, Sony, Samsung, MSI, Toshiba, HP, ASUS, Packard Bell and load the above devices from my Corsair Voyager flash drive, which contains the operating Windows system 7. Don't forget if you want to install on a new one windows laptop 7 or Windows XP, then connect the USB flash drive to USB port 2.0 (black), if you connect a USB flash drive to the USB 3.0 port (blue), the installation of the system will end with an error, because in Windows Installer 7 no USB drivers 3.0.

We will also analyze the BIOS of these devices in detail. Consider how to change the boot priority on these laptops, in case you and I cannot enter the boot menu. There is no need to be afraid of the BIOS, if you configure something in it incorrectly, you can always reset the settings to default.
Very important note: This note is useful to you if you new laptop any manufacturer (2013, 2014 with UEFI BIOS). If you have such a laptop, and you are reading these lines, then you want. To do this, naturally, the laptop needs to be loaded from .
Almost all laptops sold now have UEFI BIOS, such a laptop just cannot be loaded from a USB flash drive, since UEFI exists in BIOS special protection- protocol safe boot "secure boot"based on special certified keys (available only for Windows 8). The Secure Boot protocol will not allow you to boot your laptop from any boot disk or flash drive other than the installation Windows disk 8. In order to boot your laptop from a USB flash drive, the Secure Boot protocol must be disabled in the BIOS of your laptop, this is done very simply, read our article or.
Let's get back to this article. I think the information will be useful to many owners of laptops and netbooks. This article will also help if you want to boot from disk and don't know how to do it.
Let's start with Acer laptop, first of all, we connect our Corsair Voyager flash drive to the laptop, then press F12 at boot,

Then you need to select our flash drive in the boot menu that appears and click

If you are unable to enter the Acer laptop boot menu using the F12 key at boot, then the Boot Menu option is disabled in the BIOS and you need to enable it.
Press when loading F2, the initial tab Information, go to the tab Main, see the parameter F12 Boot Menu, set it to Enabled,

Next, press F10 to save the settings, reboot, press F12 when loading and our boot menu appears, select our USB flash drive in it and press Enter, the USB flash drive is loaded.
If the boot menu of the Acer laptop still does not appear, then we go to the BIOS again (when booting F2), the Boot tab. We select our flash drive and put it in the first position using the F6 key, then press F10 to save the settings, reboot and boot from the flash drive.


We press F12 when loading the laptop and get into the boot menu, select our USB flash drive here, if you connected a USB flash drive to the laptop, its name will be here. Press Enter and if your flash drive is bootable, it will boot from the flash drive.

If for some reason you cannot boot a laptop from a USB flash drive using the boot menu, then you can enter BIOS and change the priority of the boot device there. We often press F2 when booting a Toshiba laptop and get into the BIOS of this laptop. The initial tab Main, go to the Boot tab (responsible for loading the laptop) and see our Corsair Voyager flash drive in sixth position. We select it using the keyboard and press F6, thus moving our flash drive to the first position, then press F10 to save the settings we have changed, the reboot occurs and the laptop is loaded from the flash drive.
Friends, if you have a new samsung laptop, for example, 2012-2013, then we read this article "", for all others this instruction is also suitable.
We press when loading Esc or F10, we get into the boot menu and select our flash drive. If the boot menu does not appear, then we go to the BIOS, press F2 or DEL when loading. In the BIOS tab Boot, select the first parameter Boot Device Priority

And we enter it, here we select our flash drive and use the F6 key to put it in the first position. Next, press F10 to save the settings and reboot, reboot, then boot from our flash drive.


and get into the boot menu. The drive is now selected as the first device, if your flash drive is connected to a laptop, then its name will also be present here, select our flash drive here and press Enter or F10, it reboots and further downloads from the flash drive.

If you cannot enter the HP laptop boot menu, then go to the BIOS, press ESC when loading, then F-10, get into the BIOS,
Go to tab System Configuration, then Boot Options, press Enter


As you can see, the laptop's hard drive is set to be the first device. Notebook Hard drive. If your flash drive is connected to a laptop, then its name will be here, select our flash drive and use the F6 key to move it to the first position. Next, we save the settings we have changed, press F10 to save the settings, the reboot occurs and the laptop boots from the USB flash drive.


If the boot menu is not available, press the DEL key at boot and enter the BIOS, then go to the Boot tab, select our flash drive and, without releasing Shift, press + , thereby moving our flash drive to the first position. Press F10 to save the settings, the settings are saved and the laptop is loaded from the USB flash drive.


Then we go to the Boot tab, and set the Fast Boot option (fast boot) to Disabled (disabled),


Once again we enter the BIOS and go to the Boot tab, set the option Launch CSM(advanced boot) in Enabled,

We go down to the Boot Option Priorities and Boot Option # 1 options and enter it by pressing Enter, in the menu that appears, using the arrows on the keyboard, select the name of our flash drive and press Enter. Here we also put our Corsair Voyager flash drive in first place.


We press F10 to save the settings, reboot and our Asus laptop boots from the USB flash drive.
Also you can use boot menu Asus laptop, for this, in the initial phase of loading the laptop, often press the key Esc, you will get to the boot menu, use the arrows on the keyboard to select your bootable USB flash drive in it and press Enter.

How to boot a Packard Bell laptop from a flash drive

Press key while loading F12 and get into the boot menu of the laptop, there we simply select our USB flash drive and boot the laptop from the USB flash drive.
If F12 does not work when loading press F2, less often F6 and get into the UEFI BIOS of the laptop,

go to tab here Boot.
If before turning on the laptop you connected a USB flash drive to it, then it may not decide directly in this menu.
Set the Boot Mode option to Legacy BIOS.
And the option secure boot put in position Disabled.
Now the flash drive should be determined. Put the flash drive in the first position, save the settings and reboot. If bootable flash drive made according to our articles, then the download will be successful.
Good day.
Almost always, when reinstalling Windows, you have to edit the BIOS boot menu. If this is not done, then the bootable USB flash drive or other media (from which you want to install the OS) is simple.
In this article, I would like to review in detail, what exactly is setting the BIOS to boot from a USB flash drive (the article will consider several versions of BIOS). By the way, all operations can be performed by a user with any background (that is, even the most beginner can handle it)…
And so, let's get started.
Setting up the BIOS of a laptop (using ACER as an example)
The first thing you do is turn on the laptop (or reboot it).
It is important to pay attention to home screens greetings - there is always a button to enter the BIOS. Most of the time these are buttons. F2 or Delete(sometimes both buttons work).
The initial welcome screen is an ACER laptop.
If everything is done correctly, you should see the main window of the laptop BIOS (Main), or a window with information (Information). Within the framework of this article, we are most interested in the boot section (Boot) - we go into it.
By the way, the mouse does not work in BIOS and all operations must be performed using the arrows on the keyboard and the Enter key (the mouse works in BIOS only in new versions). They may also be involved function keys, their work is usually reported in the left/right column.
Information window in BIOS.
In the Boot section, pay attention to the boot order. The screenshot below shows the check queue for boot records, i.e. first, the laptop will check if there is nothing to boot from the WDC WD5000BEVT-22A0RT0 hard disk, and only then check the USB HDD (i.e. flash drive). Naturally, if there is already at least one OS on the hard drive, then the boot queue will simply not reach the flash drive!
Therefore, you need to do two things: put the flash drive in the boot record check queue higher than the hard drive and save the settings.
Notebook boot order.
To increase/decrease certain lines, you can use the function keys F5 and F6 (by the way, on the right side of the window we are informed about this, however, in English).
After the lines are swapped (see screenshot below), go to the Exit section.
There are several options in the Exit section, select Exit Saving Changes (we exit with saving the settings made). The laptop will reboot. If it was done correctly and inserted into USB, then the laptop will start booting from it first. Further, usually, the installation of the OS goes without problems and delays.
AMI BIOS
A fairly popular BIOS version (by the way, AWARD BIOS will not differ much in terms of boot settings).
To enter the settings, use the same keys F2 or Del.
Main window (Main). Ami Bios.
As you can see, by default, the first thing the PC checks for boot records is the hard drive (SATA: 5M-WDS WD5000). We need to put the third line (USB: Generic USB SD) in first place (see screenshot below).
After the queue (download priority) is changed, you need to save the settings. To do this, go to the Exit section.
With such a queue, it will be possible to boot from a USB flash drive.
In the Exit section, select Save Changes and Exit (in translation: save settings and exit) and press Enter. The computer goes to reboot, but after it it starts to see all bootable flash drives.
Setting up UEFI in new laptops (for booting flash drives with Windows 7).
The settings will be shown on the example of an ASUS laptop*
In new laptops, when installing old OSes (and Windows7 can already be called “old”, relatively of course), one problem arises: the flash drive becomes invisible and you can no longer boot from it. To fix this, you need to do several operations.
And so, first we go into the BIOS (press the F2 button after turning on the laptop) and go to the Boot section.
In the Security section, we are interested in one line: Security Boot Control (by default it is Enabled, but we need to put it in Disabled mode).
After that, save the laptop BIOS settings (F10 key). The laptop will go to reboot, and we will need to go into BIOS again.
Now in the Boot section, change the Launch CSM option to Enabled (i.e. enable it) and save the settings (F10 key).
After rebooting the laptop, go to the BIOS settings again (F2 button).
Now in the Boot section you can find our USB flash drive in the boot priority (and by the way, you had to insert it into USB before entering BIOS).
I understand that there are many more BIOS versions than I have considered in this article. But they are very similar and the settings are identical everywhere. Difficulties most often occur not with setting certain settings, but with incorrectly written bootable flash drives.
That's all, good luck everyone!