A local network allows you to establish a connection between several computers in the same room, establishing file sharing. As a result of setting home network users get the opportunity to work on the same document on different computers or play games together.
LAN capabilities
Windows 10 network setup allows you to get a number of convenient features that will useful users having several computers at the same time.
- Sharing files from different computers. Fast data transfer regardless of volume.
- Sharing a printer, scanner, or other network device.
- Setting up network games and entertainment.
These are the main areas, each of which contains a number of possibilities. For example, fast data transfer allows you to create backup important information, so that if one machine stops working properly, the information you need remains available from another machine.
To start using all these features, you first need to properly configure the local network in Windows 10. You can connect machines that have the same versions installed, a PC and a laptop with different Windows versions- in the interval between the "seven" and "ten" there are no restrictions on compatibility.
Network creation
The first step is to install the same name on all computers that you are going to connect to the network. working group. On Windows 10 and other versions, this is done the same way:
- Click Win+R to call the window " Run».
- Enter " sysdm.cpl" to open the system properties.
- The "" tab will appear immediately. Look at the name of the working group. To put the same name on other computers, click " Change". Use only latin letters!

Then the setting continues in " Network and Sharing Center”, which is launched through the control panel or the connection icon in the notification area. The next step is to change the advanced settings.

On Windows 10, you can still get here through the section " VPN» tab « Network and Internet» in system settings.

Here you need to enable network discovery With automatic tuning, file and device sharing, and allow the system to manage homegroup connections.

Attention: enable network discovery and general access no password required for all profiles! First you'll set up a home or work profile, then a general profile and all networks.

This operation should be repeated on all computers. As a result, the participants local network should be:
- One workgroup name assigned.
- Network discovery allowed.
If the home network to which the computers are connected is built on the basis of one router, then the listed actions are enough to normal operation local network. If the computers are connected directly using a crossover cable or the DHCP service is disabled on the router, which independently distributes IP addresses to the machines, then additional configuration should be performed.
- Open " Network Control Center", then go to the " Change adapter settings».

- Select network card, in which the crossover cable is installed, and open its properties.

- Check " Use the following IP" And " Use the following DNS". Fill in the rows with the values shown in the screenshot.

On the second computer, you need to add the following data:

On different computers The IP address will be different. If you wrote 192.168.0.2 on the first machine, then the second address will be 192.168.0.3 and so on, depending on the number of network participants. The rest of the data remains unchanged.
Turn on sharing
A local network has been created, but in order to use programs and files stored on another machine from one computer, you must also set up general access for them. Windows 10 network setup this essentially ends. Let's make a shared folder with documents:
- Click on a folder right click, open properties.
- Navigate to the " Access", click on the button " Advanced setup».

- Check the box " Share". Click on the button " Permissions».

- Set permissions. If you want the directory to be opened from another computer and view its contents, then check the box " Reading» in the column « Allow". To grant full access, check the corresponding box. Save the configuration by clicking " OK».

Then you need to return to the folder properties and go to the " Safety". Here you should press the button " Change».

The window “ Group Permissions". Under the field Groups or Users» click « Add».

Enter your name " All” (quotes are not needed), press “ OK».

Set the same permissions as you did earlier when setting up access.

After enabling sharing, it is recommended that you restart your computer in order to Windows 10 network setup completed correctly. The next time you turn on the explorer, a section will appear " Net”, which will display the computers between which the connection is established.

Inside the directory under the name of the other computer, you will find the folders that are shared.

Inside the folder will be the same documents that are stored on another computer. If you have given full access in the settings, you can safely edit them from another machine.
Sharing Internet Access
If the local network is built without a router, using a direct wired connection of computers, and one machine has Internet access and the other does not, then this is quickly corrected. The described actions are performed on the computer on which there is a connection to global network.
- Click the connection icon in the notification area. Open " Control center” and proceed to change the adapter settings.
- In the list of available connections, find your WAN connection. Open its properties, right click.
- On the tab " Access» Allow other members of your home network to use this Internet connection.

Now from one computer the Internet will be distributed to other participants in the network. This will affect the speed, but when accessed with different devices through the router, the speed is also divided proportionally to the load, so this is a common practice joint work in the Internet.
Readers contacted me several times with a request to help solve the problem with displaying computers in a networked environment on the latest Windows builds 10. Indeed, in the latest releases of Windows 10, your computer may no longer see neighboring computers in the local network workgroup, or the abyss itself from the network environment. Let's see how to fix it.
Windows 10 computers not showing up in Workgroup Network Neighborhood
Users have been experiencing problems displaying nearby computers on their workgroup LAN since Windows 10 1703 (Creators Update). After installing this W10 build, when viewing devices in a networked environment, the computer stops seeing neighboring computers.
The list of computers in the network environment can be viewed in Explorer or with the command:
If the list is empty (the command returned There are no items in the list) that you first check the following settings.
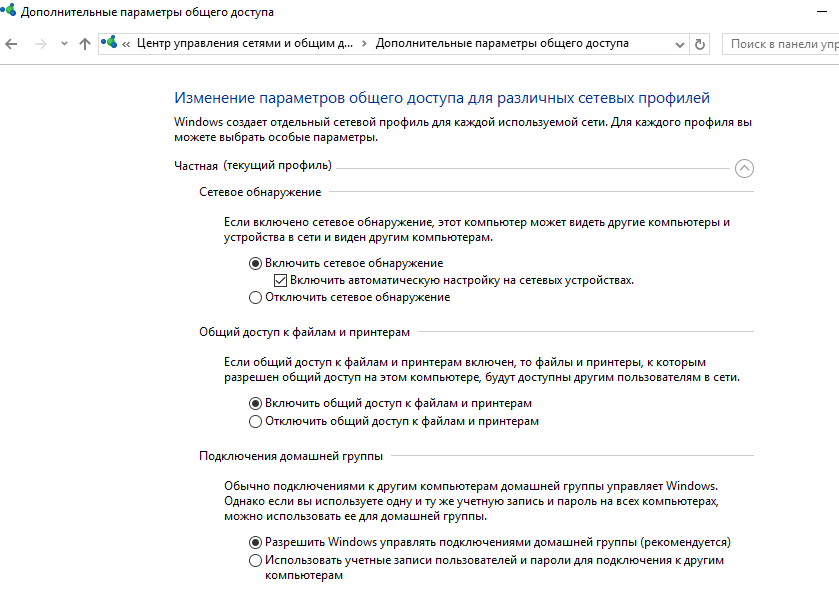
Check if you have access to files and folders enabled. Go to section Control Panel -> Network and Sharing Center -> More sharing options.
Make sure that you have in the section of the current network profile Private (current profile) options included:
- Enable network discovery
- Enable file and printer sharing
- Let Windows manage homegroup connections
Then to profiles All networks activate options:
- Turn on sharing to network users can read and write files to shared folders
- Disable password protection (if you trust all devices on your network)

Then open item Windows Settings -> Network and Internet -> ethernet(in the event that you are connected to the local network via wireless connection, select Wi-Fi). Click on the network icon and check that the option is enabled Make this computer discoverable.
In some cases, to enable discovery, you need to run the following command at the command prompt with administrator rights:
netsh advfirewall firewall set rule group="Network Discovery" new enable=Yes
In some cases, a Windows computer may not appear in Network Neighborhood due to wrong settings working group. Try re-adding this computer to the workgroup by overwriting the settings ( Control Panel -> System -> Additional system settings -> Computer name-> button Identification).

In the joined domain or workgroup wizard that opens, select in sequence: The computer is part of a corporate network -> My organization uses a network without domains -> the name of your workgroup. After that, you need to restart your computer.
If after rebooting the computer appeared in the networked environment, but you cannot access it, check the network type of the computer. Most likely your local network is recognized as public. You need to change the network type to Private. To do this, open Options -> Network and Internet -> State -> home group -> Changing your network location.

Click on the link Change network location, after that in the sidebar with the request “Do you want to allow other computers and devices on this network to discover your PC? We recommend that you do this on your home or work network, not public networks", select Yes.
Open Network Neighborhood and check if computers have appeared.

If these tips did not help, and the computers in the workgroup are still not displayed, try resetting the network settings (Settings -> Network and Internet -> Status -> Reset network).

You can reset network settings and firewall rules with the commands:
netsh int ip reset reset.txt
netsh winsock reset
netsh advfirewall reset
Then you need to restart your computer.
Also check if the following services are running (they must be in the auto-start state to display the network environment correctly):
- Function Discovery Provider Host
- Function Discovery Resource Publication (see below)
- DNS Client
- SSDP Discovery
- UPnP Device Host
SMB 1.0 and problems with Master Browser in Windows 10
It happens that problems with displaying computers in a networked environment are related to the Network Browser (Master Browser) service. This service is responsible for building and maintaining a list of active computers on the network (). There can be only one active computer with the master browser role on a local network.
In Windows 10 1703 service Network Explorer it works incorrectly. It is recommended to completely disable this service on Windows 10 and use a Windows 7 computer as the main network browser (via the registry).
In addition, in Windows 10 1709 and higher by default, this also disables the Computer Browser service, which, as we said, is responsible for compiling a list of computers on the network and displaying them. If you only have computers with Win 10 1709 and higher on the network (see table), in order to solve the problem, you will have to enable the SMB v1.0 protocol on at least one computer (unsafe!), which will be your main network browser (Master Browser). Installing SMB 1.0 is done by adding 3 components in the control panel.

Computer not visible on the network after upgrading to Windows 10 1803
In Windows 10 1803 (Spring Creators Update) Developers, in addition, Windows 10 PCs no longer appear in File Explorer's Network Neighborhood when viewing network devices.
The fact is that from the point of view of Microsoft, working groups are an outdated functionality of organizing a local network for accessing shared resources and printers. Instead of using a workgroup, Microsoft suggests using its own cloud services(OneDrive, accessed via Accounts Microsoft account). In my opinion, this is unjustified.
However, in fact, in 1803, in order to access the resources of another computer on the local network, you need to know its name (\\pcname1) or ip address (in the format \\192.168.1.100), but neighboring computers are not displayed in the network environment. However, this can be corrected.
The fact is that a separate service is responsible for discovering computers on the network in Windows 10. Function Discovery Resource Publication, which after installing 1803 does not start by default (launch type changed from Automatic to Disabled). If this service is stopped, the computer is not discovered on the network by other computers. You can enable the Autodiscover service in Windows 10 1803 as follows.

After the reboot, other computers on the local network will be able to discover this computer and its resources (printers and shared folders).
Network discovery allows Windows 10 to find other computers and devices on the network. This feature is automatically enabled when you are connected to private networks, such as in your home or workplace. Network discovery is disabled when you are connected to public networks that should not be trusted and you prevent your PC from being discoverable on those networks.
Enable network discovery
If your computer or Windows device 10 cannot browse other computers on the network, two errors are possible: you have either assigned the wrong network profile (public or private), or network discovery has turned off for some reason.
Here's how to activate network discovery in Windows 10 for an active network profile:
When you are connected to public networks, you never want to turn on network discovery. So, if you are connected to a public network, such as airports and cafes, be sure to set the profile to "Public".
Allow file and printer sharing
When you're connected to private networks, Windows 10 automatically turns on the File and Printer Sharing option. Thus, you can easily share folders, files, and printers with other computers and devices on your network. However, if your network administrator configures this setting, you may need to manually turn it on or off manually, depending on your needs.
Here's how to activate the File and Printer Sharing option in Windows 10 for an active network connection:

If you are connected to a public network, such as at airports and cafes, be sure to set Public as the profile for this connection. Also, don't enable the File and Printer Sharing option when connecting to public networks.
Enable Public Folder Sharing
The public folder is located on your hard drive in C:UsersPublic. All user accounts registered with Windows have access to it. That's why it's called Public. Any file and folder found in C:UsersPublic is fully accessible to all users on the computer. Depending on your network access settings, this folder and its contents can also be accessed by all other computers and devices on the same network.
To enable public folder sharing, follow these steps:

Enable Password Protected Sharing
When password-protected access is enabled, only users who have a user account and password on your computer or network domain (in the case of business networks) can access shared files and printers attached to your Windows 10 computer or device, as well as your shared folders. It is recommended that you avoid disabling password-protected access, but you may need to do so in some situations, such as when you want to give other people access.
To enable password protection, follow these steps:

The topic of this article is: "How to enable network discovery in Windows 7". First, let's talk about what this service is and why it is needed. The purpose of this subsystem is to ensure the visibility of the computer in the local area network of the domain. If you stop this service, then the PC with the "seven" will not be visible to the machines surrounding it.
When the service is on, they are easily detected by neighbors. This is where the name of the service comes from. Within the default settings this service disabled. To run it, you need to manually do some manipulations, which we will discuss below.
As soon as the user finds out that his computer is hidden from the network environment, he takes a variety of unnecessary actions: tries to restart network adapter, reboots the system, tries to disable the firewall, and so on. All these "experiments" do not lead to the expected result.
It remains only to bite your elbows or look for information on the problem in the help documentation or the Internet. And here we are in for a nuisance. The method of enabling network discovery described in the documentation does not always work. Here is the way:
- It is proposed to go to the control panel.
- Select the "Network and Sharing Center" section.
- Then click on the link "Change Extra options public access".
- In the profile window, put the appropriate checkmark. Approximately as in the picture:
As stated in the documentation, everything should work as it should. However, this often does not happen.
Immediately after clicking on the “OK” button, all settings are reset to their original state, and the user falls into a stupor. Repeated attempts to reanimate the service do not lead to anything either.
What to do in this case?
If nothing works?
Let's not forget that all these windows, checkboxes and buttons are just the outer shell of the system, necessary for greater convenience. Under the hood of the system, shared libraries (dll), com-objects and services are continuously working. Access to all this can be obtained bypassing the window Windows interface. Since in our case we are talking about services, we need direct access to services. It's easy to get it:
- Let's go back to the control panel.
- Select the "Administration" subsection.
- We click on the "Services" applet and get complete list Windows Services as a list.
- Double-clicking on any line of the list opens the service control window.
- This window has a Start button.
- Remains last action. You need to find in the list and run the following services:
If the detection worked, congratulations! Now you know what to do if network discovery does not turn on in Windows 7.
Some new aspects of network access in Windows XP.
Before the release of the operating room Windows systems XP problems with the provision of shared access to the shared resources of the computer almost did not arise. However, as a rule, such access was provided and is often provided uncontrollably - access to all resources is distributed, up to system drives, and for any categories of users and without restriction of powers. This practice often leads to undesirable results.
With the increasing role of group policies, they began to have a significant impact on network security, and users who are not well versed in their device began to experience certain difficulties.
It would seem that the folder is shared, but there is no access. Why? This is what we will try to figure out. It should be remembered that everything described below refers to the Professional edition. operating system Windows XP and networks without an Active Directory domain. The article is intended for novice users.
Access settings.
First of all, you need to configure the system so that access to the computer from the network becomes possible. Usually the advice boils down to the following: turn off the firewall, turn off simple sharing, turn on the guest and allow him access. It is not right. Such a policy will indeed allow resource sharing, but it does nothing to protect the owner from malicious client activity. Under such circumstances, it is possible that any user will be able to delete the data on your hard drive.
So, how to do it right. We go into the properties of the firewall, using the corresponding item "Control Panel" and check the checkbox "File and Printer Sharing" as shown in Fig.1.
With this we allow access to TCP ports 139 and 445, as well as UDP 137-138. In general, when opening network access to shared resources, the firewall is configured automatically. We did this operation in order to know exactly what possible problems not related to firewall policies.
By default, Windows searches the network for shared folders and printers. You can treat this feature differently, but if you need to use it, then it is better to use the "Peer-to-peer network" component, which is enabled through "Add or Remove Programs" - "Windows Components" - "Network Services" (Fig. 2). The firewall will be configured automatically.
In addition, you need to make sure that the "File and Printer Sharing Service" is enabled. You can check it in properties. network connection(Fig.3). By default, this service is enabled if you are not using a dial-up connection.

(fig 3)
Now you need to decide on the method of accessing the computer from the network. Windows XP provides two access models: "Guest" and "Regular".
Guest access simplifies the management of shared resources, but severely limits features such as remote administration, auditing and sharing a resource between users by access rights, etc.
When this model is selected, all users who try to connect to a computer from the network are automatically recognized as guests of the operating system. If none of the above functions are used, then you can limit yourself to guest access.
Guest access model.
To use this access model, and it is enabled in Windows by default, simply enable the Guest account in the Computer Management snap-in, or through the control panel and allow it access from the network in the security policy.
The "Guest" account is enabled as follows: right-click on the "My Computer" system icon, which, depending on the selected OS interface, "classic" or Windows XP, is located either on the "desktop" or in the "Start" menu .
Select "Manage" from the menu that appears. In the snap-in that opens, go to the "Local Users and Groups" category, then select "Users", double-click on the "Guest" account and uncheck the "Disable account" checkbox.
Then click "Apply" and "OK". The red cross at the “Guest” should disappear (Fig. 4). You can also access the "Computer Management" snap-in through the "Control Panel" by selecting the "Administrative Tools" item in it.
Go to the group policy editor snap-in - click "Start", select "Run", enter GPEDIT.MSC and click "OK".
In the snap-in that opens, we find the "User rights assignment" branch (Fig. 5), then the "Deny access to the computer over the network" item, double-click on it, highlight "Guest", click "Delete", "Apply", "OK ".
In principle, everything, guest access is included, but there are subtleties.
1. Security policy changes are applied after one and a half hours (90 minutes) by default. There are two ways to enforce settings: by rebooting the OS, or by using a forced refresh of Group Policy. You can do this as follows: "Start", "Run", enter "gpupdate / force" (without quotes) and click "OK".

(fig.6)
2.If you changed the access model before, then return it back to the guest model, as shown in Fig. 6 or Fig. 7.
Usual access model.
Now let's consider a more correct option from my point of view with the “Normal” access model, which is also called the “Classic”
First we need to disable simple sharing. This can be done in two ways. The first and simplest is shown on the left. You can open the "Folder Options" dialog by opening any folder, at least "My Computer" and select "Folder Options" from the "Tools" menu.
It is enough to uncheck the box, as shown in Figure 6, and simple sharing will be turned off. The second way is more difficult, through security policies. As mentioned above, by entering the GPEDIT.MSC command in the "Run" window of the "Start" menu, we get into the group policy editor snap-in window.
Further, following the console tree, we find the item " Network access: sharing and security model…” as shown in Figure 7. But pay attention to the name of this item. "Network Access: Sharing Model...". Such a small checkbox on the left, but completely changes the access model
So, the network access model is selected as "Normal". This means that all users who try to access the computer from the network automatically stop being guests.
At the same time, Windows will begin to check their credentials for matches with those stored on local computer accounts, as well as checking the access permissions granted to these users.
In this case, it is possible to create local users and give them access rights to folders and subfolders. This is useful when you need to open access to a certain folder to one user, but close it to another.
With simple sharing, this cannot be done, since all clients use the same account - "Guest".
There is a clause in the security policies that governs the use of blank passwords. By default, blank passwords are only allowed for console login.
If one of the users, except for the “Guest”, should enter the system with an empty password, then the value of this item must be changed to the “Disabled” position. This allows access to the computer over the network to accounts that have empty password.
But keep in mind that this opens access with empty passwords to the so-called "administrative" shared resources, which is not at all safe.
There is a drawback in the “Normal” network access model, but this drawback is more likely in the minds of users who leave the administrator password blank or put “12345” or qwerty.
If the empty password of the "Administrator" is important, then you must either rename it or disable it (do not be afraid, in safe mode"Administrator" is always enabled), or deny him access over the network, adding him to those who have such a ban, as in Fig. 5. Specific actions depend on your needs.
Authorization with the selected "Normal" network access model occurs as follows. First, Windows checks the login - password (credentials) pairing for a match with local accounts.
If the credentials match and the account has the appropriate rights, then access is allowed. If only the login matches, then access is denied and error 5 is issued.
If such credentials are not in the local database, then the user is considered a "Guest" and further actions are performed depending on the status of this account (enabled or disabled) and access rights, incl. and network access.
In this case, if the “Guest” is disabled or denied access over the network, and also if an attempt is made to log in with an empty password, but such actions are prohibited by security policy, then Windows will send an “ident” request and the user will see a window prompting you to enter correct username and password.
A few tips. If you do not want to lose your data, then follow the simplest security rules, just like you follow the rules of personal hygiene.
Take care of the administrator account, do not work under it. Create another one for yourself, and either disable or rename the “Administrator”. Don't give "Administrators" accounts a blank password. Use complex passwords.
If you are too lazy to enter it every time, then use the utility called by the CONTROL USERPASSWORDS2 command from command line or from the menu "Start" - "Run", to set auto-login. Never give full access over the network, maximum on "Change". Never share drives, use folders instead.

(fig 8)
Now it remains to create a shared resource - a shared folder. The folder can be created anywhere, but it's better to do it in the root directory of the drive, because some directories have predefined permissions. So let's create a folder and give it a name. Then right-click this folder and select "Properties".
Go to the "Access" tab. Switch the radio button to "Share this folder". There is a small nuance. If you put a dollar sign - $ at the end of the share name, then the folder will not be visible from the network, this is the so-called hidden shared resource and you can access it only by specifying full path, for example: "Start", "Run", \\mycomp\sharing$, "OK".
You can add a note. If there are many shared folders, this can be useful. The name of the share does not have to match the name of the share, it can be set arbitrarily.
Now we press the "Permissions" button and get into the window shown in Fig. 9

(fig 9)
Here you can set permissions for network access to the folder. If you have file system FAT32, permissions can only be set here using the "Add" and "Remove" buttons. For those who use NTFS, it makes little sense to add someone.
It is only necessary to determine the level of access. For example, add the right to change. If you add a user or group of users, do not get confused, because you will also have to set the rights on the "Security" tab in Fig. 10.

(fig. 10)
By clicking on the "Security" tab, you can add users and grant them access rights. Please note that by default, permissions are already delegated to certain categories of users.
Including the "Users" group, which includes the accounts you created. This means that such users already have some rights. If you are creating a folder that not all users need access to, then this situation is not acceptable. There are two ways to solve this problem.
The first option is to remove the group and add specific users (first of all, yourself and full control). Windows won't let you uninstall? That's right, go to "Advanced", uncheck "Inherit", click "Apply", in the window that appears, click "Copy", then "OK" and return to Fig. 10. But now here you can delete and add.
The second option will be useful if you need to deny access to a shared resource only for some members of the "Users" group, while allowing access to the rest.
The solution to this problem is to add the required users to the list of accounts and prohibit them from " Full access". Now, although they are part of a group that is allowed some access option, they will not receive it, because in Windows, prohibitions take precedence over permissions, which it will tell you about.
Using these simple tricks, you can build a hierarchy of folders with different access rights, the entrance to which will be the only folder visible on the network.
The advantage of this approach is that by moving the radio button in Fig. 8 to the opposite position, you can immediately cut off all users who are connected to your PC. And it's also easy to re-grant access when you need it again.

(fig 11)
Users who have chosen the "Guest" model for network access will find it much easier to share a folder.
You need to create a folder and give it a name. Then right-click on the folder icon, select "Properties" and go to the "Access" tab, fig.11.
Here, at the bottom of the window, you need to check the “Share this folder” checkbox and, possibly, the “Allow changing files over the network” checkbox if there is a need for remote users to be able to add and delete files in this folder.
It is also possible to change the name of the resource, under this name the folder will be visible on the network.
TOTAL
= - = - = - = - = - = - = - = - = - = - =


Group watering - Computer config. - Windows Config - Security Settings - Local Policy - User Rights Assignment
Group watering - Computer config. - Config.Windows - Security settings - Local policy - Security settings
After making changes to group policy, execute: gpupdate /force
I'll add more - Setting up sharing between Windows 7 and Windows XP
If there are computers with WinXP and Win7 in the grid, the ball is open on XP and computers from XP to XP see each other without problems, they come in.
But they can’t log in from Win7 to XP, do the following, as shown in the pictures below:

1) open network environment
(if a line about "network discovery" appears at the top, we answer positively
2) Open " Network and Sharing Center"

3) Press " Change advanced sharing options"

Turn on:
+ network discovery
+ file and printer sharing
+ sharing read and write to shared folders
+ turn off password protected sharing

4) visits that one again network resource where do we need
5) a window will appear asking for a login password
6) just drive in "guest" and enter!