If you have just started using Apple products, have bought an iPhone, iPad tablet, iPod player or computer running Mac OS, then sooner or later the question appears - Where to get an Apple ID? Basically, this question arises from novice users who do not know, or to another Apple device.
In fact Account Apple ID provides other opportunities, in addition to purchasing and downloading applications, music and video, an Apple ID is used when contacting the company's support service, ordering from an on-line store, when using iCloud and iChat services.
Regular Readers website already know where to get an Apple ID. In previous articles, we have already covered how to register an Apple ID without a credit card. We performed the registration procedure with two different ways:
- (without computer, on iPhone/iPad)
- (using a computer)
You can create your own Apple ID for free. If you are asked to send an SMS or pay money for registering an account, do not enter, this is a scam. Today we will get acquainted with the third way to register an Apple ID account, which is performed using any web browser.
I warn you right away that this method has its drawback. After the Apple ID registration procedure, as soon as you want to use the created account, the system will display the following message:
"This Apple ID name has not yet been used in the iTunes Store. View your account information."
Then you need to enter your payment card number. Therefore, if you have not yet acquired a payment card or do not want to link it to your Apple ID yet, then register an account without linking to a credit card using the links above, otherwise you will not be able to download the demon. paid apps from AppStore.

We will register an Apple ID using a computer, but in general you can open Safari browser in the iPad or iPhone itself (of course), and go through the account creation procedure with the same success.
1. Launch Safari, Opera, Google Chrome, Internet Explorer or Firefox and enter in the address bar: Appleid.apple.com/en/ , or just follow the link

2. A page will open called " My Apple ID", if the page is on English language, then in the lower right corner there is a round icon with a flag, by clicking which you can select your country or region. If you are registering a Russian account - choose Russia, if you need an American account - USA.

3. Click the blue button - Create an Apple ID to start the registration process

4. Creating an Apple ID starts with entering an address Email, which will later be used as Apple ID. Below we enter the password and confirm it again, enter the password in English, and follow the recommendations that we are talking about. Although the procedure for creating an Apple ID in the browser is very convenient, so this time there should be no problems with the password. As soon as all the items in the tooltip turn green, then the password is entered correctly and meets the security requirements. Having dealt with the password, select a security question and answer

5. Next, fill in, first and last name, it is not necessary to enter a patronymic

6. The country should already be there, it remains to enter your address, city and language

7. After filling in all the data, you must enter the characters (anti-spam), check the box and press the button - Create an Apple ID
8. Upon completion, the registration system will ask you to check your mail and confirm your email address, to do this, enter your E-mail, open the letter from Apple and click - Confirm now >

9. In the page that opens, enter your Email, which is now Apple ID, enter the password that we filled out in paragraph number 4 and press the button - Confirm Address. After that, your email address will be verified and linked to your Apple ID.
Perhaps that's all, now you know another way where to get new Apple ID, or rather how to create it. You can get a free Apple ID in other ways, links to which are indicated at the beginning of the material. Using the ID, you can install apps and games on your iPhone, iPad and iPod touch, but first you need and .

Apple mobile devices have become so firmly established in the user's life that they often replace stationary PCs, offering almost the same functionality in a compact, small-sized shell. And, nevertheless, a "spacious" screen, a familiar interface and, whatever one may say, is still more high level reliability and performance do not allow users to completely abandon personal computers. Moreover, using a PC it is very convenient to manage such mobile services as, for example, the App Store - registration from a computer takes no more than five minutes, while all downloaded from App Store Apps are stored on your hard drive so you can install them on your iPhone and iPad even when you're not connected to the Internet. And when updating the firmware or restoring your device, returning all games and programs will not be difficult.
How to access the App Store from a computer
Registering in the App Store through a computer involves two main components:
- iTunes app(you can download the app)
- and personal Apple account ID.
After installing iTunes, you need to open it and find the menu item "Sign in", and then - "Create an account". The further procedure is nothing unusual or unexpected. You will be asked to read the terms of use and privacy policy. Agreeing with them, you will need to specify the email address that will be used as a login. Then enter personal data, come up with a password, and at the same time indicate a backup e-mail and answers to security questions in case you ever happen to restore it. Then the bank card details and payment information. The final touch is confirmation of the email address. Just follow the instructions in the letter that will be sent to the specified e-mail. This is all.
Now you can use all the services of the iTunes store, including downloading games and programs from the App Store (almost the same as from your gadget). To do this, go to the iTunes Store menu, select among other things the App Store and enjoy shopping.

Logging into the Appstore through a computer, as you can see, is not difficult
You can buy applications by going to the description page and clicking "Buy" under the program icon. Payment is only released after confirmation of purchase. You don't have to pay for free apps ☺ - click "Download". Once downloaded, the application can be transferred to mobile device by connecting it to a PC and synchronizing.
How to register in the App Store from a computer without a bank card
If you are not interested in paid content, and you don’t feel like messing with payment information, then you don’t need to specify bank card details. Launch the iTunes application, go to the iTunes Store menu and select the App Store item (there may be Programs in the Russian-language interface). Find free app and on the page with its description under the icon, click "Download". When you need to sign in to download, select Create an Apple ID. Two minutes of standard formalities, such as specifying an e-mail address, password, backup mail, replies to security questions. When it comes to information about the payment method, politely decline by selecting the "No" option. It remains only to go to the mail and confirm the authorization.
That's how it works, App Store on PC. And, admittedly, such a tandem ensures the optimal use of portable gadgets using a computer, without detracting from the merits of either mobile or stationary devices.
Many new iPhone and iPad users find it difficult to sign up for an Apple ID, the account required to download apps from the App Store and various media content from the iTunes Store. In this manual, we in detail described the process of creating an account in the App Store (Apple ID) from a computer, or directly from mobile devices.
How to create an App Store account (Apple ID) from iPhone or iPad
Step 1. Launch the App Store app and at the very bottom of the page " Compilation» click « To come in».
 Step 2. In the menu that opens, select " Create an Apple ID».
 Step 3. Select a country and click " Further».
 Step 4. Accept the user agreement.
 Step 5. Enter the following information:
- Password
- Control questions and answers to them.
- date of birth.
After entering all the information correctly, click " Further».
 Note: On this page, you can unsubscribe from Apple emails by unchecking the appropriate boxes.
Step 6. Choose a payment method. In case of bank card, you must specify the card number, security code and expiration date. If you choose a mobile phone as a payment method (only Beeline and MegaFon), then you need to specify only the number mobile phone.
 Advice! You can learn how to create an Apple ID without a credit card at.
Step 7: Enter your billing address with your greeting, last name, first name, address, zip code, city, and mobile phone number. Click " Further».
Step 8. Confirm the creation of an Apple ID by clicking on the link " Confirm Address» in a letter that will be sent to the email address specified during registration.
Ready! You've created an Apple ID account and can download or buy apps from the App Store.
How to create an account in the App Store (Apple ID) from a computer
Step 1. Go to official site Apple account management and click " Create an Apple ID».
 Step 2. Provide the following information:
- Email- The email address will be the login of your Apple ID account.
- Password- it must contain at least 8 characters, including numbers, uppercase and lowercase letters. The same character cannot be repeated three times in a row.
- Control questions and answers to them.
- date of birth.
After entering all the information, click " Continue».
Hello everyone! We have already met with the identifier in the apple company system (). And at the end of the article, we came to the conclusion that we need to register an Apple ID in order to create our own unique account. And if necessary, then we will do it! Moreover, if you follow these instructions exactly, the whole process will not take you much time, and your efforts will generally be minimal.
By the way, the article will consider registering an Apple ID without any card (credit card). Why without her? In fact, there are many reasons why. I won't go into too much depth and list just a few of them.
And here they are:
- The simplest - not everyone has this same credit card.
- Many are afraid to enter their card details (although it is completely safe).
- For some, free apps in the App Store are enough.
If all these three points are not relevant to you, then at a certain stage (at what? All the details - below), you will need to enter the data of "plastic".
In general, you can register an Apple ID absolutely at any time, both when you turn on the device for the first time and after it. The scheme is almost the same everywhere. Here we will consider the second option, namely creating an account on an iPhone or iPad, which we have been using for some time.
That is, we need:
- Activated iPhone, iPod, iPad - here the instruction is universal, regardless of the gadget.
- Wi-Fi connection or inserted SIM card (nothing will work without the Internet).
All is ready? Begin!
We take your device, unlock it and find the App Store icon in the menu, click.
Choose any free game or application - install. Attention! The free app is required.

Next, we need a menu item to create an Apple ID.

A window for creating a new account will appear. We see the choice of a country or region, we leave Russia.

"Terms and Conditions ..." - just accept. It’s hard for me to imagine a person who will read this - 60 pages after all :) Although, perhaps, my imagination is not rich enough :)


The data entry window opens.

A few important clarifications:
- Be sure to enter a real email address.
- The password must be made up of at least 8 characters: numbers, letters of the English alphabet, and at least one capital letter is required. Write down or remember the password!
- Age - you must indicate that you are at least 18 years old. If you have not yet reached the age of majority - brazenly lie.
Very important! The given e-mail and password will be your Apple ID! Save, write down on a piece of paper, never show them to anyone.
Remember, this data is the only proof that the device belongs to you. To understand the seriousness of the situation, I advise you to read (especially pay attention to the last paragraph). All done? Go ahead…
Payment information - select no (if there is no intention to use credit card). Or (if you want to use the App Store to the fullest), specify payment system, after we enter all the necessary information. Paragraph " gift cards iTunes…" is optional. Fill in the rest of the information.


On Mailbox, indicated above, a letter was sent - open it, and of course follow the link to complete the process.


Congratulations, registration for Apple ID (and completely free of charge) is completed! And now you can use the App Store by installing free (well, or paid - paid) applications and games.
In my opinion, the instruction turned out to be quite detailed, however, if you are tormented and haunted by various questions, then I always wait for them in the comments. Feel free to tell us about your problem - I will help, as they say, than I can :)
Updated! An article has appeared that summarizes all the errors that may interfere creation of Apple ID. So if something doesn't work, .
P.S. By the way, for the full and correct registration of Apple ID, you must click on the buttons social networks and like the article - try it, it really works!
Users, when they first start using an iPhone or iPad, are sure to come across such a term as Apple ID. Applications regularly require you to enter some kind of Apple ID and, in case of refusal, they practically stop working. This situation is annoying and confusing for inexperienced users who do not understand what an Apple ID is, what it is for and how to get it.
An Apple ID is a single account used by Apple to identify users of its products. This account is created once and can then be used to sign in to all Apple products. In particular, Apple ID is used to enter services such as the store Apps Store, Store media content store, iCloud cloud storage, iMessage/iChat/FaceTime communication apps.
If you have accounts on sites such as Google or Yandex, then you are probably familiar with similar system. For example, by registering mail with Google, you get an account that you can use to sign in to all Google products. You do not need to register separate account For Google mail, a separate account for Youtube and so on. Similarly with Apple ID, register once and then use the same account.
What is an Apple ID for?
Now a little more about what the Apple ID is used for. As you already know, Apple is used to sign in to Apple products and services. And this gives you the following options:
- Buy or rent media content from the iTunes Store;
- Buy apps and games for iPhone or iPad in the App Store;
- Make video calls using the FaceTime app;
- Buy apps and games for iMac, Mac Pro, Macbook, Mac Mini from the Mac App Store;
- Receive test beta versions of operating iOS systems and OS X;
- Purchase gadgets and accessories in the Apple Online Store;
- Chat with friends using iChat and iMessage applications;
- Use iCloud and iTunes Match cloud storage;
- Listen to online radio using the iTunes Radio service;
- Access free learning materials on iTunes U;
- Create and manage your own collection of media content on Apple TV;
- Use the Find My iPhone feature, which allows you to find a stolen or lost gadget;
- Buy e-books in the iBooks Store online bookstore;
- Contact Apple Support for help;
- And much more;
As you can see, the list of opportunities that Apple ID opens up is quite wide. Therefore, if you have purchased an iPhone, iPad or Mac computer, then you should not refuse to use your Apple ID. So you only limit the capabilities of your mobile device.
How to get an Apple ID
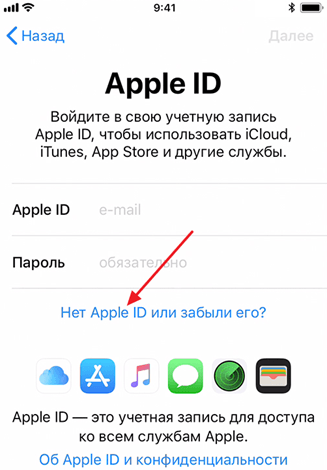
The easiest way to get an Apple ID is to create one the first time you start a new one. Apple devices. After switching on new iPhone or iPad you will be prompted to select your country, connect to WiFi networks, set up access by fingerprint or face, etc. As part of setting up your new Apple device, you'll be prompted to sign in with your Apple ID. Here you need to click on the link "No Apple ID" and go through the registration procedure.
If you skipped this step or want to get another Apple ID, then you can register it, for example, using iTunes on your computer. To do this, run iTunes, open the Account menu and select the Sign In option.

Then click on the "Create a new Apple ID" button and go through the procedure for registering a new account.

To sign up for an Apple ID, you'll need to enter your name, work email address (which will be used as your username), password, date of birth, backup email address, and three security questions and answers to them.
What else you need to know about Apple ID
In conclusion, here are some important facts about Apple ID. This information will help you not to fall for the misconceptions and myths about Apple ID, which are often spread on various sites on the network.
- You don't need to enter your payment card information to get an Apple ID. During regular Apple ID registration, you will be required to enter information about your payment card and you will not be able to skip this step. But, if you are determined not to buy anything, then you can cheat a little and register an Apple ID without a card. To do this, you need to launch the AppStore on your device and try to install the free app. In this case, at the stage of entering payment information, you will have the opportunity not to enter your card details.
- You can restore access to your Apple ID. Don't panic if you've lost your password and can't sign in to your Apple ID. Like any other password, you can recover your Apple ID password. You can read more about password recovery.
- You can change the email address used with your Apple ID. To do this, you need to go in, log in with your Apple ID and go to settings.