Fable
In principle, if it weren’t for the fact that I came across the Nokia 5800XM, I would have solved this problem long ago - the ASUS WL-500g router supports UPnP, so all I had to do was plug in a USB flash drive. The trouble is that, despite the specifications sometimes found in online stores, the Nokia 5800XM does not support UPnP/DLNA and there is no third-party client implementation either. So what on earth should we do? Put an end to the idea of viewing deleted content?The first attempt to break the impasse was video streaming. Judging by the RTSP protocol specification (RFC 2326), it must support broadcast playback control: PLAY, PAUSE, and TEARDOWN. Unfortunately, after VLC was configured to stream, it turned out that the pause request was either not processed by this server and only worked on the server side, or was not sent by the smartphone client. Moreover, in any case, in this way only the video file selected on the server for broadcasting was available, and not the entire media library.
But the first disappointment did not dampen the ardor; the search continued.
Next in line was Home Media Server, better known as Home Media Server - a program that provides media resources (photos, audio and video files) of your computer to other UPnP (DLNA) devices in home network. After installation, it pleased me with the wealth of options and ease of configuration, but... I was completely disappointed due to the fact that the Nokia 5800 did not support UPnP/DLNA, as mentioned above, and the video completely refused to play via HTTP...
A working alternative was needed. This is where the media server caught my eye TVersity- the name came up in someone’s comment while discussing DLNA media servers.
So...
TVersity Media Server (free edition) is an even easier to learn media server, again offering us UPnP, DLNA and HTTP. If everything is clear with the first two protocols, then HTTP, as it turned out, is not so simple - access to the media library was implemented in two ways: classic and via flash. But first things first.For starters, the interface. Friendly, and I would even say quite simplified. First of all, I immediately went into the settings. Hints for each option (even in English) simplify configuring the server “for yourself.”
The most important thing for me, of course, was video transcoding. The server settings, unfortunately, are aimed at the average user, so you won’t be able to play around with fine-tuning codecs, but something is better than nothing at all, right?
Setting up the media library is also quite simple (and, unlike the aforementioned Home Media Server, does not require a long restart when updating); when adding a source, you can use special checkboxes to specify the type of its content: audio, video, and/or images. I say “source” and not “folder” because this way you can add external content: for example Video RSS or Internet Radio, as well as some services like Youtube and Flickr. By the way, please note that when you select a folder using the “Browse...” button, you will get crappy names instead of Cyrillic names, so it’s better to enter the name manually or copy-paste it from the file manager.
Well, we figured out how to set up the library. Now let's talk about how to work with it. And let's start with what all this was started for: watching videos from a smartphone. To the lucky owners Nokia 5800 knows that the smartphone fundamentally cannot open an AVI container, and initially this was a big problem, because... local viewing of a movie required converting the video to MP4, but then third-party players appeared that supported this container. In this case, it doesn't matter - you just need FLV support, which is not a problem for him. So, as mentioned earlier, access to the media library is implemented in two ways. To view HTML pages in the address bar you need to specify http : //server-address:port/lib, and to download an interactive flash application - http : //server-address:port/flashlib. In this case, the last option is exactly what you need, so a bookmark with the address is created in the smartphone browser
http : //192.168.1.33:41952/flashlib. Well, now you can check what happens.
And this is the picture that turns out: after a short download of the flash application, the library directory appears on the screen with quite convenient navigation:
For smooth video playback, I had to play around with the transcoder settings, but in the end I managed to achieve an acceptable picture. True, the positioning slows down significantly, but this is not such a significant problem - you can put up with it.
In the media server itself, you can view the broadcast status, the list of addresses of devices connected to it, the status of video transcoding, as well as a log of operation and connections.
DLNA/UPNP
It would seem that's it. Not yet: after all, a media server is a convenient thing, and, of course, you want to use it to its fullest, which means not only via HTTP. In addition to smartphones, we also have a laptop with Windows 7 and a netbook with lubuntu installed. With the first one everything turned out to be as simple as shelling pears - upon startup Windows Media Player 12 he immediately discovered the library DLNA media server and started watching it without any problems.With Linux everything turned out to be a little more complicated. From the list of cross-platform UPnP/DLNA media clients, I simply could not install XBMC - it did not have binaries for Ubuntu 11.04 Natty Narwhal in the repository, and the installed VLC - under Linux it does support UPnP - did not always find the server, although at the same time I It was great to access it through a browser. As a result, it was decided to look for another way.
As a result, one wonderful thing was found called a utility based on mounting UPnP server resources. Since the program was already in the repository, installation did not take much time. Now all that remained was to create a mount point and register auto-mounting. After some research and stepping on the rake, this was finally accomplished. All of the following commands can only be executed as root, so be sure to run:
Sudo-s
First you need to create a folder that will be the mount point:
Cd/media
mkdir upnp
chmod 777 upnp
Now, actually, launching FUSE and mounting itself:
Modprobe fuse
After this, you can go to the library as a regular folder and open its contents in any convenient programs like regular files.
By the way, I have not found any mention anywhere about the most unpleasant rake I found in working with djmount, expressed in incorrect file encoding. According to the DLNA specification, file names must be exclusively in UTF-8 format, therefore TVersity Media Server does not even have a file name encoding setting. Judging by the message, when mounting, djmount also uses this encoding by default - UTF-8. But file manager, as well as the console, stubbornly refused to display the usual letters in file names, replacing them everywhere with question marks. Attempts to specify the CP1251 or IBM-866 encoding did not lead to complete success, although now it was possible to at least look into the Cyrillic folders. To my complete surprise, the solution to the situation was to directly indicate the use of UTF-8 encoding - I don’t know why I decided to try it, but it worked!
Autostart also turned out to be not an easy task, but then Google came to the rescue, and as it turned out, the problem with the impossibility of automounting from fstab had already been solved. As a result, mounting occurs every time the network is brought up. This is done as follows. Let's create a script:
Cd /etc/network/if-up.d
nano djmount
Script contents:
# Not for loopback!
[ "$IFACE" != "lo" ] || exit 0
Modprobe fuse
fusermount -u /media/upnp
djmount -o iocharset=UTF-8,allow_other /media/upnp
We set the attributes for it:
Chmod 755 djmount
chown root djmount
chgrp root djmount
That's all it really is now. The media library is accessible from any device in any possible/convenient way.
It's no secret that over time we accumulate a lot of all kinds of films, photographs and the like, and all this is usually stored on the computer.
But it wouldn’t be bad to watch a movie that you just downloaded from the network on a large TV, and not on a PC screen, but to do this you need to transfer this movie to a flash drive, or burn it to a disc.
In a word, there is a lot of unnecessary movement. But there are solutions, this is a multimedia server.
Don't be alarmed, this is not a completely separate computer with hard drives. This is a program that performs strictly the tasks assigned to it.
So let's look at several programs that can provide access to media content from other devices or programs.
Let's start with the theoretical basics of what DLNA and Smart Share are.
DLNA(in its own words) is a technology that allows devices that are connected to the same network and support DLNA technology to exchange media content (video, photos, music).
Now, almost all devices support DLNA technology: computers, TVs, smartphones, game consoles, etc.
Smart Share is a proprietary application (technology) of LG. If you can say so, then this is a kind of shell for working with DLNA.
Other TV manufacturers call these programs differently. Samsung has AllShare. SONY – VAIO Media Server.
And so, without a doubt, you can watch photos, films, etc. that are on your computer or even smartphone on your TV.
But first you need to set up DLNA (Smart Share) between your PC and TV (the TV must be able to connect to the network)
What does it mean?
This means that both the TV and the computer must be connected to the same one, no matter how they are connected. (via Wi-Fi or cable)
And so you have a router, but there is no Wi-Fi on the TV. We can simply lay a network cable from the router to the TV.
Our router must be connected to the Internet and configured. We also need a network cable. We connect one end of the cable to the router, into the yellow connector.
On the TV, connect the second end of the cable to the network connector.
 You can debug the router itself using the knowledge gained in this article:
Next, we need to set up file distribution from the computer so that the TV can play videos from the required folders, or show photos. We just need to open up access for this. This can even be done using standard Windows Player Media.
But there is a very good one and absolutely free program « Home media-server (UPnP, DLNA, HTTP)", which is an excellent analogue of Smart Share from LG, or for example AllShare from Samsung.
And so, friends, a media server for a computer that will upgrade your TV and make it much more functional.
Home Media Server
 Home media server (UPnP, DLNA, HTTP) is a program that provides media resources (photos, audio and video files) of your computer to other UPnP (DLNA) devices on the home network.
For example, Philips TVs, Sony, Samsung, LG, Toshiba, game consoles Sony Playstation 3, XBOX 360, media players WD TV Live, Popcorn Hour, Dune, Boxee Box, IconBit, ASUS O!Play, iPad/iPhone/iPod, mobile and PDA devices.
The program includes various audio and video file transcoders that allow you to convert media resources into a format supported by the playback device.
It is also possible to convert the frame format of video files to the screen format of the playback device (the color of the addition is specified by the user), select an audio track, and subtitles. You can choose to transcode from any minute.
The program includes transcoding profiles for VLC Media Player, you can redirect Internet radio and Internet television streams from your computer to your media devices.
The program supports Digital TV (C, S, T), you can redirect streams digital television from your computer to your media devices.
The program supports managing DMR (Digital Media Renderer) devices. You can use the “Play to” function for an individual device and a group of devices.
This is a whole harvester, the functionality of which knows no bounds.
The only drawback will be the terrible interface of the program, but since it is needed to play movies on the TV, this will not be a big problem. The program is absolutely free and is only available in the Windows version.
First, we need to download and install the program itself. I recommend downloading from the official website: //www.homemediaserver.ru/index.htm. There's always a new version there!
After installation, launch the program with a shortcut on the desktop. Let's go to the program settings. We won't do anything special there. We'll just point out local disks, flash drives, external HDD and, or folders, the contents of which we want to see on the TV.
For example, you can open only a few folders with movies, photos and music.
 A settings window will open. In the first category, Media Resources, we need to indicate which disks or folders we want to see on the TV. By default, standard folders with photos, videos and music are open there.
The program is trying to sort everything. And in order not to get confused in all these folders on the TV, I advise you to open general access to local disks. This means that you can open any file on your TV that is stored on these local drives (drives C, D, E, etc.).
You can also specify individual folders, or for example external hard disk. To do this, click on the Add button on the right and select in Explorer the desired folder, flash drive, or hard drive. These are the basic settings, click on the Ok button and agree to scan media resources.
Next, you can start the DLNA server itself. To do this, simply click on the “Launch” button. Now, just turn on the TV. If everything is connected correctly, it should appear in the “Home Media Server (UPnP, DLNA, HTTP)” program.
To do this, go to the Playback Devices (DMR) tab, and on the right, click the Update button.
VIDEO:
So Plex .
The most popular and, perhaps, quite convenient option. Having launched the server on your computer, you can manage it from a browser, set up a media library, add subtitles, etc.
Plex downloads all the information about the movie automatically and does it perfectly in most cases. The TV sees the Plex server without any problems and plays everything perfectly.
The disadvantage of Plex and other similar programs is that the TV does not see the subtitles built into the film, but for me and I don’t think this has any special significance for you.
Plex is free, but additional functions you'll have to buy a subscription.
//plex.tv/
PS3 Media Server.
Initially, PS3 Media Server was distributed as an add-on to the PlayStation 3, allowing the console to play movies on a TV.
Then the program began to live a separate life. Like previous alternatives, it supports DLNA playback and requires no fiddling with setup.
//www.ps3mediaserver.org/
Serviio, is far from the most popular multimedia server. The app is free, but can be purchased for $25 PRO version, which allows access to your content from any network, not just your home one.
And this allows you to play content from the WEB (this function is given as an introduction and in free version). Serviio has Android apps, but they act as a secondary control panel for the backend on the computer.
//www.serviio.org/
Kodi or (XBMC)
XBMC was created to bring video playback functionality to the Xbox. Then the project split off and now Kodi is one of the most popular media centers, supporting almost all platforms due to open source.
Kodi has apps for iOS and Android that allow you to use your smartphone as a remote control. The service relies on donations and is absolutely free.
//kodi.tv/
Good luck, Friends!
DLNA - allows compatible devices such as a computer, TV, laptop, phone, tablet to transmit, receive or play various files media content. The function provides enormous opportunities for playing media content. A video file downloaded to a PC can be watched on the TV, and music downloaded to the phone can be listened to on the audio system. It is very comfortable. You just need to create a DLNA network.
How to create a DLNA network
There are many programs for setting up a DLNA home network, but you can simply use Windows' own tools.
Installation on windows 7:
- Go to the Start menu and select Control Panel.
The “Start” menu is located in the lower left corner of the monitor, in it you need to select “Control Panel”
- On the "All Control Panel Items" tab there is an item " Home group", click on it.
On the “Control Panel” tab, select “HomeGroup”, it is indicated by a red arrow
- A new window will open, in it go to the “Change” tab additional parameters public access."
The "Change advanced sharing settings" option is located on the "Home Group" tab
- Check the connections of all positions.
All positions on the “Change additional sharing settings” tab must be in the active position
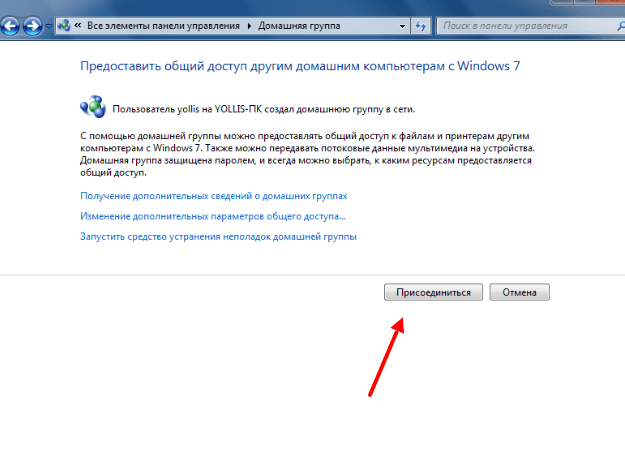
- Return to the “Home Group” window; at the bottom of it there is an item “Create a home group”; click on it.
The Create HomeGroup button is at the bottom of the HomeGroup window.
- In the next window, enter the name you came up with for the DLNA server and click OK.
In the Streaming Media Options window, enter a server name and click OK.
- Write down the password that appears in the window, you can print it (it will be needed when adding other devices to the home group), click “Done”.
The password that appears in the window must be written down or printed
- In the HomeGroup window, click on Select media streaming options.
In the HomeGroup window, select Select media streaming options.
- A media server window will appear, in which you need to select the types of content for which public access will be opened.
In the media server window, you must select the types of content that will be available to the homegroup
- Click "Next".
Server DLNA windows 7 connected. A “Network” icon will appear on the “Computer” tab; by clicking on it, you can see all connected devices. By selecting required device, click on it. All available media content files will open in the media player window, they can be viewed and transferred to other devices.
On Windows 10 everything is simpler; there is no need to create a “Home Group”.
Installation on windows 10:
- In the Control Panel Search window, type Streaming media options and open it.
In the search box, type "Media streaming options"
- On open tab Click “Enable media streaming.”
In the Streaming Media Options window, enable media streaming
- On the next tab, in the “Name of multimedia library” section, write the name of your DLNA server, click OK.
In the “Enable media streaming” window you need to enter the name of the future multimedia library
Write down the password you created and click the “Done” button.
After making the settings, you can access, view and play media content files contained in the folders on your computer from devices on your home network.
Equipment for building a home network with DLNA
To create a DLNA network, you will need a computer or laptop with a media server configured on it. Via wired or wireless Wi-fi connections it connects to the router, which, in turn, distributes the signal to other devices.
DLNA network turns your home into a media center
Such devices can be: TVs, laptops, tablets, phones, stereo systems. If you don’t have a router, you can configure signal distribution directly from your computer, but in this case you will need a Wi-Fi adapter for your computer. The principle of building a DLNA home network is similar to the Internet.
In the end you will need:
- computer or laptop;
- Wi-Fi router or adapter;
- at least one other device that supports DLNA.
It is better to connect the TV to the computer via a cable connection. Wireless connection convenient and modern, but when viewing powerful media content files, streaming data may be lost and, as a result, the TV may malfunction.
Connecting a DLNA-enabled TV to a wi-fi router
You can connect a TV to your DLNA home network, this step will give you the opportunity to fully use installed server. First of all, you need to connect the TV to your Wi-Fi router. You can do this in one of two ways.
Simply connect the TV and router with an Internet cable with LAN connectors:

Location of LAN jacks on different models TVs are different, but they are labeled everywhere and cannot be confused with outputs for other purposes.
You can connect your TV to your router wirelessly wi-fi networks. New TV models, as a rule, already have a built-in adapter. If the model is older, you will have to use an external wi-fi adapter. It needs to be inserted into the USB connector of the TV, and the system itself will detect it and put it into operation.
The Wi-Fi adapter must be connected to the TV via a USB port
- Pick up the remote control remote control TV, press the Menu key.
- In the menu that opens, click “Network”, then “Network Settings” and select “Wireless (General)”.
- In the list that opens, select yours and click “Next”.
- In the window that opens, enter the password for your home network.
- If everything is done correctly, the connection will be established.
Adding other DLNA-compatible devices to your home network
Once you have set up a DLNA server on your PC, you can connect to wi-fi router Other devices. Connecting to your home network, possibly via a wireless connection or via cable.
Laptop or other PC
To add a laptop to your home network, you need to configure its connection to the router. In the case of a wired connection, it is enough to connect the LAN connectors of it and the router. When connecting wirelessly, you need to pay attention to the bottom right corner of the monitor. There you will find an icon in the form of gray sticks of different heights.
The icon on the panel indicates that the laptop is currently disconnected from the Wi-Fi network
Clicking on it will take you to the settings menu network connection, all networks that can be connected are displayed here. Select the desired network, click the mouse.
On the Sharing Center tab, connect desired network wi-fi
If the network does not have a password, the connection will occur in automatic mode. Otherwise, a window will pop up in which you must enter a password.
Enter your home network password and click “Done.”
Video: how to connect a laptop to a wi-fi network
Before you can transfer media content to other devices, you need to configure the media server.
To add a laptop to your home network you need:
Media player
To integrate a media player into your home network, simply connect it to your router. The player automatically connects found DLNA resources. It is enough to open shared access to folders for homegroup devices on the device acting as a media server.
Setting up DLNA on your TV
TVs connected to the home network find the server and folders with content allowed for viewing in automatically. On LG TVs, folders of available media servers appear alongside pre-installed programs and features.
There are many alternative programs to create a media server. The LG TV comes with a disk with a program called Smart Share, which can also be downloaded on the Internet. This program allows you to create a media server without using windows tools. Just download it to your computer, click on its launch shortcut and wait for the installation to complete.
A folder with the Smart Share logo will appear in the TV's programs and connections panel. On your computer, in the program settings window, you can assign folders for playing content. You can view photos and videos located in these folders on your TV.
Smart Share good program for those who are too lazy to delve into windows settings. It loads the system quite heavily. Even with the TV turned off, on a weak computer, its presence can be felt. For some reason, it does not always update the folder with added files. Sometimes you have to do this manually. It is better to set up a normal server using Windows.
Exists universal program, allowing you to connect any TV that supports DLNA to your computer. It's called Home Media Server.
Video: instructions for installing and configuring the Home Media Server program
Using DLNA on Android OS
To use your Android device, you first need to connect it to your router:
- To do this, go to settings and switch the slider wi-fi connections to the "on" position.
When the wi-fi function is turned on, the slider is in the “on” position
- Next you need to go to the wi-fi settings.
- You will see a list of currently available networks.
In settings wi-fi devices on Android OS select the desired network
- Select the one you need and enter the network password.
- After some time the connection will occur.
IN wi-fi settings you can see information about the network to which the Android device is connected
Devices running Android OS have great functionality; with their help, you can not only view files with media content, but also allow you to transfer them to other devices. On Play Store You can download a program that will significantly expand the capabilities of your smartphone or tablet. It's called DLNA server.
Download the program and install it on your phone, then follow these steps:
- Go to the program and click “Add > DLNA Server”, this way you create a DLNA server.
The program will help you create a server on an Android device
- On the next tab, you set the server name in the Server Name item; the port item remains the default.
In the Server Name item you need to specify a name for the server
- Go to the Roots tab, select and designate a folder with content intended for viewing.
By going to the TV menu you will find new media server created on a device with Android OS
Video slows down and other problems
Sometimes annoying interference and malfunctions interfere with watching your favorite movies and prevent you from appreciating all the benefits provided by using the DLNA network. Possible problems and methods for solving them, see the table provided.
Table: errors that occur when playing media content and methods for eliminating them
| № | Errors and malfunctions. | Causes of errors and malfunctions. | Possible Solution. |
| 1 | Devices cannot discover the network. | there may have been a glitch in work wi-fi router. | Try rebooting your wi-fi router. |
| 2 | Low data transfer speed on a wired connection. | The cable is damaged or poorly secured in the LAN connectors. | Check the integrity of the cable and the tightness of its fastening in the connectors. |
| 3 | The media server is unavailable. | Errors in the operation of the media server. | Reboot the media server. |
| 4 | Media device is not available. | Errors in the operation of the media device. | Reboot your media device. |
| 5 | The video is slow. | The data transfer speed is insufficient to watch the movie. | Temporarily stop watching the movie to download enough data to watch it. |
| 6 | The system stops watching movies and indicates the reason - insufficient disk space. | There is not enough space to store temporary files. | Choose lower quality videos with a smaller frame size. |
| 7 | A message appears - the movie format is not supported by the media device. | The media device does not support this movie format. | Find a movie in a supported format. |
Often the reason why the TV slows down when watching movies is easily eliminated small details. The main reason lies in the unstable operation of the media server. For normal operation Periodically optimize and clean the system. Don't overload your computer unnecessary programs.
Anyone can set up DLNA-enabled devices at home. It's not difficult at all. A TV connected to your home network gets a second wind. After spending half an hour connecting to the DLNA network, you can view on big screen any content from your devices. Movies, photos, videos shot on your phone, now you can watch all this just by pressing a couple of buttons.
I recently realized that televisions are still in the last century. If mobile gadgets and computers are becoming more convenient, faster and simpler, then the only thing that changes on TVs is the screen size and resolution. There’s no point in talking about convenience yet.
A TV without a media server on your computer or a special device is practically a useless thing, unless you like to hang out. Therefore, I have selected the 5 best media servers for a computer that will upgrade your TV and make it much more functional.
Plex
PlexPlex is the most popular and perhaps convenient option. Having launched the server on your computer, you can manage it from a browser, set up a media library, add subtitles, etc. Plex downloads all the information about the movie automatically and does it perfectly in 9 cases out of 10. The TV sees the Plex server without any problems and plays everything perfectly. The only downside to Plex and other similar programs is that the TV does not see the subtitles built into the movie, but for most this does not matter.
Plex is free, but you'll need to buy a subscription for additional features.
Plex
I used this server for a very long time on an old TV. It works quite well and unlike Plex, HMS is a whole combine, the functionality of which knows no bounds. The only drawback will be the terrible interface of the program, but since it is needed to play movies on the TV, this will not be a big problem. The program is absolutely free and is only available in the Windows version.

Initially, PS3 Media Server was distributed as an add-on to the PlayStation 3, allowing the console to play movies on a TV. Then the program began to live a separate life. Like previous alternatives, it supports DLNA playback and requires no fiddling with setup.

Serviio is far from the most popular media server, but it also deserves a place in our top. The application is free, but for $25 you can buy the PRO version, which allows you to access your content from any network, not just your home one, and allows you to play content from the web (this function is provided as a preview in the free version). Serviio has Android apps, but they act as a secondary control panel for the backend on the computer.
Kodi (formerly XBMC)

XBMC was created to bring video playback functionality to the Xbox. Then the project split off and now Kodi is one of the most popular media centers, supporting almost all platforms due to its open source. Kodi has apps for iOS and Android that allow you to use your smartphone as a remote control. The service relies on donations and is absolutely free.
KodiFor me, Plex is a clear favorite. What do you use?
After that, unpack the downloaded archive and run the “setup.exe” file.
The installation process will start. You will be prompted to select a directory to install the application. You can leave it as default:
In the next step, you will be asked to select the type of device with which our media server will work.

In principle, if the “Auto-detection” option is checked, the program itself will determine everything and set required parameters your media device.
Now you need to select the folders, or entire local drives, that you want to make public:

Then the program will ask you to do backups settings. We won’t do this, since we haven’t yet set up everything we wanted. Therefore, click the “Close” button:

This step will open the main program window. You can study a little to get the hang of it. Then click the “Settings” button:

In the window that opens, select the “Scanning” tab at the bottom:


This will give us the opportunity to control the server and computer from the TV.
For example, after watching a movie you won’t need to go to the computer to turn it off. Everything can be done from the telly. Cool, don't you agree?
Now select the "Devices" tab and click the "Search" button:

Here again click the “Search” button at the bottom of the window. When asked to start the server, answer “Yes”:

The program will launch and its icon will appear in the system tray:
After this, a window will appear with a list of found devices. Find the TV and click on the red icon on the left in the form of a “No Entry” road sign:

It should now look like a green check mark. This means that the TV and the server understand each other and are ready to work over the network.
After this, all found devices should be displayed on the “Devices” tab. Select the TV again and click the “Settings” button:

If you want to access the server from any device on your home network via a web browser, select the “Advanced” tab and check the “Web navigation” checkbox:

I recommend disabling the “Creating playlists of media resources in Web navigation mode” option.
You can now access the program via a web browser:

Let's check if this is true:

As you can see, everything works.
To view media resources on your computer, you need VLC player.
If the program interface does not open, go to “Settings - Server” and check whether the port number is specified correctly:

Also disable the firewall on your computer and try again.
Therefore, blog so as not to miss interesting material.
Now I’ll briefly talk about the “Transcoder” tab:

For example, you downloaded a movie in a format that your TV cannot play.
In this case, you can select a transcoding profile that will transcode the video into the desired format. Moreover, the entire process occurs during startup, without any preliminary user actions.
It is worth noting that in the program you can set transcoding settings according to three basic principles:
First: for all movies (example in the screenshot above).
Second: For certain types of video file extensions.
To do this, follow the path “Settings - Media Resources - File Types - Change”:

Third: for a specific movie.
In the main server window, select the desired video file, click on it right click mouse and select “Transcoding Profile”:

At first glance, all these profiles, encodings, and so on may be completely incomprehensible to a beginner. It's very easy to get confused. To be honest, the author of the article also did not immediately get to the bottom of the matter. But in fact, everything is quite simple.
Look, at the very beginning of setting up the Home Media Server program, we indicated the type of our media device, in our case a Samsung TV:

After this, the application itself determines which audio-video file formats your TV supports.
And if, for example, you launch a movie with a resolution that is not in the above list, transcoding will start for it in order to convert it into a TV-readable format. I hope the point has become clear to you.
As a rule, you don’t need to change anything for Samsung TVs, so leave all the settings here as they are. We will solve all problems as they arise, since the topic of setting up transcoding in HMS is very extensive.
Now we move on to the final stage. Go to the “Advanced” tab and set the settings as in the screenshot below:

Now the program will automatically load and quietly “hang” peacefully in Windows system services.
Let's return to the main program window once again. Let's describe the main control buttons:

The “Movies - Music - Photos” buttons are used to select folders with corresponding resources.
The “Start - Stop - Restart” buttons control the server. In operation, the start button must be pressed (inactive).
That's all. The question of how to download, install and configure the Home Media Server program can be closed.