Users rarely "steam" about the settings for saving photos in their cameras - the first fact. Manufacturers put almost the most maximum size and the quality of the saved image by default is the second fact. Both can be understood. Well, why does the manufacturer need such a situation when the user buys an expensive camera, and the pictures without additional settings he will be like on a "soap box". And I’m not even talking about the user - no one reads the instructions for a long time. Sooner or later, the disk space runs out, or you get bored while uploading our modest photos under a palm tree in Egypt to a social network, each size is 20 mb. FastStone Photo Resizer will fix the situation!
Program features
So, we have pictures, the size of which allows you to print photo wallpapers. Yes, yes, you may not have guessed about it, but 10-megapixel cameras that are fashionable today take photographs of exactly this size - 3870 × 2590 pixels. According to professionals, this is enough to print a picture of 245 cm x 164 cm in size (though with 40dpi banner print quality)! Mentally imagined? Who could imagine and was perplexed about the need to print such photographs - read on. If such printing is an ordinary thing for you, then you can pass by, as we will now learn how to reduce the size of our valuable photo collection.
There is nothing complicated in FastStone Photo Resizer. The main window of the program (it is essentially the only one) contains two main lists - a tree of files on the computer's drives (on the left) and a window of photos selected for processing (on the right).
Now the most important thing is to choose the format and quality of the photos that we want to get at the output. The quality is selected by the lever and it varies from 1 to 10 (the data is given for the JPEG format).

The quality of the resulting “thinner” photos can be checked visually using the “Preview” button.

As you can see in the picture, the size of the photo is reduced by four times, and the quality does not visually differ. In fact, there are losses, but they will be visible only on very large prints.
Resizing a photo collection
To reduce the size of your photo storage, free up disk space, or send via e-mail, just use the photo quality adjustment as above. If at the same time you set the task of cleaning the disk, then do not forget to do backup"large" photos (I, for example, copy to DVD-blanks). And then uncheck "Output Folder" in this case FastStone Photo Resizer will resize photos directly on the original without making copies.
Your collection will be smaller but still contain all your photos to show off your holiday adventures to your friends.
Resizing for a post
Another problem that can be solved with FastStone Photo Resizer is reducing photos before sending them to various Internet resources (social networks, Yandex.Fotki, Picasa, and others).

Here you may need more fine tuning the process of reducing the quality and size (this time really the size of the photo, not the file containing it).

In this mode, you can control almost everything! The program can resize photos to any resolution using the selected filter (only experts will understand the meaning of its choice). A lot of other features are also implemented:
- image rotation,
- canvas resizing,
- cropping to a certain size,
- color depth change
- photo enhancement (brightness, saturation, etc.),
- DPI change,
- inserting text or watermarks,
- frame insert.
The main thing is that all these operations can be performed immediately on the entire list of selected photos.
You will say that editors like Adobe Photoshop? I agree, but they are expensive, consume a lot of system resources, and are also difficult to master. If you are a professional, then you are definitely better off using a more complex tool. If you just need to reduce the size of a photo without having to study thick books on working with Photoshop, then FastStone Photo Resizer is quite suitable for this task, because it is simple, free and does not require learning complex settings and their values.
Conclusion
FastStone Photo Resizer - excellent free program to change the size of images (both dimensions and size on disk). You can recommend it for use as a tool for processing a personal photo collection, or as a means of preparing photos for publication in in social networks and photo services.
Good day, dear friends, acquaintances, readers, admirers and other personalities.
Digital camera, mobile phone with a camera, or something else that can take photos, is now in almost every home. In this connection, a fairly substantial amount of pictures, images and other picture-differences sometimes accumulate on a computer, which take up a substantial amount of space on the hard disk ( ;)).
In connection with the foregoing, I will share with you the most valuable program that I found on the Internet, which will help you significantly simplify the processing process, reduce the weight of photos and images without much loss in quality, and also make it possible, say, to quickly do with a large number of pictures of various "fineness" (for example, highlight with a frame or put your signature in the corner) or convert them to the format you need.
Let's get started.
FastStone Photo Resizer, is a mass processing program for photos and images
As you already understood from the title, the program is called "FastStone Photo Resizer" and is engaged in recompressing, lightening, signing, changing the format, adding a frame and doing other wonders with your photos, not individually, but with all selected at once.
It is completely free, nimble and its only drawback (if it can be considered a disadvantage) is English language. However, users in need may find a crack on the Internet, but for now I'll tell you how to work with this happiness without any unnecessary installations and conjectures;)
The installation is extremely simple and I will not dwell on it (just run the file and click on the "Next") button, and therefore let's move on to setting up and using it.

To get started, using the good old Windows Explorer, take a few images and copy them to some folder. We will work with them, so to speak, in test mode, so that you understand what's what.

As a matter of fact, on the left, in the window thereof, you can select a folder on the disk (to do this, click on the button with the image of three dots) where you have the images with which you will work. Select the folder with images that you prepared in advance (above in the text of the article).
If you did everything correctly, now you can select specific images in the list with which you will work and, by pressing the "Add" button, move the desired photo from the folder to the right window, i.e. to the window containing the list of photos to be edited.

You can select multiple photos by holding down the "Ctrl" (one by one) or "Shift" (list) key and clicking on the photo name. You can remove photos from the right list by highlighting their name and pressing the "Remove" button. Transfer everything at once by pressing the "Add all" button.

The "Output Format" column allows you to select the format in which the photos will be after editing. That is, if you need, for example, to change the resolution from .bmp to .jpg , then set "JPEG Format (*.jpg)" in this field. Next to this line there is also a "Settings" button, which will allow you to set optimization settings (quality, compression method, etc.) in order to save maximum number places after converting/optimizing photos/images:

The "Output Folder" column allows you to select the folder where the program will save the photos after editing. Specify a folder using the "Browse" button.

The "Advanced Options" button allows you to set the photo editing settings (pictures or whatever you have):

Let's take a closer look at what's what, so that you have an understanding:
- The first tab, called "Rezise", allows you to set the size of your photos in pixels. It is optimal to choose something like 1280 x 1024 , because it is unlikely that if you are not going to print these pictures, you need a higher resolution. Just in case, check the box Do not resize when original size is less than the new one", which will tell the program that it is not necessary to change the resolution if the file has a resolution lower (and not higher) than the specified one (that is, so that the photo does not stretch);
- The second tab, "Rotate", allows you to flip photos horizontally or vertically, or rotate them by "90-0180% :
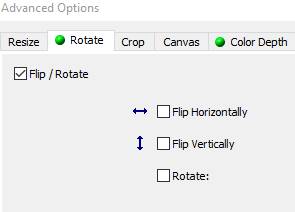 If you need it, then check the "Flip / Rotate" checkbox, and then either the "Flip Horizontally" or "Flip Vertically" or "Rotate" checkbox;
 - The "Crop" tab allows you to crop photos. I do not recommend using it, because in streaming mode you can cut it off, which will be a shame later;
- The "Canvas" tab allows you to add .. mmm .. something like margins / background, but why this is needed, I personally don’t understand, because there are frame settings around the photo for this;
- "Color Depth", "Adjustments" and "DPI". The first one allows you to cut the color palette, which, from the point of view of optimizing the file weight, can be very useful, but from the point of view of quality, it can lead to sad consequences;
- "Adjustments" allows you to change a bunch of goodies in-line, like brightness, contrast, gamma, and more:
 I would not recommend using it, because each photo must have its own parameters and massively reshape them, without looking at what happens - this is a rather controversial decision;
 - "DPI" allows you to set the number of dots per inch, which is useful when printing and often not needed in our case;
- The "Text" tab allows you to caption photos with text. One of my favorite options as a photographer, with which you can put, say, a tag on photos or the date of shooting:
 This is done very simply: enter the text in the upper right corner, then use the "Font" button to select the font, font size, etc. Next, set, if necessary, with the "Shadow" and "Background" checkboxes the background, the shadow and their (background and shadow) colors (the "Round" checkbox can round off the corners of the background), and the transparency of the inscription with the "Opacity" slider;
 - And finally, using the mouse or the "Position" option, we set where this very inscription will be located: You can make a preview (by the way, of any changes that we set in the program) and see how our inscription will look using the button with a leaflet and a magnifying glass;
- Prev last tab, with the name "Watermark", allows you to protect your photos with a so-called watermark, i.e. stick an image of, say, a logo:
 This is done by selecting, in fact, the image using the button with three dots and, again, by setting all sorts of options such as transparency, shadow, position, etc., which I described above;
 - Well, the last tab, "Border", will allow you to create a frame for your photos, and even, if necessary, so to speak, multifaceted:
 The setting is generally simple - just check the number of frame strips ("Frame 1-2-3"), set their thickness ("Width" parameter) and color ("Color" parameter) and, using the preview button, bring it to his ideal.
Having finished all the settings, click the "OK" button and, returning to the program window, once again making sure that you have set everything you need, feel free to click on " Convert".

Then all that remains is to wait for the conversion process, enjoying the numbers that indicate how much space is saved from each photo (the last column, which is called "Save (KB)"), and then go to the folder that you set as the save location ("Output Folder") and look at the result.
Everything on the sim. Let's move on to the afterword.
Afterword
Here is such a tool for mass photo processing and rescue free space(I must say that sometimes you can save whole gigabytes), and just a useful thing.
As always, if you have any questions, additions, and so on, then welcome to comment on this post.
FastStone Program Photo Resizer is designed for various manipulations with photos and pictures. The app is known for its handy features and nice interface that is easy to get used to. By using this software you can resize the graphic file and convert the image to popular formats (JPEG, JP2, TIFF, BMP, PNG, GIF). In addition, there are other interesting features in the program - changing the color depth, applying color effects and test watermarks. The application can support work not only with certain files, but also with entire folders. It is easy and pleasant to work with the program thanks to the support of Drag&Drop technology.
Settings and use of FastStone Photo Resizer
To get started, take some images and copy them to a folder somewhere. We will work with them, so to speak, in test mode, so that you understand what's what.
Launching the program shortcut, you will see the following window
FastStone Photo Resizer Interface
The left side of the window is used to select photos. They are added to the list simply - by pressing the Add button, if we need to add one photo, Add all - if all.
Below we select the output format and the folder in which the modified photos will be located.
Even lower is the most important button, but which is very easy to miss - Advanced Options. This is where the options are selected.
In the options window, you can get acquainted with the main features of the program: resizing, rotating, cropping, changing the palette depth, changing brightness / contrast, applying text, watermarks, frames. Of course, there are a lot of possibilities, but it is still better to change the brightness and contrast manually.

FastStone Photo Resizer Options Window
We apply the parameters, which, by the way, can be saved to a separate file for later use, press the Convert button on the output in the specified folder, we get the modified files.
For more information, please watch the video: How FastStone Photo Resizer works
Hello dear readers of the blog site. We continue to get acquainted with free graphic programs and today we will talk about the program FastStone Photo Resizer.
There are times when we urgently need resize multiple photos or even the size of a huge number of photos. What to do in such a situation? Of course, use one of the many programs for batch processing Images. There are a sufficient number of such programs on the Internet, and we will focus on the FastStone Photo Resizer program.
Features of FastStone Photo Resizer:
- Ability to convert and rename images.
- Ability to edit the image by changing its size, color depth, adding text, watermarks.
- Possibility to rename the image with serial number.
- Ability to support GIF, JPEG, TIFF, BMP, and PNG.
- Ability to load and save settings.
- Ability to work with separate files, and entire folders.
- And many other possibilities.
The program interface is very simple and convenient. The main window of FastStone Photo Resizer consists of two parts, left and right parts. On the left side is a window for selecting images, and on the right side are displayed all the photos that have been selected for further action.
In order to start working with the program, launch it and in the main window of the FastStone Photo Resizer program in the left window, specify the path to the folder with photos.

After that, all your photos in this folder will appear on the left side of the program. You need to select the desired photos and move them to the right window of the program. To do this, select one or more photos and click on the "Add" button, the selected photos will appear on the right side of the program.
Now just below you are invited to select the desired photo format, into which they will be automatically converted.

Next, we move on to the most necessary setting, namely the choice of resizing options by clicking on the “Advanced Options” button. Here you are offered to resize the image, to do this, check the "Resize" box and select the image size you need from the drop-down menu or enter the image size you need manually.

After you have chosen the desired image size, click on the "Convert" button.
And the process of converting photos will start automatically, and you can watch the conversion process in the window that opens.

Version: 3.1
System: Windows XP/Vista/7
English language
License: Free
Size: 1.42 Mb
Download FastStone Photo Resizer from the official website
More detailed information about the program FastStone Photo Resizer and its capabilities, see the video tutorial. Good luck to you! And see you again.
Good day, dear friends.
A digital camera, a mobile phone with a camera, or something else capable of taking photographs is now in almost every home. In connection with this, a rather substantial amount of pictures, images and other picture-differences sometimes accumulate on a computer, which take up a substantial amount of hard disk space. (and this, as you know, is not rubber).

In connection with the foregoing, I will share with you the most valuable program that I found on the Internet, which will help you significantly simplify the processing process, reduce the weight of photos and images without much loss in quality, and also make it possible, say, to quickly do with a large number of pictures various "finenesses" (for example, highlight with a frame or put your signature in the corner) or convert them to the format you need.
FastStone Photo Resizer - photo streaming software
As you already understood from the title, the program is called “” and is engaged in the fact that it re-compresses, lightens, signs, changes the format, adds a frame and works other miracles with your photos, and not one by one, but with all selected at once. It is completely free, nimble and its only drawback (if it can be considered a disadvantage), is English. However, users in need may find a crack on the Internet, but for now I will tell you how to work with this happiness without any unnecessary installations and thoughts
You can download the program by this link.
Installation is extremely simple and I will not dwell on it.
FastStone Photo Resizer - setup and use
To get started, using the good old explorer “ Windows“, take some images and copy them to some folder. We will work with them, so to speak, in test mode, so that you understand what's what.
After launching the program shortcut, you will see the following window (click to enlarge):
As a matter of fact, on the left, in the window thereof, you can select a folder on the disk (to do this, click on the button with the image of three dots) where you have the images with which you will work. Select the image folder you have prepared in advance (above in the text of the article).
If you did everything correctly, now you can select specific images in the list with which you will work and by pressing the “ Add“, move the desired photo from the folder to the right window, i.e. to the window containing the list of photos to be edited. You can select multiple photos by holding down the “ ctrl“(one by one) or “ Shift“(list) and clicking on the name of the photo. You can remove photos from the right list by highlighting their name and pressing the “ Remove“. Transfer all at once by pressing the “ Add all“.

Count output format allows you to choose the format in which the photos will be after editing. That is, if you need, for example, to change the resolution from .bmp V .jpg, then put in this field JPEG Format (*.jpg). Next to this line there is also a button “ Settings“, which will allow you to set optimization settings in order to save the maximum amount of space after conversion/optimization. To do this, press this button and set everything as in the screenshot:

Count Output Folder allows you to select the folder where the program will save photos after editing. Specify a folder using the button Browse.
button advanced options allows you to set photo editing settings:
The first tab, which is called " rezise", allows you to set the size of photos in pixels. It's best to choose something like 1280x1024, because it is unlikely that if you are not going to print these pictures, you need a higher resolution. Just in case, check the box " Do not resize when original size is less than the new one“, which will tell the program that you do not need to change the resolution if the file has a lower (not higher) than the specified (i.e. so that the photo is not stretched).
Second tab, Rotate", allows you to flip photos horizontally or vertically, or rotate them to 90-0180% . If you need it, then check the box “ Flip/Rotate“, and then either tick “ flip horizontally“, or “ flip vertically“, or “ Rotate“.
Tab “ Crop“ allows you to crop photos. I do not recommend using it, because in streaming mode you can cut it off, which will be a shame later.
Tab “ Canvas“ allows you to add.. umm.. something like margins/background. Why this is needed - I absolutely do not understand, because for this there are frame settings around the photo.
“Color Depth“, “Adjustments" And " DPI“. The first allows you to trim the color palette. From the point of view of weight optimization, it can be useful, but from the point of view of quality, I do not recommend touching it. “ Adjustments” allows you to streamline a bunch of goodies, like brightness, contrast, gamma, and so on. I would not recommend using it either, because each photo should have its own parameters and massively reshape them, without looking at what happens - this is a rather controversial decision. “ DPI” allows you to set the number of dots per inch, which is useful when printing and is not needed at all in our case.

Tab “ Text“ allows you to sign photos with text. One of my favorite options as a photographer, with which you can put, say, a tag on photos or the date of shooting. This is done very simply. Enter the text in the upper right corner, then click " Font”Choose the font, font size, etc. Next, set, if necessary, checkboxes “ Shadow" And " background” background, shadow and their (background and shadow) colors (tick “ Round” you can round the corners of the background), and the slider “ Opacity” the transparency of the inscription. And finally, using the mouse or the option “ Position” we set where this very inscription will be located. You can preview (by the way, any changes that we asked in the program) and see how our inscription will look like using a button with a leaflet and a magnifying glass (see screenshot above).

The penultimate tab, with the name “ water mark“, allows you to protect your photos with a so-called watermark, i.e. stick an image, say, of a logo. This is done by selecting, in fact, the image using a button with three dots and, again, by setting all sorts of options such as transparency, shadow, position, etc., which I described above.
Well, the last tab, “ Border“, will allow you to create a frame for your photos, and even, if necessary, so to speak, multifaceted. The setup is generally simple - just check the number of frame strips (Frame 1-2-3), set their thickness (Width parameter) and color (Color parameter) and, using the preview button, bring it to your ideal.

After completing all the settings, click the button “ OK” and, returning to the program window, once again making sure that you have set everything you need, feel free to click on “ Convert“. Then it remains only to wait for the conversion process, enjoying the numbers that indicate how much space is saved from each photo (last column called Save (KB)), and then go to the folder that you set as the save location (Output Folder) and look at the result.
Little results.
Here is such a tool for mass processing photos and saving free space
(I must say that sometimes it is possible to save whole gigabytes)