Currently, CDs are increasingly losing their former popularity, giving way to other types of storage media. It is not surprising that now users are increasingly practicing installing (and in case of emergency, loading) the OS from a USB drive. But to do this, you need to write the system image or installer onto the installation flash drive. Let's figure out how to do this in relation to Windows 7.
You cannot create a bootable USB drive using only the built-in tools of Windows 7. To do this, you will need special software designed to work with images. In addition, you will need to create backup copy systems or download Windows distribution 7 to install, depending on your goals. In addition, it should be said that by the beginning of all the manipulations that will be described below, the USB device must already be connected to the corresponding connector on the computer. Next, we will look at a detailed algorithm for creating an installation flash drive using various software.
Method 1: UltraISO
First, let's look at the algorithm of actions using the most popular application for creating bootable flash drives - UltraISO.
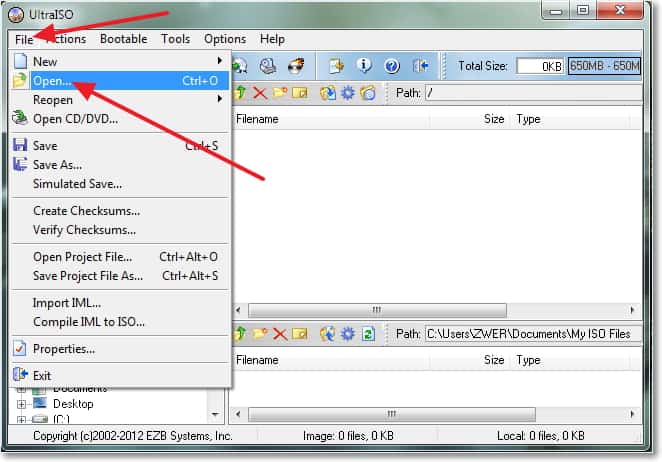
- Launch UltraISO. Then on the menu bar click "File" and from the drop-down list select "Open" or use instead Ctrl+O.
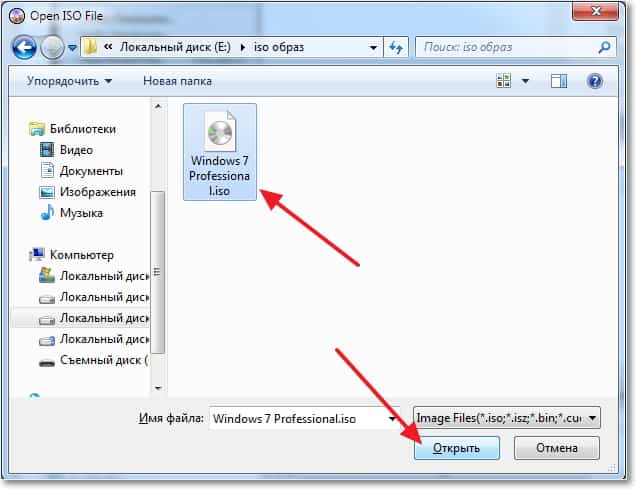
- A file selection window will open. You will need to go to the directory where the pre-prepared OS image in ISO format is located. Select this object and click "Open".
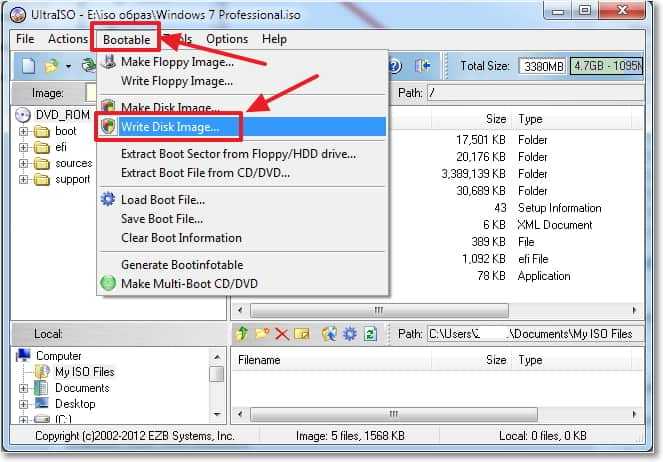
- After the contents of the image are displayed in the UltraISO window, click and select the position “Burn Hard Disk Image...”.
- The recording settings window will open. Here in the drop down list "Disk Drive" select the name of the flash drive on which you want to burn Windows. Among other media, it can be identified by the letter of the section or by its volume. First you need to format the media to remove all data from it and bring it to the required standard. To do this, click "Format".
- A formatting window will open. In the dropdown list « File system» select "FAT32". Also make sure that in the block for selecting the formatting method, the checkbox next to the option is checked "Fast". After completing these steps, click "Begin".
- A dialog box will open warning that performing the procedure will destroy all data on the media. In order to start formatting, you need to take note of the warning by clicking "OK".
- After this, the above procedure will start. Its completion will be indicated by the corresponding information in the window that appears. To close it, click "OK".
- Next click "Close" in the formatting window.
- Returning to the UltraISO recording settings window, from the drop-down list "Recording method" select "USB-HDD+". After that press "Record".
- Then a dialog box will appear where you again need to confirm your intentions by clicking "Yes".
- After this, the image recording procedure will begin operating system to a flash drive. You can monitor its dynamics using a green graphic indicator. Information about the stage of completion of the process in percentage and about the approximate time until its completion in minutes will also be displayed.
- After the procedure is completed, the following message will appear in the message area of the UltraISO window: “Recording complete!”. Now you can use a USB flash drive to install the OS on computer device or to boot a PC, depending on your purposes.


Method 2: Download Tool
Next, we will look at how to solve this problem using the Download Tool. Given software product not as popular as the previous one, but its advantage is that it was created by the same developer as the installed OS - Microsoft. In addition, it should be noted that it is less universal, that is, it is only suitable for creating bootable devices, while UltraISO can be used for many other purposes.
- After downloading, activate the installer file. In the utility installer welcome window that opens, click "Next".
- In the next window, to start installing the application directly, you need to click "Install".
- The application installation procedure will be performed.
- Once the process is complete, click to exit the installer. "Finish".
- After that on "Desktop" A shortcut to the utility will appear. To launch it, you need to click on it.
- A utility window will open. At the first stage, you need to specify the path to the file. To do this, click "Browse".
- A window will open "Open". Navigate to the directory where the OS image file is located, select it and click "Open".
- After displaying the path to the OS image in the field "Source file" click "Next".
- The next step requires you to select the type of media on which you plan to record. Since you need to create an installation flash drive, press the button "USB device".
- In the next window, from the drop-down list, select the name of the flash drive you want to record to. If it is not displayed in the list, then update the data by clicking on the button with the icon in the form of arrows forming a ring. This element is located to the right of the field. After your selection is made, click "Begin copying".
- The procedure for formatting the flash drive will start, during which all data will be deleted from it, and then automatic mode recording of the image of the selected OS starts. The progress of this procedure will be displayed graphically and as a percentage in the same window.
- After the procedure is completed, the indicator will move to the 100% mark, and below it the status will appear: "Backup completed". Now you can use the flash drive to boot the system.


Creation bootable flash drive UltraISO is the easiest way to record your Windows installation. And, perhaps, the fastest. Just a couple of minutes and you’re done (provided, of course, that you have a normal PC).
Before you start, you need to install the program. You can download it from the official website (link).
How can I create a bootable USB flash drive using UltraISO?
You just need to follow the following instructions:
- Launch the program (you need to run it as an administrator).
- Next you need to open the installation image Windows file, which you want to record. To do this, select File – Open (or you can press Ctrl + O).

- Specify the folder in which the Windows image is located, select it and click the “Open” button.

- If you did everything correctly, it should look like this:

- Now let's start recording. To do this, in the top menu you need to select the following items: Bootstrap – Burn image hard drive.

- Next, select your flash drive, leave the recording method the same – USB-HDD+ and press the “Record” button. IMPORTANT! This will delete all your data on the USB flash drive. Therefore, before performing step 6, it is recommended to save all files (for example, to a computer).

- Actually, the program will warn you about this. If you have saved all the data (or you do not need it), agree and click the “Yes” button.

- The recording can last from a couple of minutes to an hour (or even more). It depends on the power of your PC or laptop.
- After the recording is completed, the program will inform you that the process has been successfully completed.
If you do not have a Windows image, but have a licensed installation DVD, then you can make a bootable USB flash drive using it
To do this, in the 3rd step you need to indicate the path to the drive where the DVD is located by selecting the items: File - Open DVD.


Creating a bootable USB flash drive from a folder with files
Finally, there is another way to create a bootable USB flash drive in UltraISO. It is suitable if a licensed digital copy is already saved in a folder on your computer.
To write installation files to a USB flash drive, you must do the following:

After some time, the bootable USB flash drive will be ready.
P.S. If for some reason creating this bootable USB flash drive in UltraISO did not work (an error appeared or something else), try repeating the procedure, carefully following the instructions. As a last resort, you can always write it with another program - fortunately there are plenty of them.
Increasingly, USB drives are used to install or reinstall the operating system. They are not only easy to transport, but also more functional than CDs (for example, a netbook does not have a disk slot).
Sometimes during the process of installing new software, a driver error may occur: “The required driver for the optical drive was not found.” In this case, you should connect the flash card to a different slot. Usually this problem occurs among users of new PCs equipped with 2.0 and 3.0 USB ports. The newer port is not supported by Windows 7. You can identify it by its blue color.
We will tell you how to create a bootable Windows flash drive 7 in several ways.
What do we need to create a bootable USB flash drive?
To create a bootable USB flash drive, we need the following things:
- A disk with a recorded Windows 7 OS or its image.
- Empty flash drive, size 4 GB or more.
- Settings that make it possible to work with a flash card in the BIOS.
In case of absence boot disk The OS can be downloaded on the Internet. Use only trusted sites.
Format flash drive
As for the memory card, it must be completely cleaned. To do this, you need to resort to formatting. Save important files before starting this process. The formatting itself can be done both while recording the boot file, and before.
To clean the flash drive, connect the USB to your computer. In the My Computer folder right click Click on the icon of the desired removable disk with your mouse. Click "Format".
When specifying parameters, select the NTFS file system. You can also change the name of the removable drive (Volume Label). Other indicators should not be changed.

The flash drive can be formatted using the command line. To do this, write in it: format H:/FS:NTFS/Q/V:My_Fleshka and press Enter.
Selecting boot in BIOS
To select boot from a flash card, enter the BIOS. Typically this will be done by pressing Delete or F2.
First, you need to make sure that the USB controller is turned on. The status can be checked in the Integrated Peripherals tab. Opposite USB Controller and USB Controller 2.0 should be Enable.

Command line
Burning a bootable Windows 7 USB flash drive using command line- This is the simplest method, which does not require additional software downloads. However, you will need to enter a fairly large number of tasks.
Open the command line using the combination Win+R – cmd. Using Enter, enter the following tasks:
- Diskpart. This command allows you to manage objects via the command line.
- List disk. After entering this command, a list of disks will appear in front of you. Determine which one is your flash drive. As a rule, it is located after hard drives. In addition, you can recognize it by its memory size.
- Select disk #. Instead of #, write the number under which the flash drive is listed.
- Clean. Deletes all information from the selected media.
- Create partition primary. Creates a primary partition.
- Select partition 1. Select the created partition for further work with it.
- Active. Enabling a section.
- Format fs=NTFS . This command will format the flash drive on the required system.
- Assign. Will be created new disk. If necessary, you can assign a letter to it by adding letter=N.
- Exit.
- Next, simply transfer the OS files to removable media and you can get to work.
This method is complicated only by a large number of commands. You may have noticed that the process of formatting a flash drive is included in the description of the steps. If you have done this beforehand, simply omit these items.
Please note that the files you transfer to the flash drive must be unpacked. The program will not work if you just transfer the .iso file.
Ultra ISO
The utility is designed for developing and editing disk images. Making a bootable Windows 7 ultraiso USB flash drive is quite simple. To do this, you just need to download and install the program. You can purchase the full certified version or use the free trial mode.
Install the program on your PC using the Installation Wizard. As an administrator, launch the application by clicking Trial period. Next, follow this algorithm:

Windows 7 USB/DVD Download Tool
This application is located in public access and works on the ultraiso principle. It is offered by the official Microsoft developer. 
Go to the Start menu and launch the program. Find the image you need software. Click Browse, select a file and click Next.
A window will appear asking you about your preferred media - flash card or disk. Select USB Device.
Click Begin copying. If a pop-up window appears, select Erase USB Device – Yes.
When the process is completed, the flash drive can be used.
UNetBootin
The advantage of this program is that you can simply download and run it. No installation required. Creating a USB flash drive with Windows 7 takes place in one step.
In order to create a bootable USB flash drive with a specific operating system for subsequent installation on another device, we decided to use only a few programs. We will consider the use of programs from both third-party developers and those built into the operating system itself. Your task will be to determine the most convenient option for you, however, all the instructions and options have been tested by us, and if you follow them, you will be able to make a bootable USB flash drive from ISO. As you can already understand, each of the above methods will have its own specifics, but even if you have never had to deal with creating a bootable flash drive before, then by following the instructions you will be able to do it, the most important thing is to do everything in a certain sequence. Let's immediately look at all the options that can answer the question of how to make a bootable USB flash drive.
All options for creating a flash drive
Under the first option, we will consider creating a bootable flash drive with an operating system using the command line, which is available in every operating system. As a second option, we will consider a way to create a bootable flash drive using a third-party, but very well-known program - UltraISO. The third option is almost identical to the first, and here we will look at how to make a bootable Windows USB flash drive using the Windows7 USB/DVD Download Tool. In this article, we decided not to consider the option of how to create a bootable USB flash drive with an operating Linux system, but if you wish, you can easily find the relevant information on third-party resources.
Problem solution

So, now it’s worth going directly to all the options that answer the question of how to make a bootable USB flash drive. We decided to analyze all the options strictly in order, as we described them above.
How to make a bootable USB flash drive 7 via CMD

The first way you can create a bootable USB flash drive is through the command line, and now we'll look at what you need to do there. First of all, as a rule, you will be required to open the command line; to do this, go to the Start menu and find the command line in the tabs.
Working with your hands

After opening the command line, a black window will appear in front of you, and the word “Run” will be entered in it, respectively, you need to enter the new value “cmd” there and then press the “Enter” key. Subsequently, you will only need to use special commands, which are required to create a bootable USB flash drive. You should definitely follow all the steps according to the instructions and not miss anything, since even one missed step can harm your build, which you want to make bootable. You will now learn how to make a flash drive a boot disk. The first step is to write the word diskpart, with the help of it it will be launched special program, which can also be called an interpreter, only it will work, as you can already understand, in text mode. This program is aimed at convenient control objects, or rather objects include partitions, disks, volumes, and so on.
Entering special commands

After you have written the first word, you will need to write next list disk, with this query you will be able to see all the hard drives that are currently on your computer. Next, enter a new query - select disk 1, in this case the disk that is numbered 1 will be selected. Naturally, your task is to select exactly the disk under which your drive is displayed.
The next step is to enter the clean request - it is necessary in order to erase all data from removable media, however, you can understand this from the name itself. If you want to learn how to make an image of a bootable USB flash drive, then you will first need to completely clean your drive, so if there is any important information, you definitely need to copy it and transfer it directly to your computer. After selecting the required partition, or rather the flash drive, you need to enter the request - create partition primary. Using it, you can create a primary partition on which the new operating system will be installed, and the disk itself will be bootable.
Next, enter select partition 1 in the line, only instead of one you need to select the number under which yours is located removable storage, however, everything is probably clear here. Now we enter a new request called active, this is necessary to create active partition, because when the computer boots, the flash drive must be active.
Ask for cleaning

Now your task is to format the active drive, to do this, enter the request format fs=NTFS, your flash drive must be formatted in NTFS system. If you want to specify the name and letter of your future bootable flash drive, then the assign letter=T request will help you with this. Of course, it is completely optional to indicate the name and assign a letter to the new volume, so decide here at your own discretion. At this stage, the creation of a bootable flash drive ends, and in order to exit the Dispart program, you simply need to enter the Exit request. Now you know how to make a bootable USB flash drive using the command line, and if you follow all the steps indicated, then you will eventually have a full-fledged bootable USB flash drive that will be usable.
Moving
It is important to remember that you have not yet transferred all the data to a bootable USB flash drive, but transferring all the files to this system will be very simple, and of course you will need a boot disk to do this, although you can download a specific operating system using the Internet. By the way, there are currently a considerable number of excellent assemblies. If you plan to download the operating system using the Internet, then be sure to remember that all files on the flash drive must be in unpacked form, but under no circumstances add one boot file, which may have .iso permission, since in this case the installation of a new operating system will simply not begin. Naturally, in order for the download to begin, you will need to set the boot parameters in the BIOS system from primary device, or rather, set the parameters so that the download starts from your flash drive.
How to make a bootable XP flash drive using special software
So, now it’s worth moving on to the second method, or rather, now we will create a bootable flash drive with the operating system using multifunctional program UltraISO. If you have read the article up to this point, then you can learn how to make a bootable Ultraiso USB flash drive.
If you have previously encountered the above program, then you probably know what it is intended for, or rather, the purpose of the program is aimed at creating and editing disk images, and it is with the help of it that we will create a bootable USB flash drive. In order to create a new bootable USB flash drive, we will use some built-in parameters of the given program. First you will need to open the program itself, just first set the administrator parameters. If you don't have it yet installed program on your computer, then you can download it either from the official or from a third-party resource. I would like to immediately note that the program is not free, but still all the functions will be available to you in the demo version.
After you have logged into the program with administrator rights, you should go to the “File” tab and select the “Open” button there; Now you need to select the required operating system image. It doesn’t matter what operating system you want to load onto a flash drive, the most important thing is to do it correctly. Once you have found the file, you will need to select it and go to the special “Boot” menu, and then simply click record hard disk image. However, if you have previously used this program, then you should not have any problems at all, but still we will continue to solve the question of how to make a bootable Ultraiso flash drive.
Before recording

After the transition, you should see a pop-up window, and in it you will need to make sure that you have indeed selected the correct media on which you want to burn the image.
Naturally, your flash drive must be in USB-HDD+ mode; you can install a similar function directly in the program itself. Next, you just need to click on the “Record” button and wait a while for the files to be transferred. You should definitely see a prompt in which you will be asked to clean the removable drive; you definitely need to pre-format the flash drive, or rather, we simply agree to this prompt.
Cleaning
Formatting, as a rule, occurs quickly, although if you have not previously deleted the data from the flash drive being written, the formatting function may take a little longer, it all also depends on the parameters of the flash drive. Immediately after formatting, data recording should begin, or rather, an operating system image, which you can then launch in boot mode. Now you know two options on how to make a bootable USB flash drive. As for the third method, we will not consider it in detail, since it is based on the use of applications similar in function to Ultraiso. You can download any of these programs for free and then follow the instructions we provide.
That's what he told how to create a bootable USB flash drive with Windows 7 V Windows program 7 USB/DVD Download Tool. This is an official program from Microsoft and it seems to work quite well. But a comment appeared that it was impossible to create a bootable USB flash drive with this program. Maybe so, anything can happen, so I’ll write another way in which you can create a bootable USB flash drive with Windows 7. And this time we will use good program Ultra ISO, I have already written about her more than once on the blog, in various articles.
I think that there is no need to tell us why such a bootable flash drive will be useful to us; if you are reading this article, then most likely you are interested in the question of how to create it, and not why it is needed.
In this way, you can create a flash drive not only with Windows 7, but also Windows XP and Windows 8. Why, you can burn any image, any boot disk, for example Dr.Web LiveCD. Well, if you have already changed your mind about creating such a flash drive, then the image can be written to disk without any problems, I wrote about this in the article.
How to create a bootable USB flash drive with Windows 7?
We will need:
- UltraISO program. You can download it on the Internet in a couple of minutes, just type in search engine request “Download UltraISO”. After downloading, you need to install it. Installation is the most common, but if you don’t know how, then read the article. The program is paid, but when starting just select “Trial mode”. And if you want, you can buy it.
- A disk image with Windows 7, or any other image that you want to burn to a flash drive. This image must be in the format .iso, I hope you have already downloaded it.
- Flash drive size minimum 4 GB(this is for Windows 7, if you want to burn a small image, then 1 GB is enough). The flash drive will have to be formatted, and this will destroy all the files on it, so you need either a clean flash drive, or copy all the information from it to your computer in advance.
If everything is ready, then let's begin.
Launch the program Ultra ISO(there should be a shortcut on the desktop and in the start menu). I will show the example of the English version, since I had a problem with the Russian one, all menu items are displayed in an incomprehensible font. But there’s nothing wrong with that, everything is clear and so.
The program has opened, now we need to select the .iso image of the boot disk, in our case with Windows 7. Click “File” and select “Open”.
Find our image, select it and click “Open”.
Now our image is open in the UltraISO program, all that remains is to write it to a flash drive. Click and select “Write Disk Image...”.
A window will open in which we need to specify some settings. Look what's opposite “Write Method:”, the value was set to “USB-HDD+”. And opposite “Disk Drive” the flash drive we needed was selected.
Now we still need to format the flash drive and we can start recording. Click the button “Format”. Don’t look at the fact that I have a 1 GB flash drive, I just don’t have a larger capacity at hand. You must have a flash drive of at least 4 GB.

A small window will appear in which we will format our flash drive.
Formatting a flash drive will destroy all files on it. So save them to your computer in advance.
Only needed at point “File system” select NTFS, and click “Start”.

A warning will appear, click “Ok”.

 That's it, the flash drive is formatted. Closing the window “Format” by clicking on “Close”.