In this article, you will learn how to connect a TV to a computer via DNLA, through a home media server. After you set up a media server on your computer, you will have a home media network. Through it, you can transfer video from a computer to a TV, as well as other media content (photos, music) and play in real time. This approach to playing video and audio files on your TV will save you from having to download media content to a USB flash drive every time and will create the conditions for selecting the desired file on the TV panel.
How to connect a computer to a TV via DLNA.
It should be said that in order to create such a network between a computer and a TV, your TV panel must support the DLNA standard set. What is DLNA?
DLNA (Digital Living Network Alliance) - Living Digital Network Alliance) is a set of standards that enable wireless (Wi-Fi) and wired (Ethernet) networks to all compatible devices (laptop, tablet, mobile phone, game console, printer, camcorder…) transmit and receive photos, video and audio files for playback.
All famous brands such as Microsoft, Intel, Hewlett-Packard, Nokia, Samsung, LG, Sony… are members of this digital alliance, but Apple, together with BridgeCo, has developed its own AirPlay standard (technology and protocol), which is supported by devices from such manufacturers , like Bowers & Wilkins, iHome, Marantz, JBL. Therefore, if your TV or any other device is from Apple, then you will not be able to connect it to your existing DLNA network.
In one of the publications for Samsung TV owners, I already wrote about how to set up a media server through specialized programs from the developers of the same company. This is about . So, no jambs were noticed in the work of the PC Share Manager program, which cannot be said about the AllShare product. But most of the time it still works fine.
Numerous calls to the support service from different users did not give any results, and all as one received a very dry answer: "Our AllShare product does not work on a good half of the hosts." Well, let's leave them alone with their buggy "product" and use the universal alternative, the program Home media server(UPnP, DLNA, HTTP). It works with TVs from Samsung, LG, Philips, Sony, Toshiba. You can find more details about the features of the program on the official website.
Link a computer to a TV through a router for transmission multimedia files better with LAN cable () than wireless Wi-Fi connection(). Why? Of course, digital progress does not stand still, and with each new wireless standard Wi-Fi () increases the range of coverage, increases signal stability, increases data transfer speed ... All this is certainly relevant in our information age.
But in my opinion, for transferring multimedia files from a computer to a TV, it’s still better to use LAN cable. The fact is that a wired connection has only one minus - wires, and of the pluses one can note a high data transfer rate, low ping (response time), minimal interference ... Despite the fact that in wireless connection Wi-Fi connection stability and speed directly depends on the power of the antenna, the influence of interference and the presence of obstacles ().
Therefore, for comfortable viewing (without brakes and freezes) of video standards such as Full HD, Ultra HD ... it makes sense to connect a computer to a TV in a multimedia network using a LAN cable. But this is just my recommendation and you can do everything on your own. So, how to connect a TV to a computer via DLNA? First of all, make sure that you have a router set up and that you have a connection to your TV (read here and set up Wi-Fi).
Installing and configuring a DLNA home media server.
As you already understood, in order to create a network between a computer and a TV, you need to install a media server. Run the distribution kit of the program downloaded from the official site and proceed with the installation.
All you need to do is specify the installation path, check the "Create a shortcut" box and click on the "Install" button. The installation process will be quick, and upon completion, launch the program.
After starting the program, you will be prompted to familiarize yourself with the list of changes. Click the "Close" button and in a new window "Initial Settings" in the drop down menu "Devices from the list" select your device type. Depending on the type of media device you have selected in the field "Integrated file support" will display a comma-separated list of supported formats according to the documentation.


If your device supports any other types of formats that are not in the list offered by the program, then you can switch to "Arbitrary device" and in the field of extensions (movies, music, photos) add the required format separated by commas. Click the "Next" button.
In the next window "Catalogs of media resources" need to share, that is, do visible folders or local, network, removable drives for your device. Here you can also add your directory with media content (specify the path to it) by clicking on the "Add" button and remove the already suggested folders by the program.


Green dots indicate what type of media content is stored in this directory. As a rule, I open access to local and removable drives because it eliminates the need to upload and move files to specific directories. To do this, you need to tick off the necessary items and add your local drives. Click the "Finish" button. After that, the program will prompt you to scan media resources. Click the "Yes" button.
You can also add all local drives (or favorite directories) after installing the media server in the program settings on the Media Resources tab. To do this, click the "Add" button and select the local disk, and after "Scan". After that, the program interface will display the entire list of video files that are stored on your hard drive (see image below). Keep in mind that due to the large volume of media information scanned during server startup, the program will take longer to load.
So, decide for yourself how much media data will be available to the server. The less local disks (directories) are added, the faster the media server will start.
Go ahead. After the scan is completed, a window will appear. "Backup/Restore Program Data". Here, if you wish, you can specify a different path for the backup directory and configure automatic execution scheduled reservations. I'll leave everything as it is.


In field "Backup Directory" the path for saving and restoring program settings is displayed. After you click the "Run" button, the settings will be saved. That's it, click the "Close" button because all the basic settings have been completed and the computer-TV home network has been created.
I recommend you in the program settings on the tab "Additionally" Check the box "Install windows services Home Media Server (UPnP, DLNA, HTTP)" to have the media server run as a service. After that, confirm your changes by clicking the "OK" button.
To start your DLNA home media server, just click on the button in the top menu of the program "Run". Pick up the remote control and select your media server from the list.


Now you have your own network between your computer and TV. By the way, if you need to check your TV for dead pixels and, if possible, restore them, then more about this. And that's all I have for today. Bye!
2019-06-13T18:31:00+00:00
TV LG49sk8500 does not see my desktop computer in the connection manager. The laptop sees, but the PC does not. I even tried the LG Smart Share stock program, the same thing. MGTS provider.
2018-07-24T14:09:39+00:00
The home media server sees TV in the settings. TV still does not see the PC.
2018-07-24T13:34:17+00:00
Antivirus off.
2018-07-24T13:32:05+00:00
Good day! TV TCL 43P6US on Linux. The TV is connected to the Internet via a Wi-Fi router, but the TV does not see the computer. The media server program is installed, did everything as written, but all in vain. Please help me figure it out. Thank you.
2017-09-18T11:51:04+00:00
We searched for a very long time and found you. Everything was done according to the description, there is a list of channels, but the image is temporarily not available. Samsung TV connected via LAN
2016-12-19T22:25:42+00:00
Good night. Philips TV pfs7309 / 60, both video, photo, and IPTV are turned on from the TV. It's annoying that the TV doesn't show up in the DVR's playback device menu. I can’t figure out how to make it visible and run files from a computer and not from a TV set. There is a second Samsung TV, so everything is fine, it is displayed and you can run files from your computer. What's the salt???
2016-11-30T18:06:19+00:00
Try resetting your router to factory settings and reconnecting. If there is an updated software, then it may make sense to update the firmware. P.S. Let me know if it helped or not. OK.
2016-11-30T17:20:50+00:00
Good evening, the problem is the following, the TV loses connection with the server in 12-16 minutes after the start of viewing, the TV is Samsung UE55K6550AU, before that there was a Sony Bravia, there were no problems ...
2016-11-10T13:20:18+00:00
Dmitry, hello! Help, please, to understand. There is a laptop with a "Home Media Server", a Dlink 615 router and a Philips TV. The router and TV are connected by a patch cord. In this connection, everything works. I replaced the router with Xiaomi mi nano and the TV stopped seeing the server - it asks to start it. At the same time, through smart TV there is an Internet connection and the router sees the TV in the devices. Tell me what could be the reason?
2016-09-02T19:44:35+00:00
2016-09-02T06:42:11+00:00
It would be better if they talked about the LG SMART SHARY program. How to run it separately through LAN, so that it does not affect the Internet and works separately.
2016-08-26T12:06:37+00:00
What is wrong with this media server?
2016-08-26T11:48:26+00:00
Hello, and who will tell you the name of the official program from Philips, which allows you to connect to a computer via a Lan network?
2016-08-19T15:43:41+00:00
Most likely blocking the FireWall network. Disable it for a while and if everything is in order, then add HMS to the exceptions.
2016-08-19T13:04:01+00:00
Hello! Has anyone experienced setting up HMS on Samsung TV UE48H6400. I set up the server myself, and I see a TV in it. But from the TV itself it is impossible to see the network. I can’t find Allshare functions on it, and there is no media server in Source. Everything is connected to one router. What can be done in such a case?
2016-05-15T14:09:38+00:00
A lot depends on the network equipment. I hope the TV does not receive such "heavy" files via Wi-Fi. P.S. Please, describe in more detail the scheme for connecting the TV to the home network.
2016-05-12T22:43:38+00:00
Hello! I could not watch 4K videos through the media server. What is the reason? What to include? Through the flash drive it shows normally, but through the server, as a simple HD. TV LG 49UB-830V
2016-05-01T16:27:28+00:00
But I have it differently. The LAZY IPTV program is installed in the android, there is already a built-in DLNA, I can watch different channels on the LG TV
2016-02-21T19:23:31+00:00
Better is a loose concept. You justify why it is actually better. P.S. In freedom, I can test.
2016-02-18T17:41:10+00:00
Used this program, but found a better Twonky server
2016-02-11T22:24:55+00:00
I haven't encountered such problems yet. Alas! If only I wouldn’t advise anything and I don’t have a clear answer yet.
2016-02-11T22:18:12+00:00
Moreover, when you go through the prefix to HMS, the folders are fully displayed there (Actors, Genres, Media Resource Directories, etc., but when you go to the Media Resource Directories folder, it is empty
2016-02-11T22:16:15+00:00
Thanks for the link, but computers see each other and go to each other (even connected to different routers). The set-top box also sees both the HMS and Windos "ovsky server, but does not see the files in them. But the Home Media Server itself does not see the set-top box at all. And before that, I connected the TV itself in the same configuration, everything worked fine. I think there is a problem in the set-top box, but I can't figure out what.
2016-02-11T21:07:02+00:00
Scanned automatically set, the result is zero. In the HMS itself, no prefix is displayed in playback devices and there is no "play to" item.
2016-02-11T21:36:48+00:00
2016-02-07T21:39:27+00:00
On the "Scanning" tab, is there a checkmark in the "Auto Scan" box? Is the program added to the firewall or Windows firewall exceptions (depending on what you use for network filtering)?
2016-02-07T21:30:09+00:00
Try turning off encryption in wireless network. Also note if the devices are using the same IP address. P.S. If the IP devices are not tied to the MAC address, then I recommend doing this.
2016-02-07T16:43:20+00:00
Hello! Dmitriy. Media prefix DOM.RU, the media server is running on the computer, but does not display playback devices, the prefix itself sees the server (both HMS and standard windows(win 10) but the media folders are empty (files are not displayed). The network is configured as follows - the main router with an Internet connection (192.168.1.1), an additional router in another room with the address 192.168.1.30, a computer 192.168.1.40, a media set-top box 192.168.1.35. On routers ports did not register.
Previously, most users used the built-in shell in Windows to manage their media library: Windows Media center. In Windows 8, it could be installed additionally, and the 10th Windows version completely lost the ability to centrally manage multimedia content, not to mention the cuts in DVD playback in the G8.
At present, many Windows users store their library of media files on hard drives X personal computer and the vast majority of them would like to be able to manage their multimedia content and seamlessly play it on all devices on their home network, regardless of the audio and video formats of the collection. He gained particular popularity, which is one that provides rich multimedia functionality and Internet access. Modern "smart" TVs play most files from USB drives or from the Web, but let's talk about media players, which will become the main program for playing your media content on a familiar computer.
VLC: media playback out of the box
VLC is a free media player with rich features for playing video and music files without installing additional codec packs. This player also plays movies on physical media: DVD discs and Blu-ray without protection. The media player is also capable of decoding HD audio formats or bitstreaming them into . It also supports playback, just specify a playlist with a list of channels for it.
As my main media player for playing videos I use Alternative option – media player Classic Home Cinema (MPC-HC), which has the widest customization options and the richest functionality. To freely use this media player, you need to understand the filters, codecs and file formats, not to mention the numerous settings. For those who wish, I can advise an article for the correct codec package in the K-Lite Mega Codec Pack.
Kodi is the best media center

This media center is the best free shell to realize a multifunctional home entertainment center. The current version 15 of Kodi Isengard supports work not only on a stationary PC, but also on a Raspberry Pi mini-computer (versions 1 and 2) and Android devices. Kodi "eats" all file formats (except those used by Australopithecus), but its main advantage is the ability to combine various sources of media content into one. Read more about the features and settings of Kodi in. Thanks to various add-ons that you can install directly from the shell (they are stored in repositories), you can even organize your audio and movie library by getting file metadata from the Internet.
As an alternative to Kodi, I can recommend a similar PC-based media center solution for users with large media collections. The main advantage of the Plex media server over Kodi is the support for transcoding when using the client application on the playback device. By installing the media center on your computer, you can set up your media library: find movie descriptions, posters, ratings, and other data. Just like Kodi, Plex can sort TV shows into seasons and episodes and tidy up any music collection. It is worth noting that the Plex media center is a continuation of (the old name of Kodi) and has similar functionality. The Plex media center has well-implemented transcoding from one format to another, so the program will become a good media server and alternative. Great option to play your media library on smart TVs, and also supports Apple TV. The saddest moment in all this, advanced functionality is available only with the purchase of a license, but it free features and there are enough advantages to compete with Kodi.
PowerDVD and WinDVD: Best Players to Play Blu-ray on PC

Unlike the Kodi media center and the VLC player, which are distributed free of charge, the player costs 4300 rubles (PowerDVD 15 Pro version), and its counterpart WinDVD Pro 11 from Corel costs 6400 rubles. These media players are licensed to play protected Blu-ray movies. Many use the AnyDVD application, which removes protection, but this software is illegal.
I am very sorry to end support from ArcSoft in June 2014 - this media player was a great competitor to PowerDVD and WinDVD. I personally almost never use these players (I play ), but I have PowerDVD on the HTPC, and customers often ask for these solutions for use in multimedia centers. In my opinion, such prices are not justified, since apart from functions to improve the quality of the picture and sound, you will not find anything, and the need for their use is quite debatable. WinDVD and PowerDVD can be praised for their excellent interface with Russian language support and menu layout with a lot of picture and sound settings.
Devices for creating a home media center
Various set-top boxes on OC Android are an excellent alternative to the standard functionality of smart TVs. More about this is written in the article of the same name. Within the framework of this material, I will advise at least interesting devices for home media center.
Amazon Fire TV Stick- This set-top box runs on Android OS and easily connects to any TV in the HDMI socket, communicating with it via Wi-Fi. This gadget can be purchased with a pre-installed Kodi player at a price of 3000 rubles. The device has access to the Amazon app store and Netflix. The Fire TV Stick is a miniature version of the older Fire TV sister. Small dimensions and the ability to connect the HDMI module directly to the TV allow you to take the gadget with you. There are no complaints about the quality of streaming broadcasting. Only upsets limited set interfaces: there is no separate audio output, sound can only be transmitted via HDMI. By the way, there is no support for HD sound.
Enthusiast Mini PC

I envy today's schoolchildren who can dig into affordable gadgets of this kind. is a versatile mini-computer that can be used for various purposes when organizing a home network, up to. There is also a version of the Raspberry Pi 2 XBMC Media Center Kit that comes with a Kodi-based OSMC multimedia system for playing content from USB sticks. Given that the gadget is based on Linux, the Raspberry Pi 2 can also be used as a home server. Plus, the mini-computer supports DTS-HD-MA playback.
Home NAS
Potential buyers, without knowing it themselves, rarely encounter or pay attention to the possibility of using network attached storage (Network Attached Storage) in everyday life, as they consider its installation in an apartment or house to be unnecessary and unreasonable. Yes, you can save money and or order from the side, but if you are interested in a ready-made solution from manufacturers, then I recommend reading this material to the end to find out about the possibilities of using a NAS on a home network to optimize the process of playing a collection of media files with high level data storage security.
NAS: convert video files on the fly

For example, the Synology DS214Play is capable of converting videos as they are playing, allowing you to comfortably browse your media library on Smart TVs TV and iOS devices. It is worth noting that NASes do not have official support for the DTS format, but it is possible to install it separately: just download the “FFmpegWithDTS-evansport-1.0-0005.spk” file on the Internet and manually install it using the Synology Package Center.
The main feature of this model is the on-the-fly video transcoding function, but in practice, real work is usually limited to watching video in a browser and on iOS devices. Synology DS214Play supports the installation of two hard drives and supports the installation of a variety of software, it is also possible to use external drives with USB 3.0 and eSATA interfaces. Among the shortcomings, it is worth noting the noisy operation of the fan and the lack of HDMI.
Home server on the shelf of your media center

Qnap HS-251 is a network storage and playback device for your media library. This NAS comes with an HDMI port for connecting to your TV, and for dessert, it comes preloaded with a Kodi media center. It does not create noise, since the case is not equipped with a fan and two hard drives are placed inside. The device is quite expensive, the price without hard drives is 45,000 rubles. The disadvantage of a home server stems from the advantage - we pay for silence with rather strong heating, both of the device case and hard drives. Before I was able to use the device, I thought that my IPTV set-top box Cisco gets very hot 😉
UHD content: H.265 codec and 4K resolution
Those who have already purchased may not only be disappointed by the lack of UHD content. All the devices mentioned in the article cannot cope with video material in 4K resolution. The problem lies in the need to use a next generation codec - which is used to play 4K video, capable of providing better compression than H.264 with equal image quality. This also applies to older Smart TV models that do not have support for the corresponding hardware, that is, the processing power for H.265 playback. This disadvantage is solved by the organization of streaming video in 4K, but these services have not yet gained distribution. The first UHD Blu-ray player has already appeared on the market - it was Panasonic for 200,000 rubles, and 4K TVs support H.265 since the 2014 generation.
In this article, we will look at how to install your own DLNA server on Windows using the Home Media Server (HMS) program as an example.
Nowadays, it is increasingly required to have a DLNA server on the home network, since most modern TVs do not support data transfer protocols such as SMB or NFS, but only work via DLNA.
What is DLNA?
DLNA (English Digital Living Network Alliance) - a set of standards that allow compatible devices to transmit and receive various media content (images, music, video) over a home network, as well as display it in real time. That is - a technology for connecting home computers, mobile phones, laptops and consumer electronics into a single digital network. Devices that support the DLNA specification can, at the request of the user, be configured and networked in automatic mode. (Source - Wikipedia)
Installing DLNA Home Media Server (HMS)
The installation of HMS is very simple, but we will still explain in detail how it works.
First you need to download the installer. At the time of writing, the official website was down. And it didn’t work a month before, so below is a link to download from our server latest version HMS:
(47.2 MB)
Let's get started with the installation.
We start the installer:
Here we are prompted to select the directory in which the installation files will be unpacked. Select a directory and click the " Run". After unpacking, the installation will start automatically.
Attention: Unpacked files are not automatically deleted after installing the program, I advise you to delete them manually after the installation is completed
After unpacking, we automatically start installing the program:

There are not many settings here. In this window, you select the directory where the Home Media Server (HMS) program will be installed and "Program Group" - the name of the folder in the Start menu.
After selecting the installation folder and folder name in the Start menu, all that remains is to check the box “create a shortcut to launch the program on the desktop”, if necessary, and click the “ Install«.
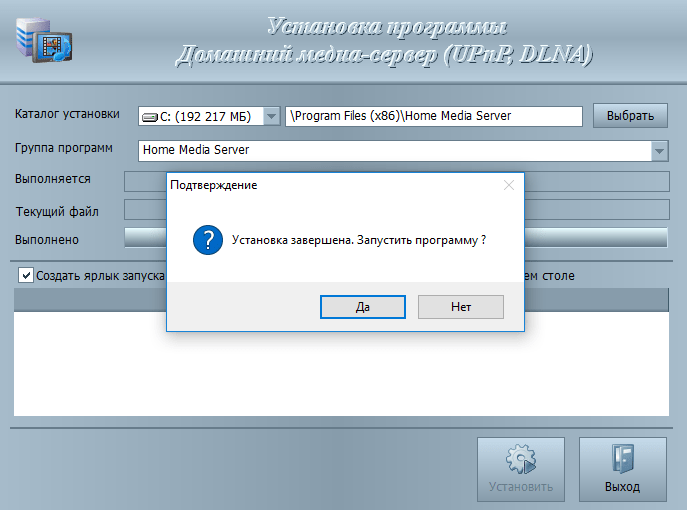
At the end of the installation, which takes less than a minute ( depends on your hardware), we are prompted to immediately launch the Home Media Server (HMS) program.
This completes the installation of the program.
Initial DLNA setting Home Media Server (HMS)
So, we have a freshly installed DLNA server, let's run it and see what it offers us to configure first, and also make a couple of useful settings. Let's get started.
After the first launch of the program, we see the first window initial settings.

In this window, we are prompted to select the device to which the media content will be broadcast. There are many templates in the list.

If you have not found your device or a device similar to yours, then you can leave the standard DLNA Device, as practice has shown, this does not greatly affect anything. Once selected, move on.

And then a choice of folders appears before our eyes, from which we will take media content. Folders with your media content can be selected now, or you can add them later. We'll take a look at how to do this below. After selecting the folders, click the " Ready«.

After the initial settings, we are prompted to do backup settings, image cache, database, set up an automatic backup schedule. Let's not dwell on this now and move on. To do this, press the button " close«.
After that, the main window of the program appears in front of us. Let's move on to a few "important" settings at once.
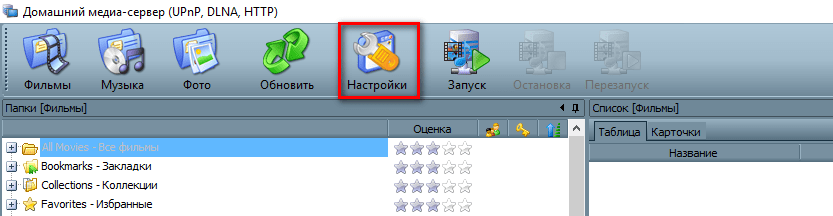
On the left are the types of settings, on the right are specific settings.

Let's jump straight into additional settings and configure the autoload of the DLNA server with the PC turned on.
To do this, select points 2 and 3.
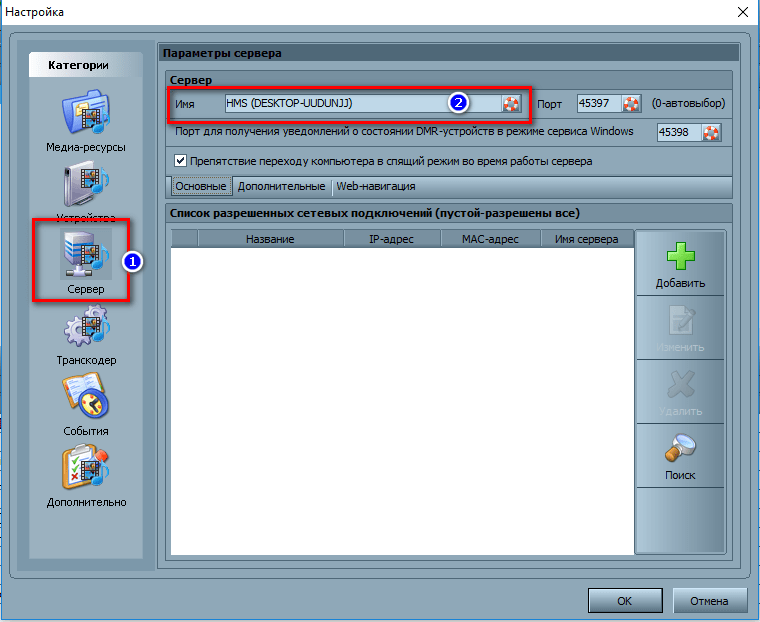
Now let's go to the tab " Server” and write down the name of our DLNA server. As we will see it online.

After changing the name, you need to add folders with media content (if you didn’t do this in the “initial setup or decided to add more folders. Everything is simple here. Press the button “ Add» (2) and select the folder you want to add. After that, it needs to Scan» (3) to get the files from the folder/folders to the server.

If you did everything right, then you should have your files on the right side (as in the screenshot highlighted in yellow).
If you have your files there, then we have quite a bit left. Launch and use. Everything is very simple here - press the button " Run«.
If you have "Windows Firewall" turned on, then the system will ask you whether to allow it access to the network. Choose which ones to allow access to and click " Allow access«.

Conclusion
We have installed the Home Media Server (HMS) program, or, to put it simply, we have set up a DLNA server on the Windows operating system.
It remains only to launch the playback device (TV, media set-top box, mobile phone, etc.) and check if our device is on the network and if it contains the files we need.
We hope this article has helped you. If something does not work out for you or you have questions - write comments, we will try to help.
Now, in the century mobile technology and gadgets, linking them within the home network seems to be a very convenient opportunity. For example, you can organize a DLNA server on your computer that will distribute video, music and other media content to your other devices. Let's see how you can create a similar point on a PC with Windows 7.
DLNA is a protocol that provides the ability to view media content (video, audio, etc.) with various devices in streaming mode, that is, without a complete download of the file. The main condition is that all devices must be connected to the same network and support the specified technology. Therefore, first of all, you need to create a home network, if you do not already have one. It can be organized using both wired and wireless connections.
Like most other tasks in Windows 7, you can organize a DLNA server using third-party software or limit yourself only to the capabilities of your own toolkit operating system. Next, we will consider various options creating such a distribution point in more detail.
Method 1: Home Media Server
The most popular third-party program for creating a DLNA server is HMS ("Home Media Server"). Next, we will study in detail how it can be used to solve the problem posed in this article.
- Run the downloaded Home Media Server setup file. The integrity of the distribution will be checked automatically. In field "Catalog" you can specify the address of the directory where it will be unpacked. However, here you can leave the default value. In this case, just click "Run".
- The distribution kit will be unpacked to the specified directory and immediately after that the program installation window will open automatically. In the field group "Installation directory" you can specify the disk partition and path to the folder where you want to install the program. By default, this is a separate subdirectory of the standard program installation directory on disk C. It is recommended that you do not change these settings unless absolutely necessary. In field "Group of programs" name will be displayed Home Media Server. It also makes no sense to change this name unnecessarily.
But opposite the parameter "Create desktop shortcut" You can check the box as it is unchecked by default. In this case, on "Desktop" the icon of the program will appear, which will further simplify its launch. Then press "Install".
- The program will be installed. After that, a dialog box will be displayed asking if you want to run the application right now. It should be pressed "Yes".
- The Home Media Server interface will open, as well as an additional initial settings shell. In its first window, the device type is indicated (by default, DLNA Device), port, types of supported files, and some other parameters. If you are not an advanced user, we advise you not to change anything, but simply click "Further".
- In the next window, the directories are assigned, in which the files available for distribution and the type of this content are located. By default, the following standard folders are open in the user's shared directory with the corresponding content type:
- Videos(movies, subdirectories);
- "Music"(music, subdirectories);
- Pictures(photo, subdirectories).
Wherein available type content is highlighted in green.
- If you want to distribute from a certain folder not only the type of content that is assigned to it by default, then in this case you only need to click on the corresponding white circle.
- It will change color to green. Now from this folder it will be possible to distribute the selected type of content.
- If you wish to connect new folder for distribution, in this case, click on the icon "Add" in the form of a green cross, which is located on the right side of the window.
- A window will open "Select directory" where you have to highlight that folder on your hard drive or external media with which you want to distribute media content, and then click OK.
- After that, the selected folder will be displayed in the list along with other directories. By clicking on the appropriate buttons, which will add or remove the green color, you can specify the type of content being distributed.
- If, on the contrary, you want to disable distribution in some directory, then in this case, select the appropriate folder and press the button "Delete".
- After that, a dialog box will open in which you should confirm your intention to delete the folder by clicking "Yes".
- The selected directory will be deleted. After you have configured all the folders that you intend to use for distribution and assigned a content type to them, click "Ready".
- A dialog box will open asking if you want to scan the media directories. Here you need to click "Yes".
- The above procedure will be performed.
- After the scan is completed, the program database will be created, and you will be required to click on the element "Close".
- Now, after the distribution settings are completed, you can start the server. To do this, click the icon "Launch" on the horizontal toolbar.
- It may then open a dialog box « Windows Firewall» where you will need to click "Allow Access", otherwise many important features programs will be blocked.
- After that, distribution will begin. You will be able to view available content from devices that are connected to the current network. If you need to turn off the server and stop distributing content, just click on the icon "Stop" on the Home Media Server toolbar.


Method 2: LG Smart Share
Unlike the previous program, the LG Smart Share application is designed to create a DLNA server on your computer that distributes content to devices manufactured by LG Corporation. That is, on the one hand, this is a more highly specialized program, but on the other hand, it allows you to achieve better tuning quality for a specific group of devices.
- Unpack the downloaded archive and run the installation file located in it.
- Welcome window will open "Install Wizard" in which you press "Further".
- Then a window will open with license agreement. To accept it, press "Yes".
- At the next stage, you can specify the program installation directory. The default is the directory LG Smart Share, which is located in the parent folder LG Software, located in the standard directory for placing programs for Windows 7. We recommend that you do not change these settings, but simply click "Further".
- After that, LG Smart Share will be installed, as well as all the necessary system components if they are not available.
- After the completion of this procedure, a window will appear informing you that the installation was successfully completed. Here you need to make some settings. First of all, pay attention to the fact that opposite the parameter "Enable all SmartShare data access services" there was a checkmark. If for some reason it is missing, then you need to set this mark.
- By default, content will be distributed from standard folders "Music", "Photos" And "Video". If you want to add a directory, then in this case press "Change".
- In the window that opens, select the desired folder and click OK.
- After the desired directory is displayed in the field "Install Wizard", press "Ready".
- Then a dialog box will open asking you to agree to use LG Smart Share system information by pressing OK.
- After that, access via the DLNA protocol will be activated.


Method 3: Windows 7 Native Toolkit
Now let's look at the algorithm for creating a DLNA server using Windows 7's own toolkit. In order to use this method, you must first organize a homegroup.
- click "Start" and go to point "Control Panel".
- In the block "Network and Internet" click on name "Setting options home group» .
- The homegroup editing shell opens. Click on the caption "Select media streaming options...".
- In the window that opens, click "Enable media streaming".
- Next, a shell opens, where in the area "Media Library Name" you need to enter an arbitrary name. The same window displays devices that are currently connected to the network. Make sure that among them there are no third-party equipment for which you do not want to distribute media content, and then click OK.
- Next, you return to the window for changing the settings of the home group. As you can see, the checkmark in front of the item "Streaming..." already installed. Check the boxes next to the names of those libraries from which you are going to distribute content over the network, and then click "Save Changes".
- As a result of the specified actions, a DLNA server will be created. You can connect to it from home network devices using the same password that you set when creating the homegroup. You can change it if you wish. To do this, you need to go back to your homegroup settings and click "Change password…".
- A window opens where you again need to click on the inscription "Change password", and then enter the desired passphrase to be used when connecting to the DLNA server.
- If the remote device does not support some of the content formats that you are distributing from your computer, then in this case you can use the standard Windows Media Player to play it. To do this, run the specified program and click on the control panel "Flow". In the menu that opens, go to .
- A dialog box will open where you need to confirm your action by clicking "Allow remote control...".
- Now you can view content remotely using Windows Media Player, which is hosted on a DLNA server, that is, on your desktop computer.


Main disadvantage this method is that owners of editions of Windows 7 "Starter" and "Home Basic" cannot use it. It can be used only by those users who have the edition " Home Premium" or higher. For the rest of the users, only options using third-party software remain available.
As you can see, creating a DLNA server on Windows 7 is not as difficult as it seems to many users. most convenient and fine tuning can be produced using for this purpose third party programs. In addition, a significant part of the work on adjusting the parameters in this case will be carried out automatically by the software without direct user intervention, which will greatly facilitate the process. But if you are against using third party applications unless absolutely necessary, then in this case it is quite possible to configure the DLNA server for distributing media content using only the operating system's own tools. Although the latter option is not available in all editions of Windows 7.
It's no secret that over time we accumulate a lot of all sorts of films, photographs, and the like, and all this is usually stored on a computer.
But it would not be bad to watch a movie that you just downloaded from the network on a large TV, and not on a PC screen, but for this you need to transfer this movie to a USB flash drive, or burn it to a disk.
In a word, a lot of unnecessary movement. But there are solutions, this is a multimedia server.
Don't be alarmed, it's not really a separate computer with hard drives. This is a program that performs strictly assigned tasks.
So let's look at several programs that can provide access to media content from other devices or programs.
Let's start with the theoretical basics of what DLNA and Smart Share are.
DLNA(in their own words) is a technology that allows devices that are connected to the same network and support DLNA technology to exchange media content (video, photos, music).
Now, almost all devices support DLNA technology: computers, TVs, smartphones, game consoles, etc.
Smart Share is a proprietary application (technology) of LG. If you can say so, then this is such a shell for working with DLNA.
Other TV manufacturers call these programs differently. Samsung has AllShare. SONY - VAIO Media Server.
And so, without a doubt, you can watch photos, movies, etc., that are on your computer or even smartphone on the TV.
But first you need to set up DLNA (Smart Share) between the PC and the TV. (The TV must be able to connect to the network)
What does it mean?
This means that both the TV and the computer must be connected to the same No matter how they are connected. (by Wi-Fi or cable)
And so you have a router, but there is no Wi-Fi on the TV. We can simply lay a network cable from the router to the TV.
Our router must be connected to the Internet and configured. Also, we need a network cable. We connect one end of the cable to the router, to the yellow connector.
On the TV, connect the other end of the cable to the network connector.
 And the router itself can be debugged from the knowledge gained in this article:
Next, we need to set up file distribution from the computer so that the TV can play videos from the desired folders, or show photos. We just need to open access for this. This can be done even with the standard Windows Media Player.
But there is a very good and absolutely free program " Home media server (UPnP, DLNA, HTTP)”, which is an excellent analogue of LG's Smart Share, or Samsung's AllShare for example.
And so, friends, a media server for a computer that will upgrade your TV and make it much more functional.
Home Media Server
 Home media server (UPnP, DLNA, HTTP) is a program that provides media resources (photos, audio and video files) of your computer to other UPnP (DLNA) devices on your home network.
For example, Philips, Sony, Samsung, LG, Toshiba TVs, game consoles Sony Playstation 3, XBOX 360, WD TV Live media players, Popcorn Hour, Dune, Boxee Box, IconBit, ASUS O!Play, iPad/iPhone/iPod, mobile and PDA devices.
The program includes various audio and video file transcoders that allow you to convert media resources into a format supported by the playback device.
It is also possible to convert the frame format of video files to the screen format of the playback device (the color of the add-on is set by the user), select an audio track, subtitles. You can choose to transcode from any minute.
The program includes transcoding profiles for VLC Media Player, you can redirect streams of Internet radio, Internet TV from your computer to your media devices.
The program supports Digital TV (C, S, T), you can redirect streams digital television from your computer to your media devices.
The program supports managing DMR (Digital Media Renderer) devices, you can use the "Play to" function for a single device and a group of devices.
This is a whole combine, the functionality of which knows no bounds.
The only negative will be the program's terrible interface, but since it is needed to play movies on a TV, this will not be a big problem. The program is absolutely free and is available only in the version for Windows.
First, we need to download and install the program itself. I recommend downloading from the official site: https://www.homemediaserver.ru/index.htm. There is always a new version!
After installation, launch the program with a shortcut on the desktop. Let's go to the program settings. We won't do anything special there. We will simply specify local drives, flash drives, external HDD and, or folders whose contents we want to see on the TV.
For example, you can only open a few folders containing movies, photos, and music.
 A window with settings will open. In the first category, Media Resources, we need to specify which drives or folders we want to see on the TV. By default, standard folders with photos, videos and music are open there.
The program tries to sort everything. And in order not to get confused in all these folders on the TV, I advise you to open general access to local drives. This means that you can open any file on the TV that is stored on these local drives(drives C, D, E, etc.).
You can also specify individual folders, or for example external hard disk. To do this, click on the Add button on the right, and select in the explorer desired folder, flash drive, or hard drive. These are the basic settings, click on the Ok button, and agree to scan media resources.
Further, you can already start the DLNA server itself. To do this, simply click on the "Start" button. Now, just turn on the TV. If everything is connected correctly, then it should appear in the "Home Media Server (UPnP, DLNA, HTTP)" program.
To do this, go to the Playback Devices (DMR) tab, and on the right, click the Refresh button.
VIDEO:
So Plex .
The most popular and, perhaps, quite convenient option. By running the server on a computer, you can manage it from a browser, set up a media library, add subtitles, and more.
Plex downloads all the information about the movie automatically and does it perfectly in most cases. The TV sees the Plex server without any problems and plays everything perfectly.
The disadvantage of Plex and other similar programs is that the TV does not see the subtitles embedded in the movie, but for me and I think for you this does not matter much.
Plex is free, but for additional features you have to buy a subscription.
https://plex.tv/
PS3 media server.
Initially, the PS3 Media Server was distributed as an add-on to the PlayStation 3, allowing you to play movies on your TV using the console.
Then the program began to live a separate life. Like the previous alternatives, it supports DLNA playback and doesn't require any setup fiddling.
http://www.ps3mediaserver.org/
Serviio, far from the most popular multimedia server. The app is free, but you can buy it for $25 PRO version, which allows access to your content from any network, not just your home network.
And this allows you to play content from the WEB (this function is given as an introduction and in free version). Serviio has apps for Android, but they act as a secondary control panel for the server side on the computer.
http://www.serviio.org/
Kodi or (XBMC)
XBMC was created to bring video playback to the Xbox. Then the project split off and now Kodi is one of the most popular media centers, supporting almost all platforms due to open source.
Kodi has apps for iOS and Android that allow you to use your smartphone as a remote control. The service lives on donations and is absolutely free.
http://kodi.tv/
Good luck Friends!