How to make a simple directional stereo microphone out of junk?
I have already described one design of a microphone designed for the DPC, but its operation revealed a number of shortcomings, which are described below. So I tried to make a better model.
The result is two different microphones, one mono and the other stereo.
The most interesting videos on Youtube
 |
 |
 |
 |
Prologue.
My first homemade microphone had a too uneven frequency response due to the resonance that occurs in the tube. In addition, it allowed recording only monophonic sound. It was decided to build a more perfect model of the microphone, but, as always, do without turning and milling.
In the course of reflection, several ideas came up for making a slot microphone tube without the use of machines, and even the tube itself.
Washer slit microphone tube.

The slot microphone tube can be made from large diameter washers. If two holes are drilled in each washer, then you can use two pins to assemble a multilayer sandwich, and adjust the size of the slots with small washers.
This idea, in my opinion, has only one significant drawback. In order to drill holes in each washer with sufficient accuracy, a small jig would have to be made.
Tube slot microphone from transistor clamps.

If instead of washers you use clamps from old-type transistors, then you won’t have to drill anything at all. It remains only to collect the tube.

The disadvantage of a pipe assembled from standard clamps from transistors of the type P213 ... P217 is a lot of weight. If you use duralumin clamps from transistors of the KT801 type, you can get a fairly light tube. True, it will be difficult to place two microphone capsules in such a tube at once, so for a stereo wet phone you will have to look for another solution.
Slit microphone tube made of metal tape.

The slit microphone tube can be made from a narrow metal tape by rolling it into a helix on a template of the desired diameter. Then the width of the slots can be adjusted by changing the pitch of the screw.
Based on these ideas, I made two microphones - monophonic and stereophonic.
This time I omitted some details regarding the assembly of microphones and the manufacture of parts, since I have already covered them in detail.
Slit microphone from clamps from transistors.
This is a drawing according to which a slit microphone was made from transistor clamps.

- Collar from transistors - duralumin.
- Nut - steel, M2.
- Grover washer - steel, M2.
- Hairpin - steel, M2.
- Gasket - cambric.
- Shielded cable - Ø2mm.
- Bushing - rubber Ø11mm.
- Body - medical syringe - 5g.
- The back wall is a medical syringe - 5g.
It turned out to be easy to assemble a microphone from clamps from transistors. Here's what was used for the build.

- Grover washer - steel, M2.
- Shielded cable with 3.5mm Jack connector.
- Helical spiral - solder Ø2mm.
- Velvet.
- Electret microphone capsule - Ø10x7mm.
- Clamp from transistors such as KT801, KT602, KT604.
- Medical syringe - 5 gr.
- Stud, nut - steel, M2 (studs were made from a bicycle spoke).

To do appearance more presentable, I wrapped the body of the microphone, made from a syringe, with heat shrink tubing. First I seated the front part, and at the end of the assembly I inserted the cover and seated the tail part.

Here's what happened.
Directional slit stereo microphone made of metal tape.
This is a drawing from which a directional stereo microphone was made from a metal tape.
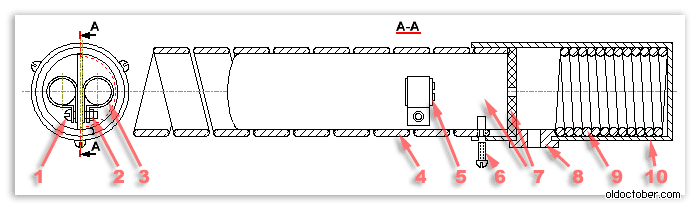
- Screw - M1.6x5.
- Nut - M1.6.
- Collar - steel, S0.3mm. (tin from a tin can).
- Tape - steel, S0.5x8x50mm.
- Screw - M1.6x5.
- Partition - medical syringe 20gr.
- Bushing through passage - rubber Ø11mm.
- Cargo - solder Ø2mm.
- Krpus - medical syringe 20gr.
Very few parts were needed for this microphone.

- Shielded mono cable - Ø2mm.
- Shielded stereo cable - Ø3mm.
- Screw - M1.6x5.
- Bushing through passage - rubber Ø11mm.
- Collar - steel, S0.3mm. (from a can).
- Screw, nut, washer - M1.6.
- Cargo - solder Ø2mm.
- Electret microphone capsule - Ø6x6mm.
- Syringe medical 20gr.
- Tape - steel, S0.5x8x50mm.
- Heat shrink tube – Ø8mm.

In order not to deal with painting, I covered the steel tape with heat shrink tubing, and then rolled it into a helical spiral pos. 1 on the body of a 10 gram syringe.
From the body of a 20-gram syringe, I made the microphone body pos.3, and the baffle pos.2 from the piston of the same syringe.
At this stage, you can drill three holes for attaching the tube to the body and cut the threads.

To reduce the length of the unshielded wires going to the microphone capsules, I extended the stereo cord with two small pieces of mono cord. The picture shows how it was done. Thick paper is used as insulation.

The microphone housing, as in the previous design, was covered with heat shrink tubing.

Another picture explaining the assembly order.

Here's what happened.
| Get the Flash Player to see this player. | ||
And here's how it works.
Small details.

When testing the first pair of microphone capsules, it turned out that their frequency response differed too much. In anticipation of the market day, I even assembled a small stand to test microphones without using soldering. I bought a few more capsules for $ 0.4, so that I had plenty to choose from. But, the very first pair taken from this purchase turned out to be consistent in frequency response. I didn't experiment anymore.
When conducting webinars on programming, one of my listeners complained about poor sound quality. I never thought about how important sound quality is.
After a quick googling, I realized that getting high-quality sound, for example, for podcasts, is a very difficult task that requires good, expensive equipment and good sound processing skills.
The question arose: is it possible to get acceptable sound from a budget microphone for webinars? As it turned out, yes. Below is a detailed guide on how it was done.
As the saying goes: every programmer is a bit of a carpenter at heart.
Formulation of the problem
I had a classic budget Genius microphone in stock. Here's one.
I believe that many of us have such a device. The microphone is normal for its price and tasks. Connected to sound Map Sound Blaster Audigy. But there are a number of serious drawbacks:
1. When the microphone is on the table, all keystrokes are heard while typing on the keyboard. And also any sounds of the table are transmitted through the base.
2. If the microphone is held not near the mouth, but as it should be on the table, the sound is as if the webinar is being held in the toilet or the “toilet” sound. Again, the microphone is inconvenient to hold in your hands and you need to somehow fix it near your mouth. If you take the microphone in your hands, and then put it, then the volume of the sound will walk. You can see it in the video below.
3. If you are not too lazy and take the microphone in your hands, then all explosive consonants (for example, “B” and “P”) will directly hit your ears.
How to solve these problems for a modest cheap microphone? We start looking.
If you look at how professionals solve these problems, it looks like this:
1. The transmission of sounds and vibrations to the microphone from the base is solved by hanging the microphone on various springs and suspensions. In general, if you look for a “suspension for a microphone”, then there are a lot of options. But in the simplest case it looks like this:

This is a classic vintage radio microphone.
2.
In order not to hold the microphone in your hands, there is such a thing as a pantograph. In fact, this is a bar from a lamp, at the end of which there is a microphone.

3. The third problem is solved by the so-called pop filter. In fact, this is a hoop in which a dense fabric is stretched, for example, from tights. There are also factory solutions.

This rag cuts explosive consonants, and the sound is softer.
All of the above products, incl. you can buy a professional microphone, but it’s more pleasant to do everything yourself. So let's show what we can do.
Sources
As a pantograph, it was decided to use a classic lamp from IKEA, which has served me faithfully for many, many years. The main goal was - not to affect the main functionality - to shine!
test lamp
As a pop filter, a hoop with an outer diameter of 90 mm was bought in a sewing store. It was very funny when an unshaven, two-meter man in camouflage, berets, windbreaker buys a hoop in a sewing store.

Hoop
And it was decided to make the suspension of the microphone on springs from a clamshell, which were bought at the nearest economic one.
10 and 20 mm plywood was chosen as the material for manufacturing. All production went on a jigsaw machine "Corvette 88".

Jigsaw machine "Corvette 88".
To be honest, I don’t understand why every house doesn’t have this thing. An indispensable thing in the household. Starting from the little things around the house, ending with the education of the child.
Plus, we need two more M6 bolts 40-50 mm long + two washers and a lamb for them, two M8x35 bolts, one lamb.
Result
Unfortunately, there will be no production photo guide. Therefore, I will show the result, and then we will analyze the finished product and see its drawings. The photos were taken in the workshop, but there is exactly the same lamp, and there is more light than in the room.
Front view

Assembly view

View from above
Among other things, provided the possibility of installation on the table as a stationary microphone.

desktop version

Back view
It so happened that I did it impromptu, almost on the go coming up with a design. Therefore, most of the drawings are made after fabrication.
Disassembly. Blueprints
Suddenly, someone has access to a laser or milling machine and wants to repeat this design. Especially for such a person, drawings with dimensions were made. It remains only to add them to your favorite drawing program.Main rack

Stand with base and pop filter removed

Back view

base stand
As you can see from the photo, the microphone had to be cut. To do this, you need to disassemble it, unsolder the microphone itself, insert it into the drilled hole, and only then solder and assemble it. The drawing of three parts is very simple. The base is held on simply by friction (the hole is made smaller than the protruding spike). He planted it with a hammer.


Pop Filter
A woman's stocking in a hoop was used as the fabric. The fingers are inserted simply by friction into the product. Mounted on a remote beam so that you can adjust the length.

The drawing is simple. But the inner diameter is determined by the hoop found.


Lamp mount
The most interesting detail is the mount to the lamp. It is made from 20mm plywood. The dimensions are chosen so that the lambs can rotate freely. I had to think about this detail.
From one

And the other side
As you can see, the bolt is pressed into a 10 mm piece of plywood, which is already glued to the base.

Mounting kit
It is curious that the diameter of the lamp is 63mm. Not a very convenient value. Therefore, I took an inner radius of 32 mm.
Another nuance: it is necessary that the sponges do not fit snugly against each other so that the lamp is captured. Therefore, after the product was made, 1-2 mm were removed from each sponge (in the drawing, the size is “1-2”).

Table base
It's so simple that I didn't even take measurements of it. For weighting, a 20 mm plywood disk, left over from the lamp attachment, is glued on top. Bolt pressed in from below.
Bottom

Top
For convenience, I give all the drawings on one sheet.

Total
Answering the question: why did I do this? Yes, it was stupidly interesting, and because I can! I thought for a long time how to screw the microphone to the lamp. And then it dispersed, and it turned out such a parsley.
Product in the work environment
I specially shot a video of how this microphone sounded and sounds now.
In this video, you can see for yourself the positive changes. I did not begin to demonstrate the sound of explosive consonants, let it be homework :) As for me, this is an excellent budget solution for direct hands and a couple of free evenings.
A microphone is a device that converts sound vibrations into electrical current. In sound transmission, the microphone is the primary link in sound reception. Microphone - useful device, which can be used to communicate on the Internet, as well as to record voice or sounds (instruments, special effects). However, high-quality microphones cost a lot of money, and cheap ones will not be able to provide sufficient sensitivity and quality.
In this article, we will tell you how to make a microphone suitable for daily use with your own hands.

What can you use a homemade microphone for?
Of course, making a condenser microphone for vocals or podcasts with your own hands is almost impossible - their device is too complicated, which can become a hindrance for a person who is poorly versed in electronics.

Electret microphones are much simpler in design and therefore more reliable. In addition, the small size and low cost of electret microphones allow them to be used almost anywhere where sound reception may be required.


Here is an easy way to make such a microphone with your own hands.
What will be needed?
- Electret capsule - you can pull it out of the old cell phone or radio tape recorders;
- Jack 3.5 plug for connecting a microphone to a computer;
- Microphone body - a cylinder from a syringe is well suited;
- Paper clip - for fixing the case and further attaching the microphone, for example, to clothing;
- Thin wire - cut off a small section 1-1.5 meters long;
- Black foam - a small piece to protect from the wind.

Manufacturing procedure
To make it easier for you to navigate, look on the Internet for photos of a homemade microphone or a standard electret microphone (“labeled”).
- To make a microphone body - you need to cut off the tip from the syringe body with a knife. You can erase the divisions on the syringe with a solvent;
- Insert a wire through the cone of the syringe and tie a knot at its end to secure the microphone in the body;
- Solder the electret capsule to the wire from the node side - connect the shielded braid to its body;
- Install the primer in the body, and fix the cone with the eye of a clerical clip;
- Solder the second end of the wire with the plug, additionally connecting the left and right channels together;
- In a piece of foam rubber, make a narrow round hole for the microphone. With a knife, you can cut off extra corners - this way you get a decent windproof cap.

That's it, your homemade microphone is ready! You managed to create a sensitive measuring microphone with your own hands, which is also well suited for communication.

DIY microphone stand
As a rule, expensive and high-quality microphones are bought for serious work or hobbies, whether it is professional sound recording, broadcasting or vocals.


In the vast majority of cases, for comfortable work and for the closest access to the sound source, you have to additionally purchase a special stand for such microphones. Now we will tell you how to make a desktop microphone stand at home.

What will be needed?
Lamp on the clamp - can be purchased at any electronics store. Attention: the mass of the lamp must correspond to the mass of your microphone, otherwise the microphone on a weak clamp will easily fall under its own weight.

The holder depends on the type of your microphone: for a dynamic microphone, a holder can be purchased at a price of 250 rubles, for a condenser (spider type) - at a price of 500 rubles.

It is possible to find and purchase an adapter for a microphone holder for easy installation on a clamp.

Manufacturing procedure
- Cut and pull out the lamp wire;
- Disassemble and remove the lamp shade;
- Attach the microphone mount to the thread to the pantograph of the lamp - due to a mismatch in the thread, you can only screw the microphone mount once;
- Attach the microphone holder to the mount;
- Install the microphone itself in the holder, fix the stand to the table.

Ready! Now you have a convenient adjustable microphone stand that can be easily attached to the table, and the clamp design allows you to screw a pop filter and other accessories to it.

DIY microphone photo


It’s very difficult to do without a computer microphone now, you can’t use voice search without it, you can’t chat with a friend via video link. However, not all computers have built-in microphones, moreover, they often do not have very good sensitivity. You can solve this problem quite simply - assemble the microphone yourself.
Scheme
The circuit is extremely simple, containing only two resistors, two capacitors, a transistor and an electret microphone capsule. The transistor can be used in almost any low-power n-p-n structures, for example, KT3102, BC547, BC337. An electret microphone can be obtained, for example, in a broken headset, telephone receiver, or you can buy it at a radio parts store. The sensitivity of the microphone will greatly depend on this element, so it is advisable to take a few and check which one is best suited. The advantage of this circuit is that it uses phantom power. Those. sound signal transmitted over the same wires as power. If you take a voltmeter and measure the voltage at the microphone input of the computer, there will be about 3-4 volts. When connecting the microphone circuit, this voltage should drop to a level of 0.6-0.7 volts, so an external power source is not needed and there will be no extra wires at the workplace.
Circuit Assembly
The circuit contains a minimum of details, so it can be assembled by surface mounting. But, adhering to tradition, I etched a miniature printed circuit board. Paths can be drawn even with a marker or nail polish. A few photos of the process:

Download board:
(downloads: 206)
A microphone capsule is soldered at one end of the board, and a shielded wire at the other. Please note that the wire must be with a screen, otherwise the microphone will be terribly phony. The braid of the wire is soldered to the minus, and the two inner cores are connected and soldered to the output of the circuit. Be sure to observe the polarity of the microphone capsule, otherwise the circuit will not work. One of his conclusions goes to minus, and the second to plus. Determining the polarity is very simple - you need to ring the conclusions with the metal case of the capsule. The terminal that connects to the body is negative.


Microphone Assembly
The board with soldered parts must be placed in a suitable case for ease of use. Because the board has a narrow elongated shape, then an ordinary ballpoint pen can be used as a case. To do this, you need to pull out the writing rod from it and check if the board fits in width. If the circuit is assembled by surface mounting, then it can be given any shape and there will be no problems with capacity. In addition to a pen, any elongated object will work well, whether it's a marker or a simple plastic tube.You can not only indulge in them with voice search on Google (there are a lot of extensions for the Chrome browser for this, they are almost all the same, they use the same thing, but it seemed to me the most convenient extension " Voice search 2.02 - in all input forms, a microphone icon appears by clicking on which you can say or dictate, or rather, for example, a search query as in the picture), but already with speech recognition somehow, but still work.
From Siri on Apple, I didn’t manage to achieve some kind of reciprocity, to the extent that it could be “used” for something serious, all the same, “imprisonment” under English language affects, and I already know the addresses of the nearest dumplings. In any case, Google remains the leader in speech recognition, voices, it's a pity there is no way to use it programmatically and in Russian.
So the main weak point of microphones is sensitivity, and then of course the price.
Here is an example of how you can get around these two restrictions and for very little money, and if you have the details listed below, then for free, get a fairly sensitive home-made microphone. A photo of how to do it yourself, a description of the work and a microphone diagram below.
Made by me homemade microphone has high sensitivity and is able to perceive even the ticking of the clock at a distance of several meters. It also allows you to record high-quality sound using a computer. The quality of the recording also depends on the capabilities sound card V system unit. In the design of the microphone unit, components of end-of-life electronics are used to the maximum.
An electret microphone can be taken from any old radio (in extreme cases, from mobile phone). I used two microphones at once (+), which made it possible to significantly expand the sound perception diagram. The signal from the microphones, amplified by a low-noise transistor VT1, is fed to operational amplifier DA1 (see drawing - microphone diagram). The amplifier output can be connected to ordinary headphones or fed further to signal recording and processing devices (desktop computer, laptop, etc.).
Drawing 1. Microphone diagram
The microphone amplifier is powered by the battery of any old mobile phone. Its battery life is tens of hours. You can use a free USB port on your computer to charge the battery. The amplifier can be left constantly connected to the port, since the charging current is small. I took the wire with the USB connector from the mouse. The connector at the output of the amplifier used 03.5 mm, - as for headphones - from any player, the volume control - too, and the rest of the details, including the SA1 power switch, - any small-sized ones.
All components should be placed on a small fiberglass board (photo 1 - above). I glued a small piece of foam rubber to the battery, and laid the board on top (photo 2). All this was well pulled off with electrical tape and tried on the regulator knob (photo 3). Then, to eliminate interference and interference, such a “sandwich” was placed in a tin screen, which was soldered to a common wire (photo 4, 5).
Microphones must be fixed in a piece of dense soft material. After that, in a piece of foam rubber (which, for example, is used for washing a car), I cut out a niche and inserted the entire block into it (photo b, 7), and pulled a fabric cover over it (photo 8). It is only necessary to provide slots for the plug, switch and volume control.
 1 PC. handmade felt homemade fabric flowers craft feltro…
14.05 rub.
Free shipping★★ ★★ ★★ ★★ ★★ (4.80) | Orders (268)