This article is about recovery
encrypted file system (efs) health, import
keys from the old user profile to
new system for accessing
encrypted information. To start
let's figure out what you can do to start
try a number of existing utilities for
of this work, the work produced in the article
requires certain knowledge and skills.
- Our favorite elcomsoft offers advanced
efs data recovery for 2K/XP for $99
available demo. - Our beloved Microsoft also has in its
arsenal recovery program
reccerts.exe, which can be obtained via
paid support service. - Well, unknown to us Passware offers efskey ,
which is said to be slower
aefsdr, but it costs exactly the same - 95 conditional
raccoons.
Let's get back to our sheep. Default names
efs in XP are colored green. When everything fails
keys are naturally lost, and when you open
file, an empty document is created with
error description. For example:
- notepad: cannot open the c:\documents and settings\foo\my
documents\report.txt - file: make sure a disk is in the drive you specified.
- wordpad: access to c:\docume~1\foo\mydocu~1\report.txt was denied.
The occurrence of such an error is usually
indicates that for all
users who had access to the file,
The wrong encryption key is being used.
There can be several reasons for this -
the most common is reinstallation
systems.
Recommended to everyone before the first
using efs to do the export
public and private keys, and
preferably on another medium (cipher /?) - these
keys are randomly generated upon creation and
when reinstalling the system
naturally do not repeat. Surprisingly, and
maybe on purpose, at the first
using efs no warnings
the valiant Microsoft does not give out and there is a real
the danger is to completely forget about it.
In 2K and XP, data on efs is here:
c:\documents and settings\user\application data\microsoft\crypto\ -
private key
c:\documents and settings\user\application data\microsoft\protect\ -
password entry to the private key
c:\documents and settings\user\application data\microsoft\systemcertificates\ -
public key. In general, not so
important.
Let's say the files are saved and you need them
use. To work with file
the system requires the same account with the same
computer number, which was originally.
You can find this data here:
c:\documents and settings\%username%\application data\microsoft\crypto\rsa\s-1-5-21-1078081533-
1606980848-854245398-1003
Computer number: 1078081533-1606980848-854245398
User number: 1003
In hex respectively: fd374240 f094c85f 16c0ea32 and 3eb.
Go to hklm\sam\sam\domains\account\users\%usernumbers% and
check if there is an account with this number in
system. If there is, then you need to find the name
user and create a profile with
original password. If not, create
before changing hklm\sam\sam\domains\account\f to
offset 48 to the required number, and add
it to the admin group. Next: in
hklm\sam\sam\domains\builtin\aliases\00000220\c change machine SID
to the original. We do the following and
here: hklm\sam\sam\domains\account\v. From hklm\software\microsoft\windows
nt\currentversion\profilelist\ export the key,
describing the car number with a suffix from
user number, change to
original numbers and import back.
Copy folders with keys to c:\documents and
settings\%username%\application data\microsoft\, rebooting...
and everything should work.
In the next part, we will consider the situation
where there are no key files.
Every time you decide to upgrade samsung galaxy S3 custom firmware, you can end up losing the data that is stored in internal memory. Unfortunately, not only ordinary data such as contacts, messages, call logs or applications can be destroyed, but also such as Internet settings or the EFS folder can be erased too. Thus, in order to avoid unpleasant situations, we will teach you how to do backup and restore EFS to Samsung Galaxy S3 with one-click method. As usual, this is all explained in a simple step-by-step guide, so let's get started.
Why do you need to do backup EFS? EFS stores the IMEI and allows the phone to establish an internet connection, so if this folder is deleted, the phone will no longer be able to use the internet connection. So, if you recently updated your Galaxy S3 and can't access the world wide web, then the EFS folder may have been destroyed. That's why you need to do it in advance so that you can easily restore it if necessary. For those who cannot do this, the only solution would be to install stock firmware or apply the official update released by Samsung suitable for S3.
There are many ways to learn how to backup EFS, today we will explain the one-click tool option. To do this, you need a computer running Windows and USB cable for the phone, as you will need to connect the S3 to the PC. In addition, this procedure requires root rights on the smartphone. If they are not there, then first you need to root the device and remove the factory restrictions. Keep in mind, rooting will automatically void the warranty. We recommend that you search through our Manuals section for a suitable step by step guide where you can find everything you need to know about getting root access. Then come back here and continue with the rest of the guide.
Remember that it is recommended that you back up all your data on your Galaxy S3 (before updating or making changes to the system), not just the EFS folders. It is important to keep your personal information safe as it is likely to be destroyed. For a complete backup, you can download SMS Backup & Restore for Android, Call Logs Backup & Restore, sync with Google to save contacts, or use a custom recovery image (such as CWM) to back up your current system.
Before completing all the steps, you must disable the security tools on your computer and phone, as these programs can interrupt the backup operation by stopping the “one-click” tool. Then enable the USB debugging option on the Galaxy S3 (this requirement is present in the steps below) and charge the smartphone battery so that it does not turn off right in the middle of the process.
Please note that this guide can and should only be applied to the Samsung Galaxy S3 and not to any other android device. This method was first developed and tested by the XDA developers, so we have to thank them for this opportunity. Now, finally, you can perform the appropriate actions. Read everything carefully. The process is simple and only takes a couple of minutes to complete, so let's get started.
How to Backup EFS on Samsung Galaxy S3 Using One-Click Method
- First of all, download Samsung Kies on your computer to install the appropriate drivers for Samsung Galaxy S3.
- Then download the EFS backup and restore application from here (search for download).
- You must have a .rar file.
- Unzip the archive.
- Galaxy S3 must have USB debugging enabled. Go to Settings -> Developer and make sure the USB debugging option is checked.
- Now, connect your device to your computer using a USB cable.
- Once the phone is connected, navigate to the folder where you extracted the downloaded file and click on the Backup EFS executable file.
- Complete all steps.
- EFS will be saved to the same folder in .img format.
- If you need to restore EFS, then you need to run Restore_EFS and follow all the steps again.
This was a one-click method that can easily back up and restore EFS on Samsung Galaxy S3. Now you can safely consider updating your phone with custom firmware as your data and EFS are in good hands.
If you often sew or sew for the first time your android smartphone or tablet manufacturer Samsung, then you need to take care of the safety of IMEI. In the article How to save and restore IMEI on Samsung, you will learn how to do it in 2 ways.
In order for you to be able to save or restore Samsung IMEI, you must have Root rights
(You can get Root in the section How to get Root)
Method #1 Save and Restore IMEI
1. Install on Android Device free android application terminal emulator
2. Go to this application and type commands:
dd if=dev/block/xxxxxx of=sdcard/efs.img
In order to repair imei:
dd if=/sdcard/efs.img of=/dev/block/xxxxxxx
Where xxxxxxx this is the name of the EFS block.
How to find out the name of the EFS block?
Go to the Android Terminal Emulator application and type the command:
mount
then find the section and its name (in my case, the name mmcblk0p1)

su
dd if=dev/block/mmcblk0p1 of=sdcard/efs.img
dd if=/sdcard/efs.img of=/dev/block/mmcblk0p1
Method number 2 Save and restore IMEI
That's all the detailed article backup and restore efs android is over, don't lose your IMEI!
Last updated: May 2, 2019.
EFS Data On A Samsung Galaxy Devices
EFS data is very important and if you are planning to make any modifications to your Android device, backing up your EFS data can protect you from the consequences of any inadvertent errors you might make.
What is EFS?
EFS is basically a system directory. It contains important information about the following:
- Wireless MAC address
- Baseband version
- product code
- System ID
- NV data.
EFS data can be corrupted when you install Custom ROMs so before doing so, it's usually a good idea to back it up.

Why might you lose EFS Data?
- If you manually downgrade or upgrade the official firmware. This is a problem that rarely occurs when installing OTA.
- You've installed a corrupt custom ROM, MOD or Kernel.
- There is a clash between an old and a new Kernel.
How to back up/restore EFS?
EFS Professional
This is a great tool that was created by XDA member LiquidPerfection to save and restore EFS data. It's very easy to work with and has the following features:
- Can automatically detect and terminate the Samsung Kies application upon startup.
- Allows you to backup and restore images in compressed archives (*.tar.gz format)
- Can detect backup archives automatically on either the phone or the PC, simplifying restoring.
- Has device filter support that allows for the display of important partitions for a variety of devices.
- Can extract and read a device's PIT file for efficient and accurate backup and restoration operations.
- Can check MD5 hash during backup and restore operations allowing for the verification of the integrity of data written.
- Gives you the option to format EFS so you can wipe all data and recreate the partition.
- Has Qualcomm device support which allows for many new features like backup and restore of FILL NV item range.
- Allows for the generation of IMEI in reversed HEX format which is useful for Qualcomm repairs
- Can read and write IMEI to and fro Qualcomm devices as well as QPST’QCN Backup’ files
- On Qualcomm devices: read/write/send SPC (Service Programming Code), can read/write Lock Code, can read ESN and MEID.
- When launching Qualcomm NV Tools, automatically detects and switches USB settings.
- Gives the option to display various device, ROM and BusyBox related info.
- Also Gives the option to restore NV data from internal ‘*.bak’ files to fix a corrupt or incorrect IMEI number.
- And Gives the option to repair NV data file ownership in order to fix ‘Unkown baseband’ and ‘No signal’ problems.
- Options such as NV Backup and NV Restore which can use Samsung's built in 'reboot no backup' and 'reboot no restore' functions.
- On newer devices, allows you to enable/driable ‘HiddenMenu’
- Allows you to launch PhoneUtil, UltraCfg and other built-in hidden device menus directly from application UI.

How can you use EFS Professional:
- First, download EFS Professional and extract it on the desktop.
- Connect a Galaxy Device to the PC. Make sure USB debugging is enabled on the device.
- As Administrator run EFS Professional.exe
- Click on EFS Professional.
- Another window will open and, once the device has been detected, this window will contain info on the device’s model number, firmware version, root and BusyBox version and others.
- Click on the Back-Up option.
- Click on Device Filter and from there, select your phone model.
- EFS Professional should now show you the System Partition where you can locate your info. Click Select All.
- Click on Back Up. EFS data will be backed-up on both the phone and the connected PC. The back-up created on the PC will be found in the EFS Professional folder located inside “EFSProBackup”. It will look like: “GT-xxxxxxx-xxxxx-xxxxxx.tar.gz”
Restore your EFS:
- Connect the device and the PC.
- Open EFS Professional.
- Click on the drop-down menu of “Restore Options” then select the Previous Backed-up file.
- You should be able to format the current corrupted EFS file.
- Click the Restore Button.
- kTool
This tool can be used to backup EFS Data as well and supports all Samsung Devices with the exception of Qualcomm-based LTE Device.

Before we begin, take note of the following features of kTool:
- Requires a rooted device.
- Will only work on the following:
- Galaxy S2
- Galaxy Note
- Galaxy Nexus
- Galaxy S3 (international I9300, not US variants)
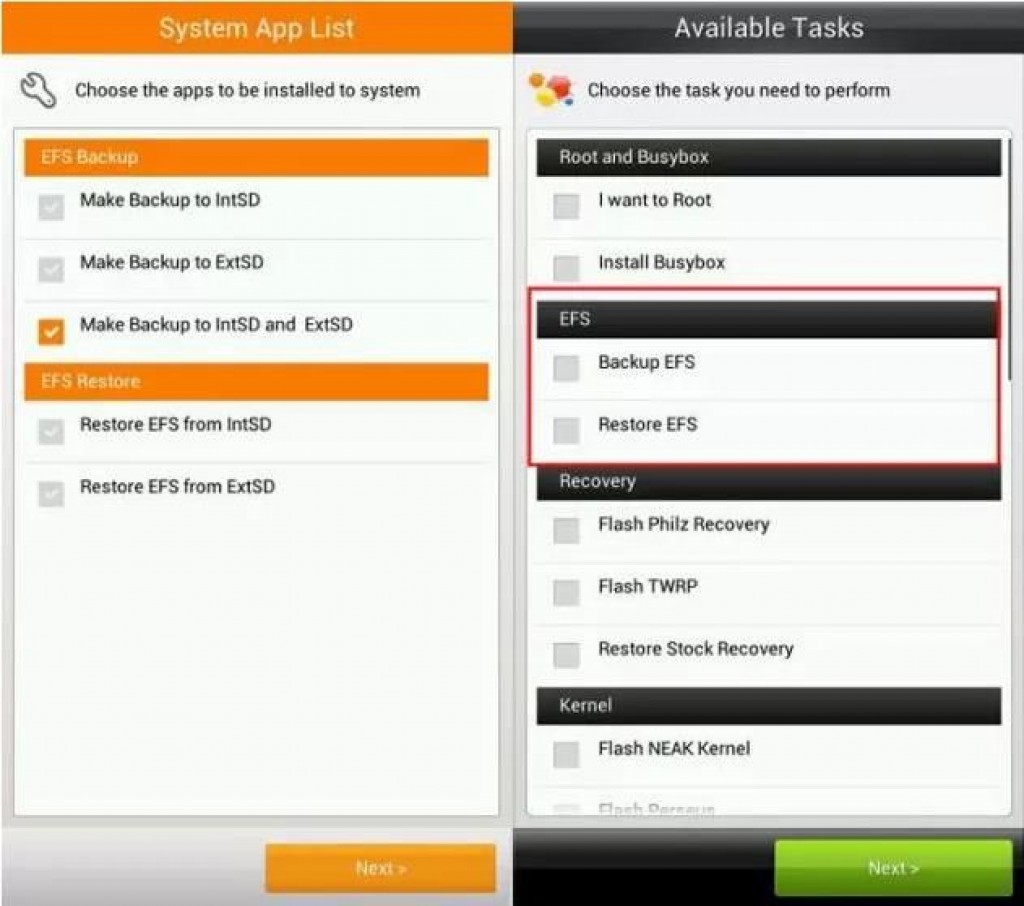
Aroma Installer
Download either of these files to get this too:
- 0.68_Release.zip
- Copy and paste the file you downloaded to the root of the device's SDcard.
- Boot into CWM recovery.
- In CM, select: Install zip>Choose zip from SDcard.
- Select the file you downloaded and select yes to let the installation proceed.
- You will then see the screen below.
terminal emulator
This tool can be used to backup the EFS data in devices that are rooted but do not have a custom recovery installed.

How To Use Terminal Emulator
- Download and install Android Terminal Emulator
- Open the app. If you are asked for SuperSU permission, grant it.
- When the Terminal appears, type the following commands according to what you want the tool to do:
- Backup EFS on Internal SD Card:
dd if=/dev/block/mmcblk0p3 of=/storage/sd card/efs.img bs=4096
- Backup EFS on External SD Card:
dd if=/dev/block/mmcblk0p3 of=/storage/extSdCard/efs.img bs=4096
If all went well, you should now find your data backed-up in either your internal or external SDcard.
As a final precaution, copy the EFS.img file on to a computer as well.
How-to resort EFS data using Terminal Emulator:
- Launch the app.
- Type either of the two commands below in the Terminal:
dd if=/storage/sdcard/efs.img of=/dev/block/mmcblk0p3 bs=4096
- Restore EFS on external SD Card:
dd if=/storage/extSdCard/efs.img of=/dev/block/mmcblk0p3 bs=4096
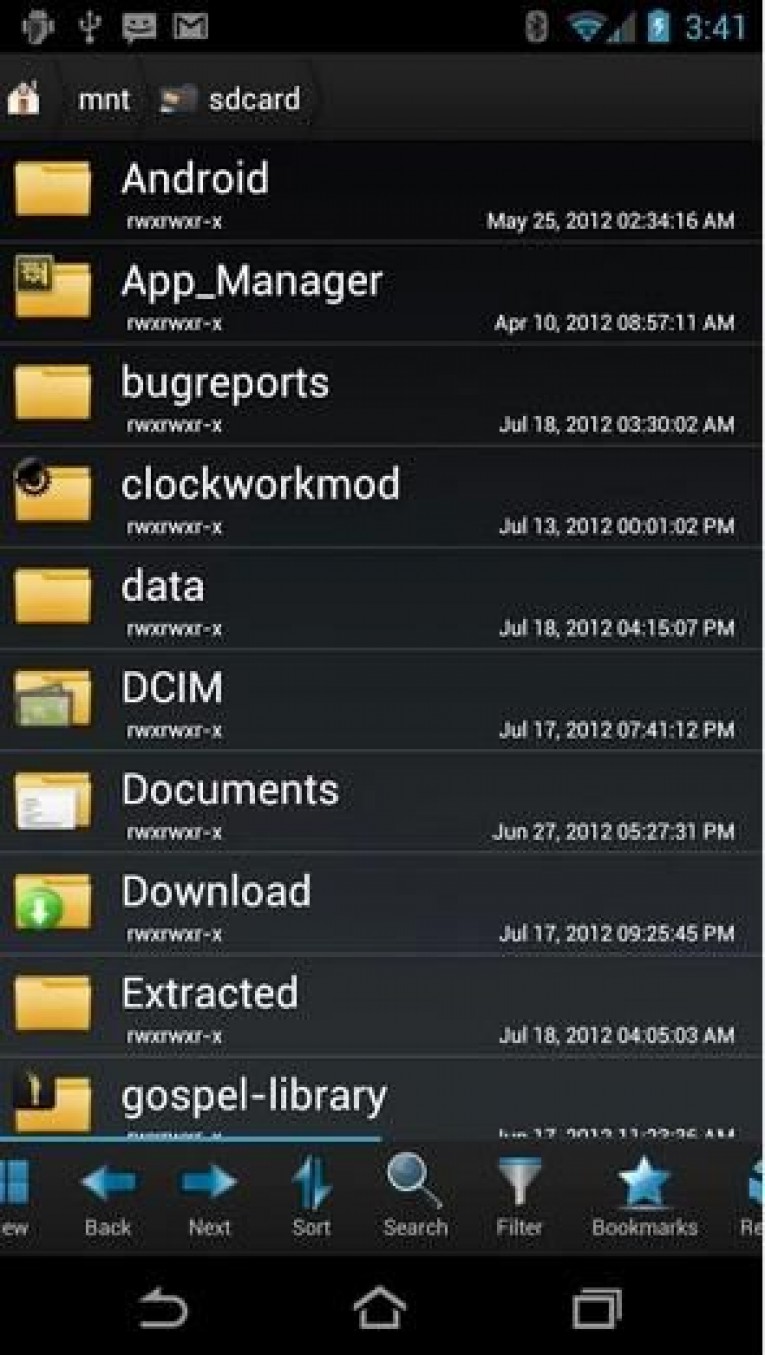
Note: If you find the Terminal Emulator is not working, try installing the Root Browser app. When it is installed, open the app and then go to dev/block directory. Copy the exact path of the EFS Data files and edit them accordingly: dd if=/dev/block/mmcblk0p3 of=/storage/sd card/efs.img bs=4096
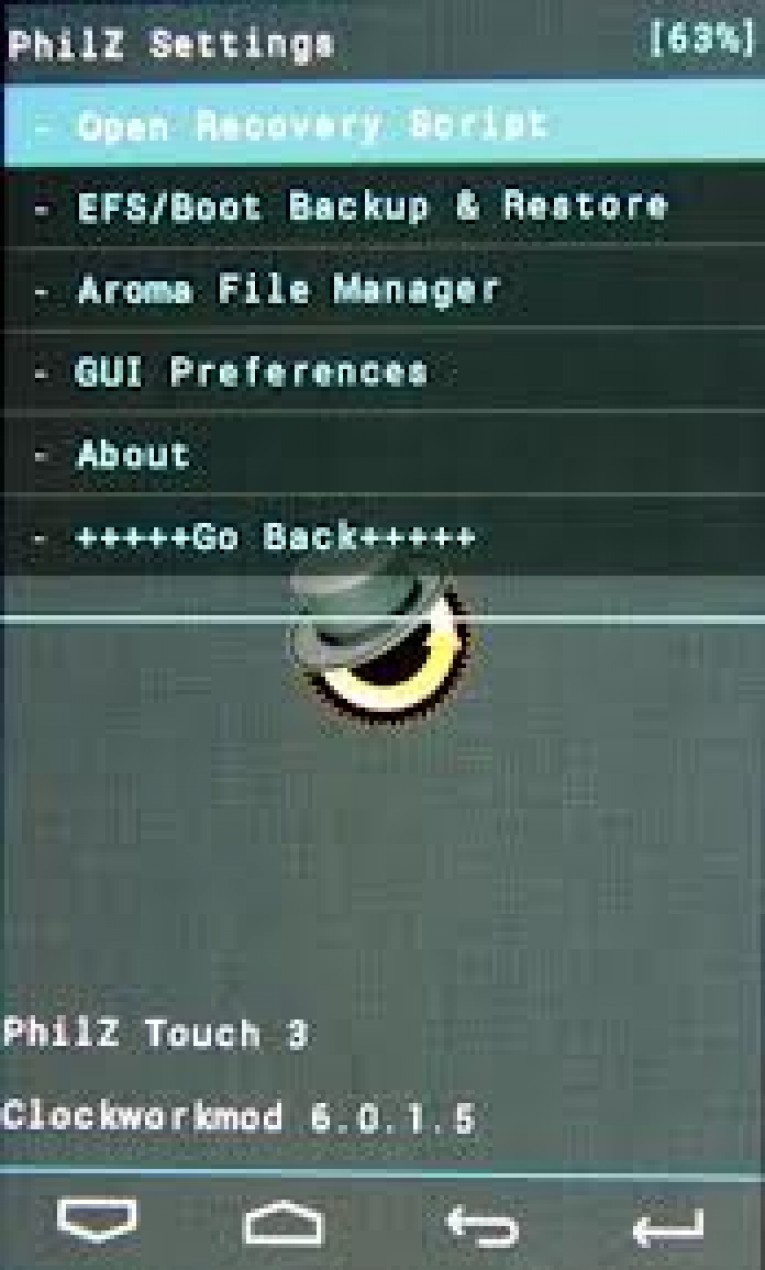
TWRP/CWM/Philz Recovery
If you have either of these three custom recovery's installed on your device, you can use them to back-up your EFS data.
- Turn off the device and boot it on into custom recovery by pressing and holding down on the volume, home and power buttons.
- Look for the create EFS data option.
Have you tried to back-up or restore your EFS data? What tool or method did you use?
Share your experience with us in the comments box below.
related posts

How To: Get Android 4.4.3 On Nexus 5 By Manually Installing It
Last updated: May 2, 2019.How to Update Nexus 5 A …
Smartphones of even the most reliable and trusted brands can be prone to breakage. And one of the most unpleasant when the phone's IMEI goes astray.
How to restore IMEI phone on "Android"
Sometimes situations arise when your favorite smartphone starts to fail and you, in order to save money, decide not to carry it to a service center (SC), but to start flashing the device yourself. But it also happens that the firmware is installed normally, and everything works, but you can’t call from the device. So, your IMEI has gone astray. What is it, and how to restore IMEI on "Android" after the firmware, we will analyze a little lower. But everything that you are going to do with your gadget, you do at your own peril and risk.
What is the phone's IMEI
IMEI is an abbreviation of the English term, which literally means International Mobile Equipment Identity. Simply put, this is a special code used to detect and identify a phone on a mobile network. Of course, not the entire phone, but just its radio module. Without this 15-digit number, the phone cannot receive or send calls. Finding IMEI is very easy. It is enough to dial the combination *#06# on the phone keypad, and it will be displayed on the screen. If instead of normal numbers you see some kind of "abracadabra", then your IMEI has fallen due to the "crooked" firmware or your inept actions. No problem. In most cases, IMEI can be restored. How to repair IMEI on Android smartphones various models, and is described in this article. The procedure depends on the specific manufacturer and the processor installed in the device.
Root rights
For some software ways your smartphone may need so-called root rights. They make it possible to change system settings phone at a deeper level, up to the removal system applications. Initially, the “superuser” mode is disabled in all smartphones, and if you decide to get it, you should remember that the current warranty (if any) will then become invalid.
Devices based on the MTK processor

Each manufacturer has in its arsenal devices based on MTK processors. If you have just such a device, then consider that you are very lucky. Because the question of how to restore IMEI to "Android" after firmware for MTK is not relevant. There, everything can be easily done with a few commands from the engineering menu. So what do we need to do?
Step-by-step instruction
Step 1. Enter the engineering menu code. The default is *#*#3646633#*#*. This code allows you to access the engineering menu of the phone, through which it is quite possible to delve into its previously inaccessible system functions. Including restore IMEI.
Step 2. Enter the command to restore IMEI. It's not all that simple here. Each manufacturer has its own code.
- ##8255## or ##4636## are replacement commands for Samsung.
- ##3424##, ##4636##, ##8255## - this is for HTC smartphones.
- ##7378423## - this character set is for Sony Xperia.
- ##3646633## - this command applies to smartphones from three manufacturers at once: Philips, Alcatel and Fly.
- ##2846579## - and this one will allow you to replace IMEI on Huawei devices.
Step 3. After entering the necessary commands, you must reboot the machine for the changes to take effect.
If after rebooting the phone started to search mobile network, found it and successfully registered on the network, then everything is done correctly. If not, then this method is not for you. There are some "problematic" smartphones with which such a focus will not work.
Repair IMEI on Samsung Galaxy S3

There are some "problem" devices on which there is protection against intrusion into the factory settings. Therefore, you can’t figure it out with such phones without “dancing with tambourines”. One of them is Samsung Galaxy S3. Restoring IMEI on it is a big problem. "More problematic" is only Apple's product called the iPhone. First, we need to download and install the EFS Professional program on the computer. It allows you to backup IMEI, as well as restore lost ones. But it can only restore from a backup. If you do not have it, then you have to do everything manually.
- We find the EFS folder in the system folder of the phone's firmware (attention, the phone must have root rights). Copy the contents of the folder to your computer.
- The EFS folder should contain the following files: , .nv_core.bak.md5. If they are in place, then we “roll back” to previous version firmware that was installed by default.
- After successful firmware, remove the .bak extension in the copied files and move them to the EFS folder located on the phone.
- Reboot device.
IMEI should be restored. If not, then your device has only one way - to the service center. You can't do anything with it on your own. Although the attempt is not torture. You can try to look for information on how to restore IMEI on "Android" after Samsung firmware Galaxy S3. It is very possible that there may be some other recovery methods.
Repair IMEI on Lenovo devices

In the devices of the glorious Chinese company Lenovo, there are also some problems with the restoration of IMEI, although not as serious as those of Samsung. Here the Chinese are ahead of the Koreans. For recovery, you need only one program called MobileUncleTools. It is free, you can find and download it without any difficulty. You can also use the Maui Meta 3G program. But MobileUncleTools is much more popular, so we will analyze the option with it. So, how to repair IMEI on a Lenovo Android smartphone?
- Install the MobileUncleTools program and all the necessary drivers for your device.
- We launch the program, press the Engineer Mode button, then MTK Engineer Mode and finally we find ourselves in engineering menu smartphone. It is very important that during all the manipulations the phone is not disconnected from the computer ahead of time!
- We write off Phone IMEI. To do this, open the back cover and take out the battery.
- We connect the phone to the computer, look for the CDS Information tab in the program, click Radio Information and Phone 1.
- IN command line program, enter the command AT + EGMR = 1.7, "imei", where imei is the phone's IMEI that you just wrote off.
- Click the Send button and wait.
- After successful completion reboot the device and check the IMEI.
As you can see, we did not have to puzzle over how to restore IMEI for a long time. Lenovo did not block access to file system their smartphones. For which they are honored and praised. In general, the MobileUncleTools program is suitable for all devices based on MTK processors. So if you didn’t succeed with the engineering codes from the first method, and you don’t know how to restore IMEI on Android after flashing, then you can try MobileUncleTools. This program should help. What's more, it's pretty easy to use. The main thing is to follow the instructions exactly, otherwise you can get a “brick” that you can’t revive on your own.
If everything is done correctly, then the device will please you for a certain number of years. But if not, then service center can't be avoided. Although few SCs agree to take on the repair of phones in the system of which someone has already “rummaged”, and if they do, they don’t really rack their brains and instead of restoring they simply change the entire motherboard. And this is completely different money.
Recovery on Explay smartphones
Now let's figure out how to restore the phone's IMEI from Explay. This Russian company has long been known in the mobile device market. Their devices combine high quality and attractive price. Here, almost everything is like the Chinese. In general, there are certain similarities between Lenovo and Explay smartphones. How to restore the IMEI of the device? Yes, just like a smartphone from Lenovo. Both companies use MTK processors. Therefore, you can use both the Lenovo method using the MobileUncleTools program, and the second method: using the original Maui Meta 3G program.
- Download and install Maui Meta 3G. Install the right drivers for the machine (if not installed).
- We start the program. In the Action tab, click the Open NVRAM Database File button and select a file called BPLGUInfoCustomAppSrcP_MT6582 from the previously downloaded firmware for your gadget.
- Then we press the Disconnect button, turn off the phone and connect it to the computer.
- Press the Download IMEI button and in the window that appears, enter the previously written-off IMEI without the last digit. She will show up later. Click Download To Flash and wait.
- At the end of the process, disconnect the device and start it. Check IMEI, and if everything is fine, close the program window.
As you can see, there is nothing complicated in the process of repairing IMEI on Explay smartphones. The process is in many ways similar to smartphones from Lenovo. Samsung alone was greedy to open its phone system to users. On the one hand, this is correct - there is less danger that the phone will be "killed" by those who, through negligence, got into its firmware. Perhaps this is exactly what Samsung was counting on. Restoring IMEI on it on your own is almost impossible. So you have to pay a tidy sum to specialists from the SC.
Recovery IMEI in "purebred Chinese"

First, we need to understand the term "purebred Chinese". This phrase is usually called cheap copies of expensive smartphones, assembled by hardworking Chinese from cheap components. Such a smartphone is distinguished by a “crooked” translation of the system into Russian, the presence unnecessary features. And in very frequent cases, smartphones have a TV receiver. Screens are usually non-capacitive. They have to be “poked” with something thin so that they work normally. But still, they sometimes install "Android", albeit rather "crooked". And this means that the question of how to restore IMEI on "Android" smartphones is also relevant for these crafts.
It should be noted separately - restoring the IMEI of a Chinese phone is not in Huawei or Lenovo, everything is much more complicated here. If in construction system folders“normal” smartphones have at least some logic, in this case it is completely absent. And the desired file is much easier to download from the Internet. But even if required firmware found for a smartphone, the difficulties do not end there.
The fact is that "gray" Chinese smartphones are connected to a computer using a USB cable. But to flash the phone, you need a cable with a completely different pinout! So you have to solder yourself. The correct wiring diagrams for a specific smartphone model can be found on specialized resources. After the firmware is found and the cable is unsoldered, the task is greatly simplified.
Now you can use the IMEI recovery method following the example of Explay and Lenovo smartphones. Oddly enough, the "purebred Chinese" also have MTK processors installed. So, download MobileUncleTools or Maui Meta 3G and follow the instructions for Lenovo and Explay. If the first method does not help, use the second. The percentage of success in restoring the IMEI of the Chinese, of course, is small, but in most cases these two methods can help bring the phone out of the "brick" state.
Generally, to avoid common problems It would be better not to buy such smartphones at all. But if this still happened, then in no case should you try to flash them yourself. Since then there will be a lot of problems with them. However, if this has already happened, then the IMEI repair method described in this article will help restore your phone to a working state.
Guarantee

It is also important to remember that if the phone has problems with IMEI, and the warranty has not yet expired, then it can and should be handed over for maintenance to a warranty service center. If this is not done, then after some software or hardware actions with the phone, the warranty may become invalid.
Conclusion

So, what have we learned about how to restore IMEI on Android smartphones? IMEI recovery is possible. The complexity of the process depends on the phone manufacturer. Samsung has serious problems with the ability self recovery IMEI. And smartphones from Lenovo and Explay are quite malleable in this regard. If you work hard enough, you can revive the gray chinese smartphone. The main thing is to follow the instructions exactly, and everything should work out.
Of course, this article is just a general guide. In some cases, you will have to turn to specialists from the service center, especially if, during some manipulations, the smartphone no longer turns on, and the emergency mode inscription is on the screen.
And finally advice. Whatever you do with your smartphone - always create a system backup. If you have a copy, then it will be much easier to restore IMEI after flashing.