A couple of days ago I installed the latest version of Android 7.1.1 revision 21 from Pure Nexus on my LG Nexus 5. All this time I was driving in the tail and in the mane. On at the moment I don't see any problems. The firmware is stable and works flawlessly.
The device began to work noticeably faster after Paranoid Android 6.0.1. Perhaps, of course, this is due to accelerated animations of the interface and service events. But the phone feels like a completely different device.
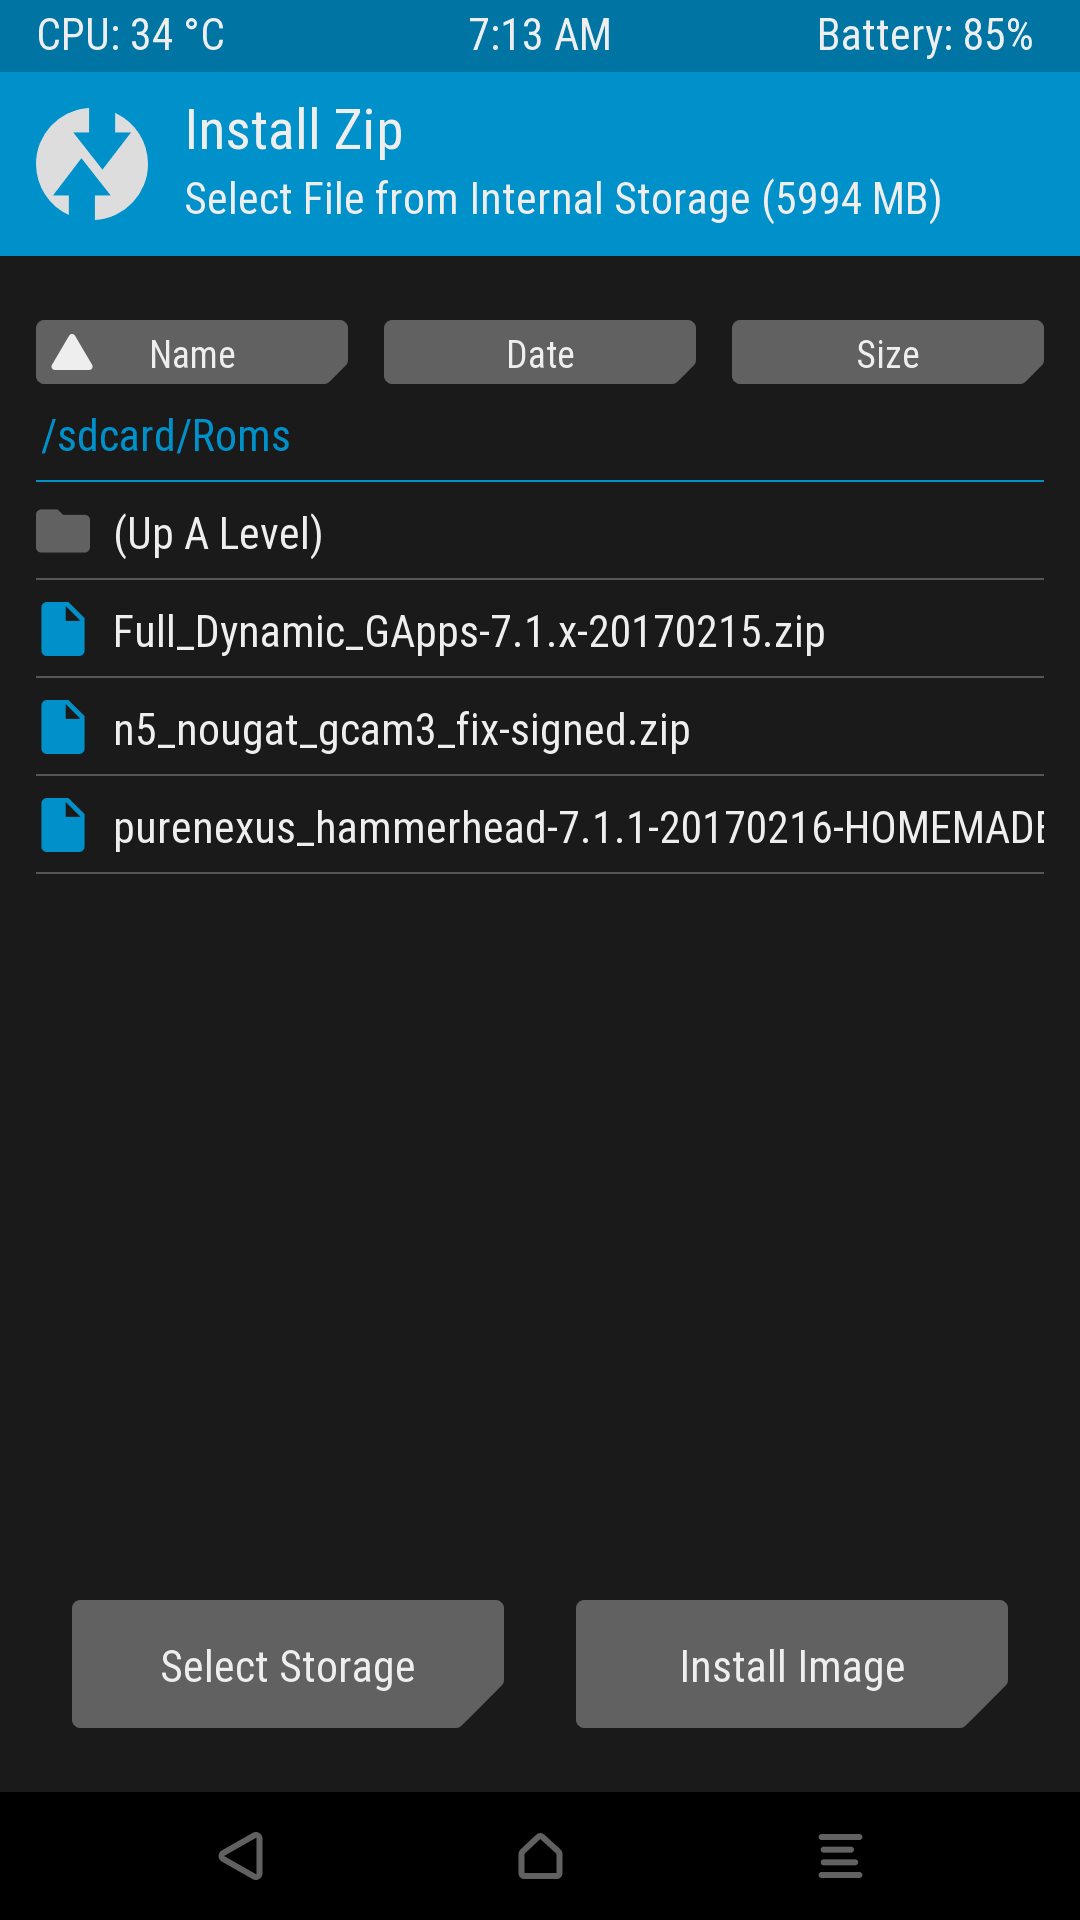
What is required for installation?
- Google Apps - Dynamic Gapps
With camera in latest version Google applications There was a problem with video recording, and the HRD+ mode was not functional at all. This fix rolls back the camera version to stable and blocks its further updating.
How to install the firmware?
Naturally, you should start by creating backup copy its current firmware. This stage helped me out when experimenting with the previous firmware revision No. 16. In the post on XDA there was attached a link to an incompatible version of Gapps, and the program initial setup The phone kept crashing. It was impossible to use the phone. So never neglect to create a backup copy of working firmware.
Initially, I downloaded the installation files into the ROMs folder in the phone's memory using ES File Explorer. You can, of course, select any folder you wish.
Installation steps:
- Backup systems- save system partition, data, cache and boot partition of the current working system (TWRP checkboxes: System, Data, Cache, Boot);
- Wipe systems- erase everything from the phone except the internal storage, where your files (photos, downloads, etc.) will remain;
- Installing ROM firmware- in TWRP go to the section Install, find the purenexus_hammerhead file, click Install Image, wait for the process to complete;
- Installing Google apps- similar to the previous paragraph only with the Full_Dynamic_GApps file;
- Rolling back the camera app to stable version- the same thing, but with the file n5_nougat_gcam3_fix-signed.zip

It's done! All the work took me about five minutes (except for the backup), TWRP worked quickly, without errors. The initial loading of Android lasts about three minutes, then loading and rebooting occurs very quickly - within 20-30 seconds.
After downloading, the Setup Wizard will launch, which will help you restore system settings from the cloud. Then, as usual, the long process of downloading applications that were installed earlier. And then you can enjoy your new Nexus 5 with the seventh Android on board.
Thank you, please.
It's all somehow connected

1. Preparation
To work, you need to download the necessary software (ADB/Fastboot) from the header.
Unpack the downloaded archive to any location convenient for you on your computer; in our example, we will consider the path C:\Nexus5, that is, let’s assume that the archive was unpacked to the root of drive C and its contents are in the Nexus5 folder.
You also need to download the current stock image from the header and unpack the contents of the archive into the same folder (where ADB/Fastboot is located).
All work is performed in the Command Prompt, to launch it - press the key combination Win + R, type cmd in the input window and press “Open” / Enter key, or find the command line in Start - All Programs (Applications) - Accessories (System) - Command line.
IN command line go to the folder with the necessary software with the command:
cd C:\Nexus5
Please note that if your working folder with the necessary software and firmware is located on another drive, for example, D, then the cd command to go to the required folder should be used with the /d key, i.e.:
cd /d D:\Nexus5
Install the drivers, the drivers are present in the usb_drivers folder in the archive you downloaded with the necessary software, and there is also a link in the header to the latest drivers from Google (Google USB Driver). Instructions for installing drivers are described here - Installing drivers on a PC
On the command line, run:
fastboot devices
If your smartphone appears in the list, it means you did everything right.
2. Unlocking the bootloader
If your bootloader was not unlocked before, or you blocked it back, then you need to unlock it to flash the firmware.
Run the command:
fastboot oem unlock
A message warning about bootloader unlocking will appear on the smartphone screen; use the volume buttons to select Yes and confirm the selection with the Power button.
3. Firmware stock image
Stock images from Google provide the possibility of flashing in two ways:
Method number 1 is a simple automatic method.
Turn off your smartphone.
Put your smartphone into bootloader/fastboot mode by simultaneously pressing the following buttons: Volume down + Power button (Volume down + Power) and connect it to the computer.
Run the flash-all.bat file from the folder where the necessary software and firmware image are unpacked.
Wait for the firmware process to complete.
After flashing the firmware, you need to do a wipe data/factory reset in recovery, to do this, in bootloader/fastboot mode, using the volume buttons, select the item Recovery Mode and confirm the selection with the Power button. When the Android robot icon appears on the screen, press the Volume Up button. In the recovery menu, run the command "Wipe data/factory data reset".
Restart your smartphone.
PS. When flashing the firmware, by running flash-all.bat, all data will be deleted, but this can be avoided if you open the flash-all.bat file using notepad, remove the -w, Save key in the last command.
Method No. 2 - manual step-by-step (file-by-file) method.
Turn off your smartphone.
Put your smartphone into bootloader/fastboot mode by simultaneously pressing the following buttons: Volume down + Power button (Volume down + Power) and connect it to the computer.
On the command line, execute the following commands in turn (for version 4.4.2 KOT49H):
fastboot flash bootloader bootloader-hammerhead-hhz11k.img
fastboot reboot-bootloader
fastboot flash radio radio-hammerhead-m8974a-1.0.25.0.23.img
fastboot reboot-bootloader
fastboot -w update image-hammerhead-kot49h.zip
After flashing the firmware, you need to do a wipe data/factory reset in recovery. To do this, in bootloader/fastboot mode, using the volume buttons, select Recovery Mode and confirm the selection with the Power button. When the Android robot icon appears on the screen, press the Volume Up button. In the recovery menu, run the command "Wipe data/factory data reset".
PS. If you remove the -w switch in the last command, then during the flashing process the partitions will not be completely reformatted, thus the user files will remain.
P.S.S. After installing the firmware, you may want to lock the bootloader back. This can be done, again, in bootloader/fastboot mode by running the command:
fastboot oem lock
The data will not be erased! Or, if you have received root rights, you can lock the bootloader directly from the system itself by installing the BootUnlocker program on your smartphone - an application for locking/unlocking the bootloader without reboots and without data loss.
This firmware version is for LG Nexus 5 contains several improvements, here are some of them:
● OS performance has been optimized. Games and applications will now run even more smoothly and quickly.
● The system's response speed to user actions has been improved, making the smartphone respond even faster to commands from its owner.
● Work has been done on software improvements sound driver. The sound has become clearer and more pleasant to the ear.
Nexus 5 firmware process
Installing drivers. First, download and install the drivers. Unpack them on your computer into the Nexus5 folder, which you need to create on drive C. By going to Device Manager in the Control Panel section, connect your smartphone to the computer via a cable. will appear unknown device, right-click on it to bring up a menu in which select “Update drivers”.

Specify the path to the drivers that you downloaded and unpacked to hard drive.
Unlocking the bootloader. You need to unpack all downloaded files into the Nexus5 folder on system disk, in the following path: C:\Nexus5
Be sure to check that all the necessary files are in place, i.e. in this folder.


Launch cmd application. In the command line, enter the following commands one by one, after each entry press Enter:
cd C:\Nexus5


fastboot oem unlock

At this stage, a question will appear on the display of your smartphone if you confirm the unlocking of the bootloader. You must agree by moving to “Yes” using the volume keys. To select this option, press the Power/Lock button.
The unlocking process will begin (about 30 seconds). When finished, enter the following command:
flash-all.bat
The process will be completed when the word “finished” appears at the very bottom. After this, the device should restart itself. If this does not happen, turn on the device yourself using the power button.
Sometimes there comes a turning point when the firmware gets boring and you want to sit on the “good old stock”. This instruction is also suitable for people who have experienced some technical problems and need to return the device under warranty (remove the hacking flag).
Instructions for installing stock firmware on Nexus 5
All your data will be deleted. If you want to save important information, then I recommend making a backup. Everything you do, you do at your own peril and risk. The author is not responsible for the “bricking” of your device.
Preparing to flash stock firmware on Nexus 5
- We charge the device to at least 70%.
- Download the drivers and unpack them into any folder.
- Installing drivers: “First you need to transfer your smartphone to Fastboot mode(Power +Volume down for 10 seconds when turned on). Then we go to the device manager -> RMB on our device -> properties -> driver -> update -> search for drivers on this computer -> select a driver from the list already installed drivers-> show all devices -> install from disk -> go to the folder with our drivers, select the file android_winusb.inf -> Ok -> Android ADB Interface -> Yes -> install.”
- Download ADB and Fastboot depending on the OS bit depth: , . Unpack the archive into any folder. It is necessary that there are no Russian letters and numbers along the way. I unzipped my folder to d:\ADB
- Download the file with the firmware.
Installing stock firmware on Nexus 5
- We put the Nexus 5 into Fastboot mode:
- Turn off the smartphone.
- Clamp Power button+ “Volume -“ for 10 seconds, fastboot starts
- Connecting the device to the computer
- Unpack the archive with the firmware into the ADB folder. It is necessary that you unpack not a folder into a folder, but rather the files that are in the archive with the firmware into the folder with ADB. If this point is not entirely clear, you can watch the video.
- We go to the folder with ADB (my ADB folder is located at the following path “D:\ADB”). And run the file flash-all.bat
We are waiting for the firmware to finish
If Nexus 5 is stuck in eternal loading
- Turn off the smartphone by holding the Power button for 10 seconds
- Press the Power + “Volume -” button, fastboot starts
- Go to Recovery Mode
- We see an android with exclamation point, hold down the Power button and volume “-“
- Select wipe data/factory reset and confirm the choice.
- And now we reboot the smartphone using the reboot system now item
- Enjoying the stock firmware
For those returning Nexus 5 under warranty
If you are going to return your smartphone under warranty, then you need to lock the Bootloader and reset the hacking flag, otherwise you will be denied warranty. This flag shows the unlocked service center whether the Bootloader has ever been unlocked.
Resetting the "jailbreak flag" and locking the bootloader on Nexus 5

If you unlock the bootloader again, then Device tampered will take effect again true.
The smartphone from Google and LG - Nexus 5 - is undoubtedly an interesting product. You can even loudly say that today this smartphone is truly the most worthy and high-quality of the entire Nexus line. We must give credit to LG for the work done. They were able to create good device for little money, which is a definite plus in the smartphone market.
Due to its popularity and streamlined design, the device receives all the latest updates from Google. What can I say? The smartphone turned out to be so successful that LG released an updated version of this device - Nexus 5X, changing only the hardware of the gadget (that is, they modernized it, making it completely modern and relevant). And the Nexus 5 works like a charm! But users often have a question: how to flash Nexus 5? Therefore, today we will devote ourselves to this problem.
Before talking about the firmware, it is worth mentioning what changes in the device’s hardware after the procedure. The essence of this “game” is to change operating system devices. What OS is pre-installed on the LG Nexus 5? That's right, Android. It is the version of Android that we will change today. For example, if you have KitKat 4.4, then you can install Lollipop or another available version on your phone using the official over-the-air device update.
What do you need to know before flashing?
First, you need to undergo some instruction before performing basic actions. In no case should we belittle these recommendations, because you can be left with nothing, that is, with a non-working smartphone. So, what do you need to know before flashing your favorite phone?

- The device must have a charge of at least 60-80 percent for uninterrupted use.
- Be sure to use only original components (USB cable, power supply, etc.).
- To download data (firmware, update software) you need an Internet connection with unlimited (unlimited) traffic. In principle, tariffs with limited traffic, if this does not cause you any inconvenience. If you are unsure about your tariff, be sure to check with your Internet provider.
- If you just need to update the software version of your Nexus 5 smartphone, then the following paragraph is at your service.
- If you want to install stock firmware using a computer, then go to the appropriate paragraph.
- If you are in doubt about the choice, then read all the instructions and choose the most suitable one.
- The main thing for you is to remember the following fact: you do all actions performed with the device at your own peril and risk. No one guarantees the correctness of flashing using third party programs(this does not apply to official software version updates). Therefore, it is better to think carefully about your decision several times, so as not to walk around with a “brick” rather than a Google Nexus phone
Updating the operating system version over the air
If you don’t know the meaning of “by air,” then we’ll tell you. This means that the update will be performed directly from the phone itself without the use of a computer or cords.

- First connect to an available wireless network Wi-Fi.
- Now go to the “Settings” menu and find the “About device” item. Here we will need a tab called “Software Update”. Click the Update button.
- If your smartphone says that updates have already been installed on your device, it means available firmware no for your device. That is, the latest available version of the operating system is installed.
- Otherwise, you need to agree to download the updates and wait for it to complete. When finished, click on the Install button. After this, your Nexus 5 will begin a system update, during which the device cannot be used. Do not turn off the phone under any circumstances, do not try to reboot it, or remove the battery - you may end up with a “brick,” that is, a completely inoperative device.
- Only when you see the familiar home screen and a message that you have successfully completed the firmware update procedure, can you use the device as usual.
Install stock firmware
Preparatory work
- Charge your smartphone to at least 70-80 percent.
- Download the drivers https://yadi.sk/d/tj4QEzxr34GU9C and extract them into new folder on a computer or laptop.
- Now you will need to install the downloaded drivers. To do this, we put the Nexus 5 into Fastboot mode as follows: turn off the device, and when turning it on, simultaneously hold down the Power button and the volume down key for ten seconds.

- By using USB cable connect to the computer.
- On a PC or laptop, go to the device manager and look for our smartphone there. Click on it right click mouse and launch its properties. In the window that appears, switch to the Driver tab and click on “Update”. Now the computer will ask you to select the update method, where you must select the driver from the list of installed ones. Next, we move along the following path: first “Show all devices”, then go to “Install from disk”. Now go to the folder created in the second step and find the android_winusb.inf file there and click OK. Next, we simply install the driver using the prompts in the pop-up windows.
- Now download ADB and Fastboot on your PC. Please note that these programs must be installed in accordance with the computer system bit size. That is, if you have Windows x32, then download the utility for x32/86. The situation is similar with Windows x. The downloaded archive needs to be unpacked into a new folder. Do not make Russian folders or subfolders under any circumstances. For example, the program path D:\Program\ADB is incorrect. It would be correct to do this: D:\Programms\ADB.
- Now download the stock firmware for your smartphone. The firmware files must be unpacked into the ADB folder, which should not contain other subfolders
At this point, the preparatory work is declared completed. Be sure to check that the instructions are followed correctly so that problems do not arise in the future. Next, let’s move on to the actual firmware process itself.
Flashing
- To begin, repeat the third point of the previous paragraph - switching the device to Fastboot mode.
- We connect the smartphone to the personal computer using a USB cable.
- The third step will be to launch the utility from the ADB folder (seventh paragraph of the previous paragraph) - the file is called flash-all.bat. All you have to do is wait until the device is flashed.
Problem Solving
Of course, it happens that not everyone is able to flash the firmware for the Nexus 5, or any other device, the first time. And often users have some problems. Most frequently asked question in such cases, it is an eternal reboot of the device. What to do?
- Turn off the power to the smartphone using the power button.
- Enter the phone into Fastboot mode (if you have forgotten how to do this, then return to the third point of the “Preparatory work” paragraph).
- So, now launch Recovery Mode, where you should see an Android icon with an exclamation mark. Press the power and volume down buttons again.

- In the menu that appears, we will need to select wipe data/factory reset. Reboot your device using reboot system now.
- Ready! You are amazing and have stock firmware on your smartphone.
Answers to some questions
Friends, let’s answer for ourselves some of the questions that most often arise among users even after successfully flashing the device.
- Will the official ones come? Google updates to the device “over the air”, if you return to the stock firmware? Yes, you will receive updates as expected.
- Will the official warranty for repairs be void? Of course, your warranty will not expire. However, to return the device to the store or official service center, then you will need to block the Bootloader and reset the hacking flag.
Let's sum it up
So, today we learned how to flash or reflash the LG Nexus 5 smartphone. We also looked at the solution to one of the most common problems - the device constantly rebooting. In addition, we have answered two frequently asked questions regarding stock firmware. Now you can consider yourself completely savvy in this matter. Good luck, dear friends! Don't forget to share your results in the comments.