Designers sometimes have to remove unnecessary elements from images: people, inscriptions, and so on. We tell you how to do it without ruining the image.
Removing the watermark with Photoshop
To remove copyright marks, select the desired area with the tool Lasso/Lasso Tool, then click on the selection right click mouse and select Fill. In the window that opens, it is important to set the fill type - it is this parameter that helps Photoshop to correctly complete the image.
fill Content-Aware- the easiest way to remove copyright
Removing the caption from the image
When deleting an inscription, it is important on what background it is placed. If the background is uniform, the easiest way is to paint over the excess using the tool Brush, which can be found in the toolbar on the left.
It is very easy to remove the inscription from a homogeneous background.
Another way is to select and fill the desired area, which we have already considered. Content-Aware.
How to remove the inscription using a simple fill
If neither one nor the other method worked, try removing the inscription using Healing Brush/Healing Brush, Stamp/Clone Stamp Tool or Patches / Patch Tool.
Healing Brush useful for correcting small areas. To use the tool, hold down the Alt key to select the area on the image that you want, and then paint over the text or other element.
Clone Stamp Tool works in a similar way, but is more convenient for larger areas.
Applying tool Patch/Patch Tool, you must first select the area that you want to paint over, and then move the cursor to the part of the image with which you want to replace the unwanted element.
Removing objects using tools Healing Brush, Clone Stamp Tool and Patch Tool
We remove the object
You can get rid of most of the extra objects using the same tools. For example, if you need to mask a homogeneous area - part of a lawn, mountain or beach, then you can simply copy a good section of the image, duplicate it, overlay it over an extra element, create a mask and go over it with a soft brush so that the boundaries of the built-in area are not noticeable.
Modern technologies greatly simplify the life of photography lovers. Even if the picture did not come out very well, using Photoshop programs you can retouch it on the computer and remove unwanted objects. WITH mobile application TouchRetouch and Bye Bye Camera make it even easier to edit and clean up photos - no need to use computer mouse, one finger is enough.
Modern smart algorithms allow you to improve a photo even after it is taken. But most of the methods involve the use of graphic editors, the development of which for many is a difficult task. And many simply do not have time to delve into the settings and capabilities of numerous tools. You can quickly apply some kind of filter, change the contrast of the image in a couple of movements, but retouching or removing details, or even people who accidentally get into the frame, will turn out to be much more difficult.
How to remove unwanted objects from a photo using TouchRetouch
1 . Open the app, click on Albums” and select a photo.
2 . Zoom in on the part of the image you want to remove.
3 . Press " Deleting objects» . The tool will open by default. Brush". In one motion, “paint over” an extra object. Press " Forward».
4 . On this stage the unwanted object should disappear from the photo. If you still have extra lines, erase them again. You can also click on the " Back”, return everything as it was, and try again.

Alternatively, you can use the " Lasso”, which also marks extra objects very accurately. " Quick edits" And "Remove Lines" act in a similar way.

Bye Bye Camera was created by Do Something Good to automatically remove people from photos. Special smart self-learning algorithms are used. When artificial intelligence analyzes the picture and detects the contours of the human body on it, the object is retouched, and the background is automatically drawn instead. This is how a photograph is obtained in which there are no people. This is very convenient, for example, when post-processing landscapes. Each of us has experienced a situation where beautiful view spoils a person accidentally caught in the frame.
The presented images clearly demonstrate the operation of the application - people really disappear from the frame, but at the same time there are some signs of their former presence in the picture.

For example, algorithms have not yet learned how to remove the shadow. Yes, and animals are badly retouched. So, if there is a dog in the hands of a person, then it will disappear along with the owner, but the creature standing next to the person will remain in the same place.

The background also affects the quality of retouching quite strongly. If it is motley, then the algorithm has to think out a lot of small details. Most likely, this will negatively affect the final result. But if the background is more or less complete, then after processing the photo, it will be difficult to notice signs of post-processing. Whether such a result is worth the asking price for the application is up to you.
In this tutorial, I will show you how to remove any object in a photo in a quality manner using several cloning techniques. You will learn how to use tools such as fill content-Aware(Subject to content), PatchTool(Patch), clonestampTool(stamp), and copy and paste photo fragments.
How to use Content-Aware Fill
Step 1
Open in Photoshop photo with a woman file- open(File - Open). I will work directly on the original photo, but you can copy it (Ctrl+J) and work on the duplicate.
Now we activate LassoTool(L) (Lasso). Check that the mode is active on the top panel NewSelection(New selection).

Step 2
With the help of Lasso create a selection around the woman.
This is what my selection looks like:

Then we go Edit-Fill(Editing - Fill) and in the settings select content-Aware(Subject to content).

When finished, click OK. Then press the key combination Ctrl + D to remove the selection, and look at the result.

How to use the Patch tool
Step 1
Next, we will remove the pointer on the wall using the tool PatchTool(J) (Patch). Activate it and check that the mode is selected NewSelection(New selection), Patch(Patch) set to Normal(Normal) and active Source(Source).

Now select the pointer with the mouse, as shown below.

Step 2
Without removing the selection, move the cursor to any area of the image that is suitable for overlapping. For example, I moved the selection to the right to an area suitable for cloning and released the mouse button. The Patch tool automatically clones the selected area and overlays the selection.
You can move the selection up, down, right or left and then release the mouse button.

As you can see, we removed two objects in the photo in just a few minutes using basic Photoshop tools:

How to use the stamp tool
Step 1
Open in Photoshop photo with the old man. Duplicate (Ctrl+J) the original layer and name the copy "Cut Object". By using PenTool(P) (Feather) select the man and add a layer mask layer-LayerMask- RevealAll(Layer - Layer Mask - Show All).

Next, we need to expand the selection, as I did in the background blur tutorial. Hold down the Ctrl key and left-click on the mask thumbnail in the layers panel to load the selection of the man. Select the original layer and go Select- Modify-Expand(Selection - Modification - Expand). In the window that opens, enter 5 pixels and click OK.

Now, to remove the man, apply a fill to him content-Aware(Content Aware) that we used at the beginning of the lesson.

We have the main object of the photo cut out on a separate layer, and we can continue to remove excess from the original layer.
Step 2
Activate clonestampTool(S) (Stamp) and check that the parameter sample(Sample) has been installed on CurrentandBelow(Active and below). This function will allow us to work on empty layer, while taking samples for cloning from the layer below.
Press Ctrl+Shift+N to create a new layer called "Clone". We place it above the original layer and start cloning the tile with the Stamp. To take a sample, hold down the Alt key and click on the area you want to clone, then brush over the area with the details you want to hide.

Below you can see my result with the bottom part finished:

Step 3
By using RectangularMarqueeTool(M) (Rectangular Selection) Select the top part of the door. Copy (Ctrl + C) the selected area and paste (Ctrl + V) it on a new layer.

With the help of free transformation (Ctrl + T) stretch the copied part down to the very base of the door. To do this, drag the bottom center anchor point.

Step 4
Add a mask to the door part layer and with a black brush (B) paint over the mask to remove the area that covered the handle in the original photo.

Non-destructive removal of any objects
Before continuing, I want to show you one trick that will allow you to clone an area without editing the original layer.
First, create a merged copy of all layers (Ctrl+Alt+Shift+E).

Above this copy, add a new layer and continue cloning on it, while we do not touch the original layer that we have left as backup. Just make sure that when working with Stamp in the options bar sample(Sample) has been installed on CurrentandBelow(Active and below) as it was in Step 2 so that we can sample for cloning from the layer below.

In the event that you want to return to work with those layers that are below the merged copy, simply delete this copy. In the next step, I will work on the merged copy to hide the rest of the motorcycle.

Step 5
We continue to remove the motorcycle.

We start from the back. We clone a part of the wall and block the trunk of the motorcycle.

We remove the central part of the motorcycle.
21.01.2017 27.01.2018
Hello dear visitors of the Pixelbox website!
Many of us have had to deal with a situation where a photograph, thought out in terms of composition and beautiful in terms of plot, is spoiled by an outsider, a bird, or the like unexpectedly wedged into the frame. What to do - throw away / delete the damaged photo? Of course not! In Photoshop, there are several tools that help you easily and simply remove an extra object in a photo.
1 way
How to remove an extra item using the Content-Aware Fill function
There is a photo from the sea, but everything is spoiled by the guy in the background, who, moreover, is standing with his back. Opening a photo in Photoshop (ctrl + O).
The easiest and easiest way to remove a guy from a photo (no crime, just photoshop magic!) is to use the function Content-Aware Fill. This feature appeared in Adobe versions Photoshop CS5 and peacefully migrated to the next versions of the program.
In order to take advantage Content-aware fill, you must first select the item you want to delete. You can do this in any way convenient for you, I used the tool Lasso (Lasso), tool call hotkey - L.

We circle the guy with the mouse “with a margin”, not back to back:

Go to the menu Editing-Fill (Edit-Fill):

In the window that appears, select WITHcontent-aware fill:

Naturally, we press OK and this is what we get:

To remove the selection that prevents us from admiring the beauties of the water, press ctrl + D:

Magic! Easy and fast! For those who are not looking for easy ways, I will tell you one more way to eliminate any unnecessary object from a photo.
2 way
How to remove an extra item using the tool Stamp (Clone Stamp Tool)
Tool Stamp (clone stamp Tool) allows you to mask unnecessary objects in the photo, replacing the area with a defect with the desired area that you choose. hot key tool call - S.

Top settings panel tool, you can choose on which layer the cloning will occur - on the active, on the active and below, or on all layers. If you choose the first option, on the active layer remember - all changes will occur on the main layer. I do not recommend using such a destructive photo editing method, it is better to create a layer on top of the main one and select "on active and below"- in this case, you can always correct the layer with cloning.
Create a new layer (click on the icon for creating a new layer in layers palette):

Make this layer active:

And holding down the key alt, take the site next to the guy, release the key alt transfer this plot to the guy, and to “attach” the plot in the right place, click left mouse button.

So gradually, taking the areas that are near the object to be removed, we paint over the guy:

I hope the lesson was useful to you and will help you create high-quality and beautiful photos!
Quite often beautiful and high quality photos spoiled due to various little things in the background. Of course, you can download the photos to your computer and edit them in graphics editor, but there is not always time and energy for this. But if those photos are on your iPhone, iPad, or iPod Touch, then you can edit them on your device using a useful application from Adva-Soft - .
The principle of operation is very similar to the function retouch in iPhoto, which we wrote about in . The application interface does not shine with uniqueness, but it is still quite well drawn.

In the main menu of the program, you can watch 2 training videos. We recommend that you carefully read them in order to clearly understand the principle of the program.
allows you to edit images from the media library or received from the camera, to do this, click the corresponding button.
Once you've uploaded a photo, you can start editing it.
The toolbar consists of:
- Lasso - selection of an area using the "lasso" method (you draw an arbitrary shape)
- Brush - selection of an area using the "brush" method
- Eraser - clearing the selected area
- Navigation - zoom and navigate through the photo
- Cut - remove the selected area from the photo
- Cloning - painting over an area with a selected base
- Save - allows you to save the edited photo in a photo album, send it by e-mail or publish it on social networks
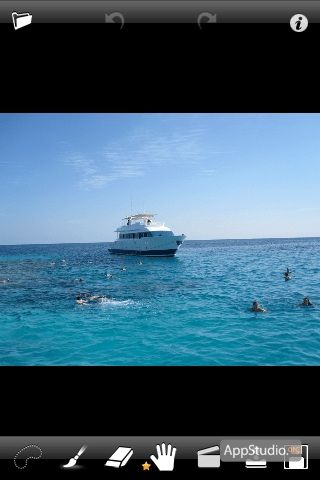
Let's remove the people on the right first. To do this, increase this area and select people with the brush tool.

Now let's click on the "cut" button, and then zoom out, in the end we will get a clear sea on the right without any hint that someone was swimming there.

Let's select the nearby people with the lasso tool and edit the selected borders with the eraser tool.
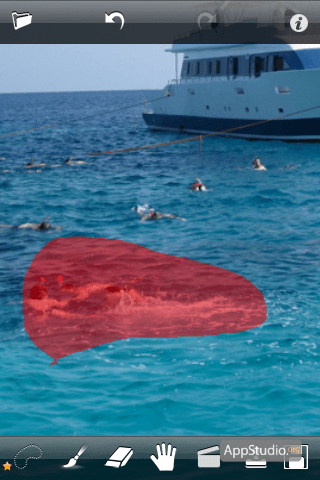
The remaining people on the left side will be painted over with the “cloning” tool. As a result, thanks to us, we got a yacht against the background of the sky and the sea without unwanted objects.


To get to the application settings, click on the " i" in the upper right corner. In this menu, in addition to settings, you can watch a training video for beginners and experienced users, read help, get technical support

Settings allow.