Instructions for generating an electronic signature key
(version dated 20.09.2016)
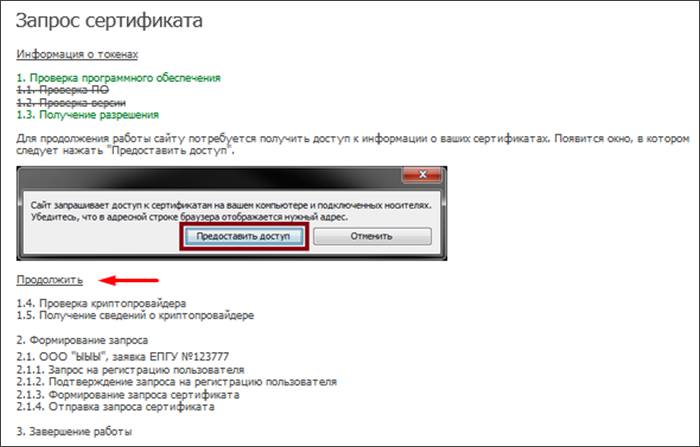
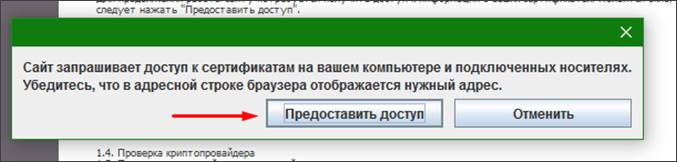
Effective September 1, 2016 a new version regulations of the Certification Center of the Federal Treasury, approved by Order No. 280 dated July 25, 2016. Please familiarize yourself with the updated stages of obtaining certificates
19.09.2016
released a new version 1
Key generation workstation 10.0.0.44
n, it needs to be installed after uninstalling the previous version.
List of used abbreviations:
| workstation | automated workplace |
| ASFC | Automated system of the Federal Treasury |
| GAS | State automated system |
| GMU | State municipal institution |
| PPO | Applied software |
| PC | Personal electronic computer |
| CIPF | Means cryptographic protection information |
| SUFD | Remote financial document management system |
| TOFC | Territorial body of the Federal Treasury |
| FC | Federal Treasury |
Before you start, make sure that your workstation has:
CIPF "Crypto PRO CSP" (version 3.6 or newer);
AWP for Key Generation (the current version of the AWP for Key Generation can be downloaded at ftp://ftp.ufk39.ru/RCR/Distrib/ or with connected CIPF "Continent AP" on start page SUFD portal ( http://10.39.4.123). Attention, in case of installation of "Workstation of Key Generation" on workstation, designed to work in the software "SUFD", you must use the instructions for setting up an additional workstation.
Skilled the certificate is required to work in all systems (SUFD, CIPF Continent AP, Procurement website under 223-FZ, EIS (unified information system in the field of procurement) under 44-FZ, State Medical University, GAS "Upravlenie", GIIS "Electronic budget", Portal "Gosuslugi", etc.).
Connect a blank formatted key medium (flash drive, floppy disk, Ru-token, etc.) to system unit PC.
The carrier must be considered in the "Journal of accounting for machine storage media" (the form was approved by order of the FAPSI dated June 13, 2001 No. 152), a form with an example of filling out can be downloaded from the website of the Office.
In the Key Generation Workstation, click the "Create a certificate request" button (see Fig. 1).
Fig.1 Key generation workstation
Select the request type (see Figure 2).

Fig.2 Dialog box with a choice of request type for key generation
In case you already have there is a data certificateTIN of an individual, then select "Generate a certificate request based on an existing certificate" (see Figure 3) and click "Next".
IMPORTANT
if your previous certificate contained the TIN of a legal entity, and you need a certificate for an individual, then NOT
select the type "Generate a certificate request based on an existing certificate" because in this case, only a certificate for a legal entity will be created, in this case, select the “Request for an Applicant’s certificate” item and fill in all the parameters manually. 
Fig.3 Dialog box with a choice of request type for key generation
In the window that appears, click the "Find" button (see Fig. 4) and select the previous certificate file (with the CER extension) or request file (with the REQ extension) (see Fig. 5, Fig. 6, Fig. 7) and click the "Next" button.

Fig.4 Dialog box for file selection

Fig.5 Dialog box for file selection

Fig.6 Dialog box for selecting a file

Fig.7 Dialog box with a choice of request type for key generation
In the window that appears, specify the required user roles (see Fig. 8). If an organization has several authorizations in the field of placing orders (for example, the Customer and the Financial Authority), each such authorization requires the generation of INDIVIDUAL KEY . IMPORTANT: for certificate Legal entity only the "Client Authentication" role is required, which is mandatory for all types of certificates. Role Selection Examples for Common information systems are given in Appendix 1 to this Instruction.

Fig.8 Dialog box. User Roles
In the window that appears, fill in all the required open to write the field (see Fig.9).

Fig.9 Dialog box with Applicant data
"Surname" - fill in the Applicant's Surname.
"Name Patronymic" - fill in the Name and Patronymic of the Applicant (if any), as indicated in the identity document.
"E-mail" - fill in the address Email Applicant, personal information will be sent to this address, for example, login and password for the first login to the information system.
"Position" - is filled in only for a request for a certificate of a Legal Entity. When filling given field for the heads of the organization, it is necessary to take into account the data of the Unified State Register of Legal Entities, for other employees of the organization it is necessary to be guided by the staffing table.
“Formalized position” - the field becomes active when choosing roles from the “ASFC” group You must choose from 2: “ Supervisor" (if the right of the first signature) or " Chief Accountant” (if the right of the second signature), the right of the first or second signature is determined in the document “Signature Sample Card” submitted by your organization to the Federal Treasury Department for the Kemerovo Region at the place where your account is serviced. The only exception is when an employee turned off in the Signature Sample Card, but he signing of separate documents is required(non-settlement) in terms of cash services - you must select " Operationist».
"Last Name First Name" - the field is filled in automatically.
"Organization" - fill in only COMPLETE name of company, name should symbol by symbol match the information from the Unified State Register of Legal Entities. The EXCEPTION IS the name of the organization ONLY for certificate Legal entity , you need to fill in a short name, provided that the full name is longer 164 characters in other cases, the full name is filled in if it does not exceed 164 characters.
"Unit 1st level" - to be completed only when generating a certificate Legal entity.
"Division of the 2nd level" - to be completed only when generating a certificate Legal entity. This field is filled only if an organization (Legal entity) has separate subdivisions, for example, Kemerovo State University (Full name is filled in the "Organization" field) has a branch in the city of Belovo (the name of the branch is filled in the "Level 1 subdivision" field) which has "Accounting" structural subdivisions (to be completed in the “Level 2 Subdivision”) (see Fig. 10).
"Name locality» - fill in the name of the location of the Applicant Organization, for example, «Tashtagol».
Address (street, house) - filled in only when generating a certificate Legal entity. This field indicates the address of the location of the Legal Entity of the Applicant Organization.
"Country" - fill in with the value "RU".
"Name of the subject" - select from the list "Kemerovo region".
"TIN" - for a certificate of an individual, fill in the value of the TIN (12 characters) of the Applicant, for a certificate of a Legal entity, fill in the value of the TIN (10 characters, with 2 zeros in front, for example, 004205654585) of the Legal entity.
"OGRN" - filled out only when generating a certificate Legal entity. The value of the OGRN of the Legal entity is indicated.
"SNILS" - the value of the SNILS of the Applicant is indicated.
“Account number of the UIS organization” - the field becomes active only when selected in the previous step when choosing roles from the section “Working with the UIS”. The field is filled with the value of the SDR code (code of the customer's consolidated list), this value can be viewed on the website http:// www. purchases. gov. en to search for YOUR organization, in the register of organizations: tab " Additional Information” - the value “Unique account number of the organization” (11 digits), if there is no specified tab, then in the information “Registration data of the organization” the value is: “SPZ code” (11 digits). (See Fig.11 or Fig.12)
"GMU account number" - the field becomes active when selected in the previous step when selecting roles from the section "work with GMU". The field is filled in with the value of the account number of the GMU of the Applicant Organization, this value can be viewed on the website http:// www. bus. gov. en in the information about the organization “PSMU Code” (see Fig. 13) or “Registry number in the list of GMU” (see Fig. 14).
"Protection class" - select the value "KS1" if at your workplace (computer) NOT installed hardware protection "Sobol", "Accord", etc. (hardware protection with a random number generator), "KS2" - if the specified protection is installed.
"Exportable private key" - the value "Yes" is always indicated.
In accordance with the clarifications of the Federal Treasury ( letter of the Federal Treasury dated July 21, 2016 No. 07-04-05 / 12-529), representatives the legal entities listed below in connection with the non-placement of the procurement provision in accordance with the Federal Law of July 18, 2011 No. 223-FZ, it is necessary in the field " Account number of the EIS organization» indicate value « 00000000000 »:
Electronic platform operator
Information system operator
Organization providing services for servicing users of the EIS
A legal entity carrying out procurement in accordance with Part 4 of Article 5 of the Federal Law of December 30, 2008 N 307-FZ "On Auditing"

Fig.10. An example of filling in data for a legal entity
Fig.11 Dialog box from http:// site www.
purchases.
gov.
en

Fig.12 Dialog box from http:// site www. purchases. gov. en

Fig.13 Dialog box from the site www.
bus.
gov.
en. Register of organizations
Fig.14 Dialog box from the site www. bus. gov. en. Registration data of the organization
In the window that appears, click "Run" (see Fig. 15)

Fig. 15 Dialog box of key generation workstation
At the next step, you need to select the type of media, depending on the media prepared in the first step, see step 1.
In the next window (see Fig.16) enter the password and its confirmation. ATTENTION! Remember the entered password, if it is lost, recovery is impossible. These fields can be left blank, then when signing electronic signature no password will be requested.

Fig.16 Entering a password for the created private key
At the next stage, the system will offer to save the certificate request file (see Fig. 17).

Fig.17 Dialog box. Saving a certificate request to a file
This request file must be brought to removable media information (flash drive, floppy disk, etc.), not containing key containers(private keys) of users
, to the point of registration of the Certification Center of the Federal Treasury, according to the territorial location of your organization.
Both copies of the application must be completed and submitted to the Certification Center of the Federal Treasury, according to the territorial location of your organization.

Fig.18. Print form statements
Sample certification documents are available at information resource on the Internet ftp:// ftp. ufk39. en , information portal by the address http://10.39.4.123(in a secure network segment, section Certification Authority), on the official website of the Federal Treasury Department for the Kemerovo Region http://kemerovskaya.roskazna.ru . (section GIS -- Certification Authority)
Contact details of the Department of privacy and security of information
Office of the Federal Treasury for the Kemerovo Region:
head of department: Opalev Kirill Nikolaevich (384-2) 719-005, e-mail: opalevkn@
ufk39.
en
Deputy Head of Department: Rodionov Stanislav Nikolaevich (384-2) 719-022,
certification specialists: (384-2) 719-034,719-164, 719-163,
specialists in work with EP and CIPF means: (384-2) 719-161, 719-162, 719-022.
e-mail: uuc@
ufk39.
en
The contact details of operators of remote regional registration centers are posted on the website of the Office on the Internet in the section GIS - Certification Authority - Contacts
Annex 1
Common examples of distribution of roles for work in various information systems
All certificates require the Client Authentication role. The specified role is the only for certificate Legal entity.
IMPORTANT only for the section "Working with UIS"!!! for one certificate, only one group of roles from the section "Working with the UIS" can be involved, for example, "Customer" or "Financial Authority", etc.
Please note that the roles required earlier are "Email Security" and "Server Authentication" are not mandatory roles.

Rice. 1. Mandatory user roles for working in SUFD with the right to sign
Rice. 2. Mandatory user roles for working in SUFD WITHOUT signing rights
Rice. 3. Possible user roles for working on the site http://
www.
bus.
gov.
en

Rice. 4. Possible user roles for working on the site http://
www.
purchases.
gov.
en as part of the work on the Federal Law No. 44. Personal Area- Customer.
Rice. 5. Possible user roles for working on the site http://
www.
purchases.
gov.
en as part of work under Federal Law No. 44. Personal account - Financial authority.
Rice. 6. Mandatory user role for work in the GIS "Electronic budget"
Change Registration Sheet
| Date modified |
BASIC CONCEPTS
KSKPEP
– a qualified certificate of the electronic signature verification key.
CEP– qualified electronic signature.
Crypto provider – means of protection of cryptographic protection of information. A program with the help of which the closed part of an electronic signature is generated and which allows you to work with an electronic signature. This checkbox is checked automatically.
Exported Key – the possibility of copying an electronic signature to another medium. If the checkbox is unchecked, copying the electronic signature will be impossible.
paintwork – left button mice.
PKM – right button mice.
CRM-AGENT- an application developed by CA specialists to simplify the procedure for generating a key pair, creating a request and writing a certificate.
Before the start of generation
After visiting the certification center and going through the identity verification procedure, the CA sent a letter to the e-mail address you specified in the application containing a link for generation. If you have not received a letter, please contact your manager or the CA Technical Support for contact number from this guide.
Open the link to generate from the email in one of the recommended browsers:Google Chrome, Mozilla Firefox, Yandex.Browser. If you are already in one of the above browsers, click on the link paintwork or PKM> "Open link in new tab". The generation page (Fig.1) will open in a new window.
When you open the link, an initial warning will appear. Read it if you are using storage media to store the CEP.Jakarta LT . Learn more about media inbelow. If you are using a different media, then click the button "Close".
Fig.1 - Generation page
Click on the link"Download app" to start downloading. If nothing happened after clicking, click on the link PKM > "Open link in new tab". After downloading the application, run the installation.
It is recommended to disable anti-virus software before downloading the program !
During app installation « crm - agent » a message will appear asking for access (Fig.2).
Fig. 2 - Access request

Click the button "Yes".
After the installation of the application is completed, return to the page with the generation. A message will appear about "Granting access" (Fig. 3).
Fig.3 - Access to the certificate store
Click "Continue" and, in the window that appears, "Grant access"(Fig.4).
Fig.4 - Access to the certificate store 2
If the button does not appear "Continue"
If after installing the application « crm - agent » , the link to download the application has not disappeared, the connection may be blocked by your security system.
To resolve the situation, you must:
Disable the antivirus installed on your computer;
Open a new tab in the browser;
Enter the address without spaces in the address bar of the browser - 127.0.0.1:90 - and go (pressEnter on keyboard);
When a browser message appears "Your connection is not secure", add the page to browser exceptions. For example,Chrome: "Additional" - "Go to the site anyway". For other browsers, use the appropriate developer instructions.
After the error message appears, return to the page with the generation and repeat Point 2 this manual.
If you do not have pre-installed crypto providers, after the stage of granting access, links for downloading CryptoPRO will appear (Fig. 5).

It is important: application « crm - agent » detects any cryptographic providers on the computer, and if you have a system other than CryptoPRO CSP program (eg.VIPNET CSP ), contact the experts technical support TC for advice.
Click on the link "CryptoPRO 4.0" on the generation page or on a similar link below to download the CryptoPRO installation file to your computer.
CryptoPro CSP 4.0 - version for OS Win 7 / 8 / 10
After the download is complete, openzip-archive using an appropriate archiver program (for example,Win - RAR ). Inside there will be the CryptoPRO installation file itself. Run it and install with default options. During the installation process, you may see the following window:
Fig.5 - Installing CryptoPRO

Skip the window by clicking "Further". CryptoPRO installation is completed.
Installing the driver for the token
Signatures can be stored in the computer registry, on conventional flash drives and on specialusb-tokens. The list of tokens, pin codes and links to the software are presented in the table below (Table 1).
Table 1 - Drivers for secure media
|
USB media type |
Appearance USB media |
Driver download link |
PIN code |
|
ruToken |
 |
Instructions for generating an electronic signature key
(version dated 11/21/2017)
List of used abbreviations:
| workstation | Automated workplace |
| ASFC | Automated system of the Federal Treasury |
| GAS | State automated system |
| GMU | State municipal institution |
| PPO | Application software |
| PC | Personal electronic computer |
| CIPF | Means of cryptographic information protection |
| SUFD | Remote financial document management system |
| TOFC | Territorial body of the Federal Treasury |
| FC | Federal Treasury |
Before you start, make sure that your workstation has:
CIPF "Crypto PRO CSP" (version 4.0 (4.0.98.42));
AWP for Key Generation (the current version of the AWP for Key Generation can be downloaded at ftp://ftp.ufk39.ru/RCR/Distrib/ or when the CIPF "Continent AP" is connected on the start page of the SUFD portal ( http://10.39.4.123). Attention, in case of installing "Key Generation Workstation" on a workstation designed to work in the "SUFD" software, you must use the instructions for setting up an additional workstation.
Connect a blank formatted key medium (flash drive, floppy disk, Ru-token, etc.) to the PC system unit.
The carrier must be considered in the "Journal of accounting for machine storage media" (the form was approved by order of FAPSI dated 13.06.2001 No. 152), the form with an example of filling out can be found .
In the Key Generation Workstation, click the "Create a certificate request" button (see Fig. 1).
Fig.1 Key generation workstation
Select the request type (see Figure 2).

Fig.2 Dialog box with a choice of request type for key generation
In case you already have there is a data certificateTIN of an individual, then select "Generate a certificate request based on an existing certificate" (see Figure 3) and click "Next".
IMPORTANT
if your previous certificate contained the TIN of a legal entity, and you need a certificate for an individual, then NOT
select the type "Generate a certificate request based on an existing certificate" because in this case, only a certificate for a legal entity will be created, in this case, select the “Request for an Applicant’s certificate” item and fill in all the parameters manually. 
Fig.3 Dialog box with a choice of request type for key generation
In the window that appears, click the "Find" button (see Fig. 4) and select the previous certificate file (with the CER extension) or request file (with the REQ extension) (see Fig. 5, Fig. 6, Fig. 7) and click the "Next" button.

Fig.4 Dialog box for file selection

Fig.5 Dialog box for file selection

Fig.6 Dialog box for selecting a file

Fig.7 Dialog box with a choice of request type for key generation
In the window that appears, specify the required user roles (see Fig. 8). IMPORTANT: for certificate Legal entity only the "Client Authentication" role is required, which is mandatory for all types of certificates. Examples of choosing roles for common information systems are given in Appendix 1 to this Instruction.

Fig.8 Dialog box. User Roles
In the window that appears, fill in all the required open to write the field (see Fig.9).

Fig.9 Dialog box with Applicant data
Rules for filling in the fields (read all):
"Surname" - fill in the Applicant's Surname.
"Name Patronymic" - fill in the Name and Patronymic of the Applicant (if any), as indicated in the identity document.
"E-mail" - fill in the Applicant's e-mail address, personal information will be sent to this address, for example, login and password for the first entry into the information system.
"Position" - is filled in only for a request for a certificate of a Legal Entity. When filling out this field for the heads of the organization, it is necessary to take into account the data of the Unified State Register of Legal Entities, for other employees of the organization it is necessary to be guided by the staffing table.
“Formalized position” - the field becomes active when choosing roles from the “ASFC” group You must choose from 2: “ Supervisor" (if the right of the first signature) or " Chief Accountant” (if the right of the second signature), the right of the first or second signature is determined in the document “Signature Sample Card” submitted by your organization to the Federal Treasury Department for the Kemerovo Region at the place where your account is serviced. The only exception is when an employee turned off in the Signature Sample Card, but he signing of separate documents is required(non-settlement) in terms of cash services - you must select " Operationist».
"Last Name First Name" - the field is filled in automatically.
"Organization" - fill in only COMPLETE name of company, name should symbol by symbol match the information from the Unified State Register of Legal Entities. The EXCEPTION IS the name of the organization ONLY for certificate Legal entity , you need to fill in a short name, provided that the full name is longer 164 characters in other cases, the full name is filled in if it does not exceed 164 characters. For individual entrepreneurs this field contains the Surname, Name, Patronymic of the individual entrepreneur.
"Unit 1st level" - to be completed only when generating a certificate Legal entity.
"Division of the 2nd level" - to be completed only when generating a certificate Legal entity. This field is filled only if an organization (Legal entity) has separate subdivisions, for example, Kemerovo State University (Full name is filled in the "Organization" field) has a branch in the city of Belovo (the name of the branch is filled in the "Level 1 subdivision" field) which has "Accounting" structural subdivisions (to be completed in the “Level 2 Subdivision”) (see Fig. 10).
"Name of settlement" - fill in the name of the settlement where the Applicant Organization is located, for example, "Tashtagol".
Address (street, house) - filled in only when generating a certificate Legal entity. This field indicates the address of the location of the Legal Entity of the Applicant Organization.
"Country" - fill in with the value "RU".
"Name of the subject" - select from the list "Kemerovo region".
"TIN" - for a certificate of an individual, an individual entrepreneur, fill in the value of the TIN (12 characters) of the Applicant, for a certificate of a Legal entity, fill in the value of the TIN (10 characters, with 2 zeros in front, for example, 004205654585) of the Legal entity.
"OGRN" - filled out only when generating a certificate Legal entity. The value of the OGRN of the Legal entity is indicated.
"SNILS" - the value of the SNILS of the Applicant is indicated.
"Account number of the organization UIS / SDR" - the field becomes active only when a request is generated based on an existing certificate, if the section "Working with the UIS" was filled out during the previous generation. IMPORTANT!!! To work on the EIS website ( http :// www . purchases . gov . en ) separate powers are no longer required, all the necessary roles for users are set by the administrator of the organization when registering a certificate in the UIS. In this regard, when generating a request based on an existing certificate, if the section “Working with the UIS” was completed during the previous generation, you should return to the stage of specifying the authorities by clicking the “Back” button and clear the section “Working with the UIS”.
"GMU account number" - the field becomes active when selected in the previous step when selecting roles from the section "work with GMU". The field is filled in with the value of the account number of the GMU of the Applicant Organization, this value can be viewed on the website http :// www . bus . gov . en in the information about the organization “PSMU Code” (see Fig. 11) or “Registry number in the list of GMU” (see Fig. 12).
"Protection class" - select the value "KS1" if at your workplace (computer) NOT installed hardware protection "Sobol", "Accord", etc. (hardware protection with a random number generator), "KS2" - if the specified protection is installed.
"Exportable private key" - the value "Yes" is always indicated.
In accordance with the clarifications of the Federal Treasury ( letter of the Federal Treasury dated July 21, 2016 No. 07-04-05 / 12-529), representatives the legal entities listed below in connection with the non-placement of the procurement provision in accordance with the Federal Law of July 18, 2011 No. 223-FZ, it is necessary in the field " Account number of the EIS organization» indicate value « 00000000000 »:
Electronic platform operator
Information system operator
Organization providing services for servicing users of the EIS
A legal entity carrying out procurement in accordance with Part 4 of Article 5 of the Federal Law of December 30, 2008 N 307-FZ "On Auditing"

Fig.10. An example of filling in data for a legal entity

Fig.11 Dialog box from the site www.
bus.
gov.
en. Register of organizations
Fig.12 Dialog box from the site www. bus. gov. en. Registration data of the organization
In the window that appears, click "Run" (see Fig. 13)

Fig. 13 Dialog box of key generation workstation
At the next step, you need to select the type of media, depending on the media prepared in the first step, see step 1.
In the next window (see Fig.14) enter the password and its confirmation. ATTENTION! Remember the entered password, if it is lost, recovery is impossible. These fields can be left blank, then the password will not be requested when signing with an electronic signature.

Fig.14 Entering a password for the created private key
At the next stage, the system will offer to save the certificate request file (see Fig.15).

Fig.15 Dialog box. Saving a certificate request to a file
This request file must be brought on a removable storage medium (flash drive, floppy disk, etc.), not containing key containers (private keys) of users
, to the point of registration of the Certification Center of the Federal Treasury, according to the territorial location of your organization.
Both copies of the application must be completed and submitted to the Certification Center of the Federal Treasury, according to the territorial location of your organization.

Fig.16. Printed application form
Sample documents for certification are posted on the information resource on the Internet ftp://ftp.ufk39.ru/RCR/Shablon/, information portal at http://10.39.4.123(in a secure network segment, section Certification Authority), on the official website of the Federal Treasury Department for the Kemerovo Region http://kemerovskaya.roskazna.ru . (section GIS -- Certification Authority)
Contact details of the Department of privacy and security of information
Office of the Federal Treasury for the Kemerovo Region:
head of department: Opalev Kirill Nikolaevich (384-2) 719-005, e-mail: opalevkn@
ufk39.
en
Deputy Head of Department: Rodionov Stanislav Nikolaevich (384-2) 719-022,
certification specialists: (384-2) 719-034,719-164, 719-163,
specialists in work with EP and CIPF means: (384-2) 719-161, 719-162, 719-022.
e-mail: uuc@
ufk39.
en
The contact details of operators of remote regional registration centers are posted on the website of the Office on the Internet in the section GIS - Certification Authority - Contacts
Annex 1
Common examples of distribution of roles for work in various information systems
All certificates require the Client Authentication role. The specified role is the only for certificate Legal entity.
IMPORTANT!!! To work on the site http :// www . purchases . gov . en separate powers are not required, all the necessary roles are set by the administrator of the organization when registering a certificate in the UIS.
Please note that the roles required earlier are "Email Security" and "Server Authentication" are not mandatory roles.

Rice. 1. Mandatory user roles for working in SUFD with the right to sign
Rice. 2. Mandatory user roles for working in SUFD WITHOUT signing rights
Rice. 3. Possible user roles for working on the site http:// www. bus. gov. en

Rice. 4. Mandatory role of users to work in the GIS "Electronic budget", on the sitehttp
://
www
.
purchases
.
gov
.
en
Change Registration Sheet
| Date modified |


