On your own and without the involvement of a specialist, if necessary, you can connect an additional HDD. Next, we will analyze installation diagram and subsequent connection of a new hard drive in the system unit. It should be noted that the actions are performed smoothly, clearly, without the use of force and abrupt actions.
First step need to de-energize the whole system unit, to do this, turn off the power, and then disconnect absolutely all the wires. Next, the side covers are unscrewed and removed, as well as in the image.
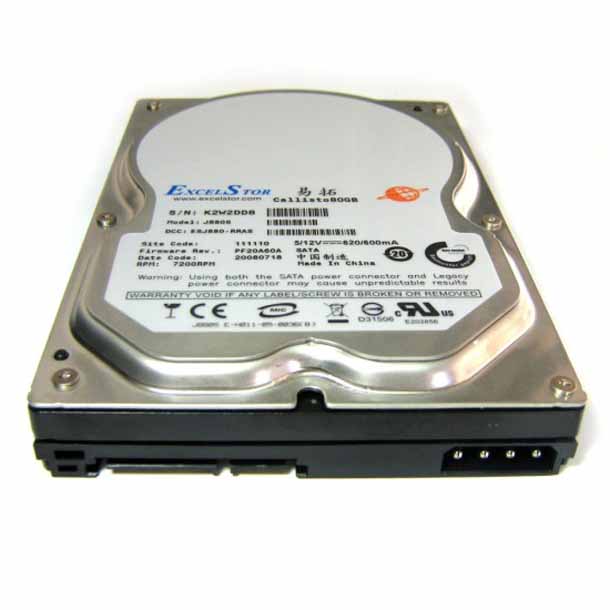
For the hard drive, of course, there are their own compartments, which, depending on the model of the system unit, can be located in different positions and have a different position. 
According to the method of connecting the hard drive directly to the motherboard, they are divided into two types, and exactlySATAAndIDE. The second option, which has very wide cables and ports for connection, is considered obsolete and is now rarely used. Due to its irrelevance IDE variation will not be considered here.
If the SATA hard drive is already connected to the computer, then adding a second one can be quick and easy. Additional drive is inserted into the appropriate free cell and attached to the body. It is desirable that they are located at a sufficient distance from each other to avoid overheating. 
In order to connect a new hard drive to the motherboard itself, you need a cableSATA. Plug one end into the corresponding slot on the board, and the other to the hard drive. 
It should be noted that in each modern model of the system unit, there is a minimum twoSATA- connector.
The next step will require connect new hard drive directly to the power supply. For this, it is applied special cable, the plug of which is slightly wider than that of the SATA cable. In the case when a single plug comes out of the power supply, you will need a splitter. It happens that a narrow plug in the power supply was not provided, then you should purchase an adapter. Examples are shown in the images: 
Having obtained all the above cables, you should connect the hard drive to the power cable.
The secondary media is now fully connected. You can then start the computer by attaching the covers, connecting the cables, and applying power. After that, will follow, if necessary, the stage system setting new hard drive.

Often the unstable operation of the computer is associated with a lack free space on the hard drive. To solve this problem, you can remove junk files, but if there are none, you need to install an additional HDD on the PC. This article provides instructions for connecting a second drive and describes some of the pitfalls that a user can expect when performing this operation.
Motherboard support
So how to connect second hard disk to computer? "SATA or IDE ports soldered on the motherboard?" - the first question to be answered before installing the HDD. You need to find out which motherboard model is installed in the system unit. This can be done by installing the AIDA64 program on the computer. This utility shows full information about the computer. On the left side of the main application window, just click on the text "Motherboard" to find out the model. After that, you need to find the documentation for the motherboard and find out which connection ports for drives are installed on it: SATA or IDE.
If you can’t find the documentation, you will need to study the inside of the computer yourself. To do this, you need to remove the left cover of the system unit, after unscrewing the fixing bolts on its back side. Hard drives are located in front of the PC case in special pockets. Pay attention to the cable that goes from the motherboard to the HDD. If it is wide, then the drive connection interface is IDE, narrow - SATA.
After visual inspection still have doubts about what type of connection is used on the motherboard? In this case, disconnect the cables from the drive and pay attention to their shear. If there is a slot in the connector in the form of the letter "G". If IDE - the connector will look like a rectangle with two rows of holes.
Pay attention to the motherboard area, where is going storage loop. Are all ports busy? If there are no free ports, you will not be able to connect the hard drive in the classical way. Also take a look at the cable itself if the HDD connection interface is IDE. Usually it has two connectors for drives, and one of them may be free.

Before you connect a second hard drive to your computer, see if there are free pockets in the equipment case for installing drives. If they are not there, the hard drive can be placed on the bottom of the system unit, but this is not safe for the equipment. When moving computer hard the disk will dangle, and there is a chance that it will damage the PC elements or fail itself.
Hard drive selection
Before you can connect a second hard drive to your computer, you must first purchase it. After determining the connection interface, you can start selecting the drive. Remember that 3.5-inch hard drives are best for your computer. Smaller samples are designed for installation in laptops. Although, if there is a suitable 2.5-inch form factor HDD, you can install it in a special adapter case and use it in a desktop PC.
Also determine which one you need. If only documents will be stored on it, it is enough to purchase HDD capacity 320 GB. If it is supposed to store films high definition And computer games, it is better to choose a hard drive with a capacity of at least 1 TB.

It makes sense to pay attention to the characteristics of the speed of reading and writing data. There is only one rule: more is better. Although, if the computer is used only for work in office applications It makes no sense to overpay for this feature.
Correct jumper position
Users whose motherboard is equipped with IDE ports only must configure the jumpers. How to connect a second hard drive to a computer, where to put the jumper? So, if only one HDD is connected to the cable, the jumper must be set to the Master position, and the drive itself must be connected to the outer cable connector. If two drives are connected to one wire, then the jumper on the additional hard disk must be in the slave position, and it must be connected to the connector that is located at a distance from the edge of the cable. You don't need to install jumpers on a SATA drive because each drive uses a separate cable.

How to connect a second hard drive to a computer?
Order HDD settings for drives with any interface is the same. Regardless of the type of hard drive, to mount it, follow these steps:
- Unplug the system unit.
- Loosen the screws holding the left housing cover and remove it. Usually you have to pull it back to do this.
- Install the drive in the pocket of the system unit. At correct installation the slots for the screws at the hard drive mounting location and the holes on the HDD will match.
- Tighten the fixing screws.
- Before connecting a second hard drive to a computer, pay attention to connecting cables to the first one. Connect the wires to the additional drive in the same way as to the main one.
- Replace the case cover and turn on the computer.
BIOS setup
After a second hard drive is connected to the computer, several changes should be made to the "BIOS", because sometimes the first boot device the newly installed HDD is assigned. This makes it impossible to boot the OS. To configure "BIOS":
- Turn on the computer by pressing the power button.
- As soon as the screen lights up, immediately start pressing the DEL or F8 key. Different motherboards use different buttons to enter the utility BIOS settings. To understand which key to press, watch the messages on the screen or read the instructions that came with the motherboard.
- After entering the BIOS, go to the Boot tab.
- In it, select with arrows and press "ENTER".
- In the menu that opens, move the cursor to the First Drive item, press ENTER and select the hard drive on which the system is installed. If you are not sure which HDD to select, set the switch to a random position.
- Return to the previous menu by pressing ESC.
- Here, move to the First Boot Device line and press "ENTER". Sometimes, to see it, you should move to the Boot Devices Priority submenu.
- In the drop-down menu, select Hard Drive. Sometimes, instead of this inscription, the full name of the hard drive will be displayed.
- Press F10 to save your changes and then ESC to exit the configuration utility and restart your computer.
If after the manipulations the PC does not boot, go back to step 5 and select another drive.
External hard drive
How to connect a second hard drive to a computer if the SATA and IDE ports on the motherboard are busy? In this case the best option will use external drive. Typically, these devices are connected to a USB port. Less often - to FireWire. In the first case, the drive can be installed on any PC, in the second - only on a PC equipped with a special port. The main advantage of an external HDD is portability. It can be easily connected and disconnected without turning off or disassembling the computer. However, such devices are usually slower than those installed in a PC case.
Operating system settings
What system settings should be done after a second hard drive is connected to a computer on WIndows 7? SATA or IDE - drives that are often not detected by the system in file manager after installation.

To display the new HDD in Explorer, follow these steps:
- In the Start menu search bar, type "Manage".
- Click on the item with the text "Computer Management".
- On the left side of the snap-in window, select Disk Management.
- Click right click on the disk that is not displayed in the explorer. You can find out which HDD you should work with by comparing the indicated volume with the real one and examining the partition labels.
- In the expanded list of actions, click on "Create a simple volume", then specify file system and cluster size, then click OK.
- After completing the operation, right-click on the HDD again, and select the "Change drive letter" line from the menu.
- In the window that opens, click on the "Add" button and set the desired letter.
Installing a second hard drive in your computer can improve system performance and generally increase the amount of storage space you need. Most serial computers have built-in IDE (PATA) or SATA (Serial ATA) support for connection of rigid drives to the motherboard.
Modern operating systems support any type of hard drive, regardless of the type of hard drive already installed on the computer. Contrary to popular belief, installing a second hard drive does not require professional technical training, but requires minimal skills to disassemble the computer and replace its components.
In fact, to install a second hard drive, you only need an additional cable (if one is not available) and a screwdriver. In the event of a malfunction, professional assistance may be required. Remember, it is always possible to refer to the help manual.
To install a second hard drive on your computer, follow these steps:
1. First of all, back up the data stored on the primary device.
2. Turn off the computer and disconnect all power cords from it. Before opening the case, you must touch something metallic to remove the static charge.
3. Before buying a second hard drive, find out what type of drives your computer supports. IDE drive and use 2-inch flat cables with three or more connectors. SATA drives use thin and round cables.
4. Refer to the instructions printed on the hard drive label for instructions on how to properly set the jumpers. Jumpers are tiny connectors that can be found on IDE drives. They help identify the primary drive. Set the jumper to "Slave (ide2)" on the second drive. Also, don't forget to jumper the main hard drive to set it to "Master (IDE1)." If you purchased a SATA drive, skip to step 5. Drives with SATA interface no jumper required.
5. Locate an empty bay to accommodate the second hard drive. Carefully slide the new hard drive into the bay. Use the two mounting screws on both sides to secure the new hard drive to the metal case. Connect the IDE drive to the second connector located on the main cable. For SATA, connect one connector to the main drive and the other end of the cable to the SATA connector on the motherboard.
6. Replace the computer cover. Connect the power cords to it. Turn on your computer. Press F1, F2, F10, or the Delete button to enter the BIOS menu. Check if they are detected by the system. If not, then check again that all cables and loops are connected correctly.
After that, configure the hard drive to work in operating system. If it is new, then first of all it is necessary to assign a letter to it. You can also perform partitioning. Using a second hard drive as the primary for installing applications and storage virtual memory is one way to improve system performance. This will also free up space for the operating system to run.
Today, the computer contains all our memories, work, plans for the future, favorite films. Sooner or later, the moment comes when there is very little space on the computer. Then the question arises, how to install a second hard drive, and what is needed for this. Let's consider this problem from all sides.
No matter how frightened you are by the abundance of wires in the system unit, do not worry, this is not as difficult as it seems at first glance. Now “we tell how to do it in Russian”, briefly and clearly. To begin with, we will determine where a solution to the problem is required, on desktop computer or on a laptop. Let's consider the first option.
How to install a second hard drive on a computer?
Installing an HDD on a desktop computer
Before adding a new hard drive, you need to pay attention to the model of the old drive. They are divided into two types according to the interface (connector) of the connection:
IDE connector (ATA or PATA). Such storage media are obsolete models and are rare.
SATA connector. Carriers with such a connector are sold everywhere. Standard purchase of any computer store.
The hard drive is connected with two cables. One supplying power, the second transmitting information. To understand what storage media is in your computer, open the side cover and look. If a flat, half a millimeter thick and 6-7 cm wide cable goes to the hard drive, then you have an old model that connects via an IDE connector. If a neat cable, a centimeter wide, means modern SATA.
- Does the motherboard have a connector for a new purchase. Previously met budgetary motherboards with a small number of connectors, and if you have a drive connected, there may not be enough space. The problem is solved by STLab RAID SATA 2. There are also similar controllers with IDE.
- Free SATA cable in the power supply. IN budget options, the number of slots may be limited. The problem is solved by purchasing a Molex-SATA adapter.
The hard drive model has been determined, it has been purchased, and we have come to the practical part of resolving the issue of how to install a second hard drive on a computer and do it safely.
Installation with IDE connector
The main rule for working with computer components is to de-energize the system unit, that is, simply unplug it from the outlet. Next, we follow simple algorithms:
- Remove the case cover.
- We install the purchase, in special fastenings of the computer case (skids).
- We fix the new device with special regular bolts. If not, purchase with a hard drive.
- We connect the power cable.
- Connect the IDE cable. Here you need to pay attention to the nuances of the connection. The cable is connected at one end to the motherboard (usually it is painted in a separate color), and at the other end to the device. One of the connectors is marked as "Master" (main) and is located at the end of the cable, the other as "Slave" (auxiliary). Also, the hard drive has jumpers, and instructions on the case with a description of the positions. Therefore, if the HDD is connected to the "Slave", then you also need to set this mode on the media itself. Otherwise, the PC will not see the new acquisition.
- When everything is connected, we launch the system unit, split and configure the new HDD to our liking.
Installation with SATA connector

This option is less complicated, since new technologies are more gentle for beginners and do not require long setup. It is also necessary to de-energize the system unit, install the disk and fasten it in the case.
- We also check with a plug to the HDD. If there are not enough connectors, use the Molex-SATA adapter.
- We look where the HDD connection connector is on the motherboard and connect a new device using a SATA II or SATA III cable. The technologies are backward compatible and do not require any configuration. Connected and forgotten.
- We start the system block.
Here is a simple solution to an urgent problem, how to install 2 hard drives on a computer, without problems and errors.
Installing a hard drive in a laptop.
An ordinary user looking at this monolithic and elegant gadget is unlikely to decide on self-installation and go to the service center. And make a mistake. The devil is not as scary as he is drawn. Installing an additional HDD in a laptop is even easier than in a system unit. You do not need to look for connectors, models, cables.
Here we make a little reservation that installation in a laptop is possible in two cases:
You have an additional HDD slot inside your laptop.
Your laptop has a DVD drive installed.
The first case is rare, and the HDD is installed in a finished niche in the case. The second most common, let's look at it in more detail. First of all, there is a ready-made solution, and it plays the role of an adapter or even a pocket. To do this, you need a screwdriver and the device itself, which you can buy at any store.
Procedure
1. Power off the laptop and remove the battery.
2. Remove the screw on the bottom cover of the laptop holding the drive.
3. Pry and carefully remove the DVD drive.
4. Insert into the adapter on the 2nd HDD SATA, a new device.
5. Carefully place the adapter in place of the drive.
6. Screw back the bolt.
7. Insert the battery and turn on the laptop.
If everything is done carefully, the components are working and of good quality, you will see a new hard drive in the operating system.
We just briefly and clearly figured out how to install a second hard drive on a PC, and how easy it is even for ordinary user. Therefore, be careful, collected and do not be afraid to experiment.
When you run out of hard drive space, you can either remove or add more space. While an external USB hard drive is easy to plug in and as an option for extra storage, it's not really suitable - they take up space on the drive, perhaps an additional power connector, you need to use a valuable USB port, and they tend to be slower than internal drives. Today let's look at a more complex option for adding a second internal drive.
It's time to get familiar with the basics of your computer. Today we will concentrate only on the hard drive, but the manual will give you great review on all random connectors and ports that you will see on the motherboard after you open the computer case.
Step 1: Determine if you can add another internal drive or not
Unfortunately, not all computers are built equal. If you have a laptop, or an all-in-one machine where the internal systems are hidden in the monitor, then your only option is to go to a USB drive and you don't need to open it. If you have a system unit, then read on, as there is a chance that you will have enough space to install a second drive. If you have a full tower size, then you can easily add a second drive, or 2, or 3! But, if you are not sure, refer to the table below.
Step 2: Backup
Although we do not anticipate any problems, but this good practice, to create backup important data before making any changes to the equipment. Here we have looked at some options for Reserve copy.
The best software backup for Windows.
The best backup programs for Windows.
Your data is fragile - and it only takes one small accident to lose all data. The more copies you make, the better. Here we present the best free programs backup for Windows.
Step 3: Open the Case
Before continuing, turn off power to the system unit and all peripheral devices.

In most cases, the system unit may have covers on each side that need to be removed with just two screws. You need to remove the side cover that does not have the motherboard, so look at back panel systems, find USB ports/ mouse and remove the cover, so look at the back of the system, find the USB/mouse ports and remove the opposite side.
Step 4: Get Rid of Static Electricity
When touching the inside of a computer, technicians use a grounded wrist strap to reduce the risk of damage to any sensitive component from static electricity that remains in the human body. For our purposes, touching the heatsink will suffice.
Step 5: Find your hard drive and its slots
The internals of all computers are very similar. A hard drive is a fairly large piece of metal like this:
You have to find it, it is usually in some kind of metal box. Check now to see if you have a box to fit another hard drive in. A chassis tower usually has room for 3 or 4 drives, but a small desktop system might only have room for one drive, in which case you're out of luck and will have to consider either upgrading the chassis or using external USB disk.
Step 6: Determine if you have a SATA or IDE drive
Take a look at the following image and compare it with your drive. If you have a disk type like the one at the top, a wide ribbon cable, then this is a very old type of connection called IDE. Ideally, your new disk will be with SATA interface. If it turns out that you have an IDE disk, then you are completely out of luck, but this is already beyond the scope of this article. IDE drives are getting harder and harder to buy, which is a sign that your PC has really gotten old.

Check ALL connected devices. There are two possible types of power cables, and you will of course need to find a spare in your system that you can use. It might be hidden somewhere, so keep an eye on other power cables carefully and try to find a spare.
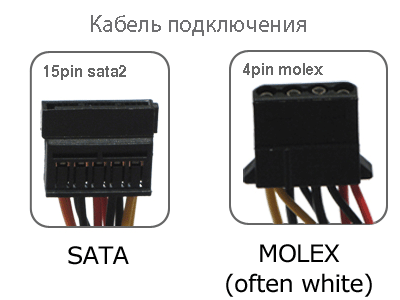
Some hard drives can accept any kind of cable, but the SATA type is easier to connect, so I use those if available. If you have a spare power cable, but it's not SATA, then you can still install a second drive, but you need to make sure it can accept the Molex type of power cable, or you can buy a Molex to SATA adapter.
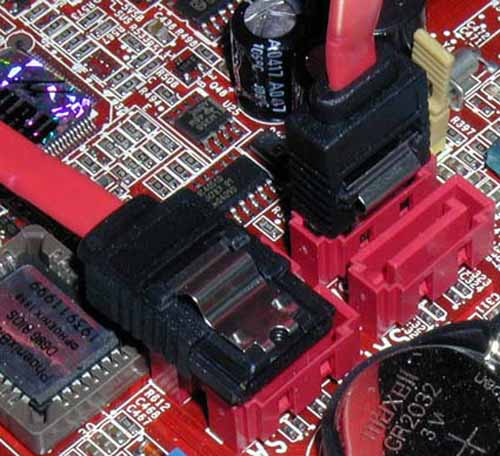
Next, plug in the SATA data cable on the motherboard, and see where it's plugged in. Different motherboards have different SATA port numbers, and older machines may even only have one. Obviously, if you can only find one SATA port, then you can only connect one SATA disk drive. If you can see some spare connectors, then congratulations - you can now go out and buy a second drive!
Step 7: Buying a Disc
There is very little difference between manufacturers hard drives. On the technical side, you should look for "3.5" SATA hard drive", and make sure you pick up another "SATA cable" while you're in the store, the salesperson should be able to help you with that if you can't find the right one. you hard drive" and make sure you pick up another "SATA cable" while you're at the store and the salesperson should be able to help you with that if you can't find one.
Step 8: Installation
Installation hard drive into the box is the hardest part, as it can sometimes get blocked by the graphics card or other cables. You'll need to identify the cables before you actually go any further, noting the side of the cable facing up (SATA data cable and power cables all have a notch on one end, which means it's nearly impossible to insert it incorrectly).
With the drive in place, use the screws that came with the drive to secure it - you'll need to align the holes on the drive with the holes in the box or tray. Next, find the spare power cables and SATA cable and connect them.
In my next article, I'll be covering software and configuration when adding a second drive - so stay tuned. As always, feel free to ask any questions in the comments and I will try to answer them quickly.