Let's see how to organize the two most common administrative tasks. SQL Server'A:
Planning for database backups
- Open SQL Management Studio and connect to the required database. Make sure the SQL Server Agent is running;
- Expand the Management - Maintenance node (you must have the "SYSADMIN" role for this) - click right click and select "New Maintenance Plan";
- Enter a name for the new maintenance plan;
- Click on the calendar icon on the right side of the single line. In the window that opens, configure the task execution time. Choose a time when the database is less busy;
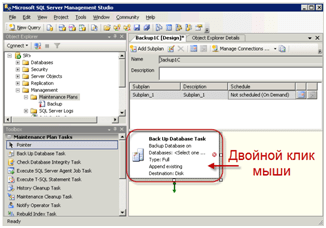
- From the Toolbox section, drag the Backup Database Task to the main area;
- Double click on Backup Database Task - the backup task settings window will open - set the desired settings;
- Click OK - now backups will be created in accordance with the scheduled time;


Deleting old backups
Since backup files will be created frequently, you will soon have less free space on your hard drive. Therefore, you will need to delete obsolete backup files. Let's continue configuring the maintenance plan:
- From the Toolbox, drag the Maintenance Cleanup Task to the main area;
- Double click Maintenance Cleanup Task to open the properties window. In it, you must define the location of the backups, their extension and determine the age of the files to be deleted. It is good practice to keep backups up to one month;
- Click OK and save the maintenance plan;
- Then you can either wait until the next maintenance plan execution time, or execute it manually (by right-clicking on the maintenance plan in Object Explorer).
It is recommended to customize regular database backup(in case of hardware or software failures), and best of all with backups for the last few days, for example seven (for the last week).
To do this, you can use either the built-in task scheduler in SQL Server - "SQL Server Agent" (in free version not included), or the standard "Windows Scheduler" in combination with the SQLCMD.EXE utility, which allows you to run queries against SQL Server from command line. You must create at least seven jobs in the scheduler (one for each day of the week), each of which will (once a week) replace one of the seven files containing the corresponding database backup.
In addition, it is recommended to store backup files not only on the hard drive of the computer where SQL Server is installed, but also to duplicate them on tape or HDD another computer on the network. To do this, you can either use special software that allows you to backup the entire disk, or use the same scheduler to copy files to tape or another computer (second step).
Using the "Windows Scheduler" (for the free version)
To create a task in the "Windows Scheduler" you need:
Run the Notepad program (Start->All Programs->Accessories->Notepad) and enter the following two lines, then save them as a batch file (*.BAT):
SQLCMD -S (local) -E -Q "BACKUP DATABASE AltaSVHDb TO DISK = "D:\BACKUP\ AltaSVHDb_monday.bak" WITH INIT, NOFORMAT, SKIP, NOUNLOAD"
XCOPY D:\BACKUP\ AltaSVHDb_monday.bak \\BACKUP_SERVER\Folder\*.* /Y
Where "(local)"- server name (if you are installing a named instance of SQL Server, you must specify the name in full: “COMP_NAME\SQLEXPRESS”), AltaSVHDb- database name, "D:\BACKUP\ AltaSVHDb_monday.bak"- the name of the file to create a backup copy in it (will vary by day of the week), "BACKUP_SERVER"- the name of the computer to which additional copying will be performed, Folder- a folder on this computer (it must be shared).
Launch the task scheduling wizard (Control Panel->Scheduled Tasks->Add Task) and click the "Next" button:
Click the "Browse" button and specify the path to batch file(*.BAT) created in step a):

Specify a name for the task, select the "weekly" run option and click the "Next" button:

Check the box next to the desired day of the week, and in the "Start time" field, specify the time when the backup process should start (usually this is done at night), then click the "Next" button:

Enter the username and password (twice) of the OS account under which the task will be executed, and click the "Next" button:

Attention! For the task to run successfully, you must provide the account specified here (domain or local computer) write permissions to the above folder "\\BACKUP_SERVER\Folder", as well as configure access to SQL Server itself.
Press the "Finish" button

Note. To check the operability of the created task, in the list of tasks (Control Panel->Scheduled Tasks) right-click on the task of interest and in context menu select the "Run" item, then make sure that the database backup file was successfully created using the paths that were specified in step a).
Using "SQL Server Agent" (not included in the free version)
To create a task in SQL Server Agent, you need to:
Run the SQL Server Management Studio utility and connect to the server with an administrator account.
In the left part of the window, right-click on the "Server objects / Backup devices" section and select the "Create backup device" item in the context menu:

In the "Device name" field, enter a name that will be associated with the database backup file, change the path in the "File" field if necessary, and click "OK":

In the left part of the window, right-click on the "SQL Server Agent/Jobs" section and select the "Create Job" item in the context menu:

In the "Name" field, enter the name of the task:

On the Steps page, click the Create button:

In the window that appears, enter a name in the "Step Name" field, check that "Transact-SQL (T-SQL) Script" is selected in the "Type" field, and enter the line in the "Command" field:
BACKUP DATABASE AltaSVHDb TO AltaSVHDb_monday WITH INIT, NOFORMAT, SKIP, NOUNLOAD
Where AltaSVHDb- database name, AltaSVHDb_monday- the name of the backup device created in step c) (will vary by day of the week):

In the previous window, click the "OK" button, as a result, the following line should appear on the "Steps" page:

In order for the database backup file to be immediately copied to another computer on the network, repeat steps f) - h), in the "Creating a task step" window, selecting the value " operating system(CmdExec)", and in the "Command" field specifying the line:
XCOPY D:\MSSQL\BACKUP\AltaSVHDb_monday.bak \\BACKUP_SERVER\Folder\*.* /Y
Where "D:\MSSQL\BACKUP\AltaSVHDb_monday.bak"- the path specified in step c) (will vary by day of the week), "BACKUP_SERVER"- the name of the computer to which the copy will be made, Folder- a folder on this computer (it must be shared):

Note. To copy the file successfully, you must run the "SQL Server Agent" under the account Windows domain, for which permissions have been granted to write to the aforementioned folder (see also "SQL2005_installation.doc" or "SQL2008_installation.doc"), and access to SQL Server itself has been configured (see section "Setting database access rights", enable this account on the Server Roles page, and do nothing on the User Mapping and Securable Objects pages).
On the "Schedules" page, click the "Create" button:

Enter a name in the Name field, make sure the Schedule Type field is set to Recurring Task and the Runs field is set to Weekly. Check the box next to the desired day of the week (uncheck the rest), and in the "Single task" field, specify the time when the backup process should start (usually this is done at night):

In the previous window, click the "OK" button, as a result, the following line should appear on the "Schedules" page:

Press the "OK" button.
Note. To check the operability of the created task, you need to right-click on the task of interest in the "SQL Server Agent / Tasks" section and select the "Run task at a step" item in the context menu, select the first step of this task in the window that appears and click "OK". A window will appear showing the progress of the task. If the execution of the task ends with an error, then detailed description errors can be seen by calling the "View log" item of the same context menu.
A differential backup is based on the most recent previous full data backup. A differential backup retains only the changes that have been made since the last full backup.Recommendations:
- Use differential database copies if creating a full database copy takes a long time
- Make a full database backup periodically to reduce the amount of differential backups you create.
- After creating a full copy of the database, all previous differential copies lose their relevance.
I will give a small example from practice why we began to use a differential copy. Over time, our client's database grew to such a size that the creation of a full backup took 8 hours, several more months, and perhaps by the beginning of the working day this operation would not have had time to complete. After switching to differential backup, we reduced the time from 8 hours to 2-4 minutes (depending on the day of the week). Once a week we made a full copy of the database.
SQL example for creating a differential database backup with backup verification upon completion (different from full copy flag DIFFERENTIAL should be used instead NOFORMAT).
Declare @pathBackup as varchar(55) set @pathBackup = N"C:\Backup\[DB Filename]_" + REPLACE(convert(varchar,GETDATE(), 104),".","_") + " .bak" BACKUP DATABASE [Database name] TO DISK = @pathBackup WITH DIFFERENTIAL, NOFORMAT, INIT, NAME = N"Full Database Backup", SKIP, NOREWIND, NOUNLOAD, STATS = 10, CHECKSUM GO declare @backupSetId as int declare @pathBackup as varchar(55) set @pathBackup = N"C:\Backup\[Database Filename]_" + REPLACE(convert(varchar,GETDATE(), 104),".","_") + " .bak" select @backupSetId = position from msdb..backupset where database_name=N"[Database name]" and backup_set_id=(select max(backup_set_id) from msdb..backupset where database_name=N"[Database name]") if @backupSetId is null begin raiserror(N"Verification failed. No backup information found for database '[Database Name]'", 16, 1) end RESTORE VERIFYONLY FROM DISK = @pathBackup WITH FILE = @backupSetId, NOUNLOAD, NOREWIND GO
3.System databases
In addition to the main database and its associated files, I strongly recommend making copies of the system databases as well. Let's start by looking at what databases exist in MS SQL. There are only 5 of them:I chose to back up only 2 system databases:
- msdb - because configured tasks and others are stored there
- master - stores all the settings made by SQL Server.
4. Backup plan
Based on the above, we will draw up our data backup plan. It may differ from what you need, it all depends on the requirements for restoring the database. When I was preparing the plan, I had to take into account that it was necessary to restore the data as much as possible and the data loss was no more than one hour.We will make the following backups:
- Full copy of the main database, more than once a week is not necessary
- Differential copy of the main database, every day
- Copies of the transaction log of the main database, every hour
- A copy of the master system database, once a week
- Copy of the system database msdb, once a week
| Day of the week |
Time |
Actions |
Frequency |
Description |
| Monday Friday |
From 8-00 to 21-00 |
Backups Transaction log |
Each hour |
After performing a database backup, the transaction log is compressed and truncated |
| Saturday Sunday |
From 8-00 to 18-00 |
|||
| Monday Sunday |
22-00 |
Differential copy of the main database |
1 per day |
After a successful delta copy, all old copies of the transaction log are deleted |
| Saturday |
12-00 |
Database check |
1 per day |
Checking the database Case for integrity. |
| Saturday |
18-00 |
Creating a full copy of the database |
1 per day |
Upon completion of this operation, a notification is sent to the mail. If the backup was successful, the
|
| Monday Sunday |
23-30 |
Creating a copy of the master system base |
1 per day |
|
| Sunday |
12-30 |
Creating a copy of the msdb system database |
1 time per month |
Only the last copy of the database is always stored |
- Use the BACKUP WITH CHECKSUM option
to make sure everything went well. The disadvantage of this solution is that, for large databases, checking the checksum can seriously load the system. - Do not back up files to the same physical disk as the database or transaction log.
- If you are using MS SQL 2008 or higher, I recommend you use SQL backup compression. The following code will enable compression by default: USE master; GO EXEC sp_configure ‘backup compression default’, "1"; RECONFIGURE WITH OVERRIDE;
- keep backups for several days in case one of them gets corrupted - an old backup is better than none.
- Use DBCC CHECKDB to check each database before copying, this will warn you in a timely manner of impending problems. DBCC CHECKDB("Database name") WITH NO_INFOMSGS, ALL_ERRORMSGS; Note: in practice we used this check, just before performing a full backup.
- Periodically update statistics and reorganize database indexes
We use the application
A few notes about the application:- All texts and requests in the code are taken out as resources, it was easier for me
- When you enter connection parameters and other settings, they are saved to a file. For Express and Standard, different files are used (dbStandart, udExpress) they store the UserData class
- Some operations may require administrator rights
- On this moment db connection not working under domain account
- The program does not have a super beautiful interface
1. Administrator notification setting
I was too lazy to go to the server every time and check if the task worked or some kind of error occurred. Yes, and I wanted to be able to receive other notifications, not only about the completion of tasks.For this purpose, DatabaseMail MS SQL is used (for the Standard version and higher)
In my application, I made a special section to automate this task

When clicked, a form will appear for filling in the information necessary to create a mailing list profile:

The application is automatically set to the standard 25 SMTP port for the address from which letters are sent. If necessary, it can be changed in the sysmail_add_account_sp procedure
A username and password are required if the mail service has authentication configured.
The name of the operator in the system is indicated so that we can normally create a profile in DatabaseMail. Write any name that will be clear to you. Below is an example of a completed form.

- are changing system parameters MS SQL.
- DatabaseMail Profile is created
- Profile activated in SQL Agente
- DatabaseMail Account is created
- Add DatabaseMail Account to Database Mail Profile
- DatabaseMail Operator is created
2.Additional notices for administrator
The program provides 2 tasks applied to the database:- checking the integrity of the database. The standard procedure DBCC CHECKDB was used to check the database.
- informing about free space in filegroups.
- The second task was implemented by querying the dbo.sysfiles system table
- Here is an example given request, which was executed to the database:
The response from the server comes to the administrator's mail in the form of html markup. This syntax is possible due to the following standard function MS SQL FOR XML .
Also, while I was looking for how to convert text into the returned result of queries in html, I came across the following page, where a person created a whole procedure for these purposes
You can configure these operations using the corresponding item in the program menu:

A window will appear for specifying the mailbox to which the html text of the report should be sent:

3. Troubleshooting when configuring DatabaseMail
In MS SQL 2008, I ran into a problem while configuring SQL Server Agent. The symptoms are as follows, after setting it is not possible to start the SQL Agent. This is mainly solved by installing update on the SQL server.If these updates do not help, you need to download the fix. It can be found on this site. I can’t specify the final link now, in order to get to the fix package, I will need to answer a number of questions.
If there are problems with the DatabaseMail module. After configuring this module using the application, you need to go to SQL Agent and view the event log. If there are errors "unable to connect to mailbox". Means there is a problem even if the letter is sent through check.
This is corrected by the following manipulations:
- Management Studio - SQL Server Agent - Properties.
- Alert System
- Uncheck Enable mail profile
- Click OK
- Please login again and check the box.
- Restart SQL Server Agent.
4.Set up backup using the application for SQL Standard:
Select the Standard version. Set up notifications. (see section, notification settings):
We connect to the database, filling in the data for the connection and specifying the database for which the Job will be applied:

Select a backup setting:

Specify the paths for saving copies of the database. If the specified folders do not exist, the program will try to create them (appropriate rights are required).

We press save and the corresponding tasks are configured for the database. It is advisable to configure for each backup different folders, because when deleting, all files with bak extension will be deleted. (cm. section deleting database copies)

5.Set up backup using the application for SQL Express:
Since there is no SQL Agent in SQL Express, the task of automating backups had to be solved in a different way. Created in the user-specified folder bat file e in which it is described SQL query The one responsible for creating the backup. If necessary, you can edit it directly. In addition to this, the standard Windows scheduler should work, it creates a task that will run once a day at the specified time.To do this, we launch the application. Select MS SQL Express:

A form for filling in the parameters appears:

We indicate where our copy will be saved, and also where the bat file will be located to create a copy of the database (you do not need to specify the file name, it will be set automatically). Next, specify the connection settings and the time when you want to run the task.
The only disadvantage of this approach is that the password for connecting to the database has to be stored in clear text.
6.Deleting tasks from the database.
If you need to delete all tasks from the database (for example, you want to change the way the database is saved). To do this, use the corresponding item in the program menu. All tasks with a certain initial prefix (in my case, King) will be deleted from the SQL Agent:
7. Deleting database copies
In some tasks, deletion of old database copies is configured. To do this, I use the master.dbo.xp_delete_file procedure. Usage example: Delete all bak files from the specified folder that are older than 14 days.EXECUTE master.dbo.xp_delete_file 0,"E:\backups",N"bak",dateadd(d,-14,getdate()),0;
And here is another more detailed example and information about what parameters the given function accepts.
How to restore backups
Due to lack of time, the recovery module has not yet been implemented, perhaps in the future I will add it, but for now I will simply briefly describe how it will be possible to restore the database.WITH using SQL script. The RESTORE command is used to restore a database.
If you need to restore just the database from a full copy, then just execute the following script:
RESTORE DATABASE [Database name] FROM DISK = "Z:\SQLServerBackups\back.bak" WITH REPLACE
If it is necessary to restore sequentially first the full copy, differential copies and transaction logs, then you need to write the following SQL script.
RESTORE DATABASE TEST_DB - restore a full copy FROM test_db_full WITH NORECOVERY; GO RESTORE DATABASE TEST_DB - restore differential copy FROM test_db_diff WITH FILE = 1, NORECOVERY; GO RESTORE LOG TEST_DB – restore transaction log #1 FROM test_db_tran_1 WITH FILE = 1, WITH NORECOVERY; GO RESTORE LOG TEST_DB – restore transaction log #2 FROM test_db_tran_2 WITH FILE = 1, WITH NORECOVERY; GO RESTORE DATABASE TEST_DB WITH RECOVERY; GO
You can also use SSMS to restore the database.
Tags: Add tags
Despite the fact that in our previous materials we have already touched on the issue of backup Microsoft bases SQL Server, the reader's response showed the need to create a full-fledged material with a deeper study of the theoretical part. Indeed, made with an emphasis on practical instructions articles allow you to quickly configure backup, but do not explain the reasons for choosing certain settings. Let's try to fix this gap.
Recovery models
Before setting up a backup, you must select a recovery model. For optimal choice you should evaluate the requirements for recovery and the criticality of data loss, comparing them with the overhead costs of implementing a particular model.
As you know, the MS SQL database consists of two parts: the database itself and the transaction log to it. The database contains user and service data at the current time, the transaction log includes a history of all database changes for a certain period, having a transaction log, we can roll back the state of the database to any arbitrary point in time.
Two recovery models are offered for use in production environments: simple and complete. There is also a model with incomplete logging, but it is recommended only as an addition to the full model for the period of large-scale mass operations, when there is no need to restore the base to a certain point in time.
simple model provides for backing up only the database, respectively, we can restore the state of the database only at the time of the backup, all changes in the time interval between the creation of the last backup and the failure will be lost. In the same time simple circuit has a small overhead: you only need to store copies of the database, the transaction log is automatically truncated and does not grow in size. Also, the recovery process is the simplest and does not take much time.
complete model allows you to restore the database to any arbitrary point in time, but requires, in addition to database backups, to store copies of the transaction log for the entire period for which restoration may be required. At active work with a database, the size of the transaction log, and, consequently, the size of the archives, can reach large sizes. The recovery process is also much more complex and time consuming.
When choosing a recovery model, you should compare the costs of recovery with the costs of storing backups, and you should also take into account the availability and qualifications of the personnel who will perform the recovery. Recovery with a full model requires certain qualifications and knowledge from the personnel, while with a simple scheme it will be enough to follow the instructions.
For databases with a small amount of information added, it may be more beneficial to use a simple model with a high copy frequency, which will allow you to quickly recover and continue working by manually entering lost data. The full model should be used first of all where data loss is unacceptable, and their possible recovery is associated with significant costs.
Types of backups
Full copy of the database- as its name implies, it represents the contents of the database and part of the active transaction log for the time that the backup was formed (i.e. information about all current and incomplete transactions). Allows you to completely restore the database to the time the backup was created.
Delta database copy- a full copy has one significant drawback, it contains all the information in the database. If backups need to be done quite often, then the question of wasteful use of disk space immediately arises, since the same data will occupy most of the storage. To overcome this shortcoming, you can use differential copies of the database, which contain only the information that has changed since the last full backup.
 Please note that a differential copy is data from the moment of the last complete copying, i.e. each subsequent differential copy contains the data of the previous one (but they can be changed) and the size of the copy will constantly grow. Restoration requires one full and one differential backup, usually the last one. The number of differential copies should be chosen based on the increase in their size, as soon as the size of the differential copy compares with the size of half of the full one, it makes sense to make a new full copy.
Transaction log backup- applies only to the full recovery model and contains a copy of the transaction log starting from the moment the previous copy was created.

It is important to remember the following point - copies of the transaction log are not related to database copies in any way and do not contain information from previous copies, therefore, in order to restore the database, you need to have a continuous chain of copies of the period during which you want to be able to roll back the state of the database. In this case, the moment of the last successful copy must be within this period.
Let's look at the figure above, if the first copy of the log file is lost, then you can restore the state of the database only at the time of the full copy, which will be similar to the simple recovery model, you can restore the state of the database to any point in time only after the next differential (or full) copy , provided that the chain of log copies starting from the database preceding copying and further will be continuous (in the figure - from the third and further).
Transaction log
To understand recovery and assignment processes different types backups, you should take a closer look at the structure and operation of the transaction log. A transaction is the smallest possible logical operation that makes sense and can only be completed in its entirety. This approach ensures the integrity and consistency of data in any situation, since the intermediate state of the operation is not allowed. The transaction log is designed to control any changes in the database.
When any operation is performed, an entry about the beginning of the transaction is added to the transaction log, each entry is assigned a unique number (LSN) from an inseparable sequence, with any data change, a corresponding entry is made to the log, and after the completion of the operation, a mark about the closing (committing) of the transaction appears in the log.
 At each startup, the system analyzes the transaction log and rolls back all uncommitted transactions, while at the same time, changes are rolled forward that are committed in the log but have not been written to disk. This makes it possible to use caching and write-back without fear for data integrity even in the absence of backup power systems.
The part of the log that contains active transactions and is used for data recovery is called the active part of the log. It starts with a number called the Minimum Recovery Number (MinLSN).
In the simplest case, MinLSN is the record number of the first pending transaction. If you look at the figure above, then by opening the blue transaction we will get MinLSN equal to 321, after it is fixed in record 324, the MinLSN number will change to 323, which will correspond to the green transaction number, which has not yet been committed.
In practice, things are a little more complicated, for example, the data of a closed blue transaction may not yet be flushed to disk, and moving the MinLSN to 323 will make recovery of this operation impossible. In order to avoid such situations, the concept of a control point was introduced. A checkpoint is created automatically when the following conditions occur:
- When explicitly executing the CHECKPOINT. The checkpoint fires on the current connection database.
- When you perform a minimally logged operation on a database, such as when you perform a bulk copy operation on a database that is subject to the bulk-logged recovery model.
- When adding or removing database files using the ALTER DATABASE statement.
- When the SQL Server instance is stopped by using the SHUTDOWN statement, or when the SQL Server (MSSQLSERVER) service is stopped. In both cases, a checkpoint will be created for each database in the instance of SQL Server.
- If an instance of SQL Server periodically creates automatic checkpoints on each database to reduce database recovery time.
- When creating a database backup.
- When you perform an action that requires you to shut down the database. Examples include setting AUTO_CLOSE to ON and closing the user's last connection to the database, or changing a database setting that requires a database restart.
Depending on which event happened first, MinLSN will be set to either the checkpoint record number or the start of the oldest pending transaction.
Transaction log truncation
The transaction log, like any log, requires periodic cleaning of obsolete records, otherwise it will grow and take up all available space. Considering that during active work with the database, the size of the transaction log can significantly exceed the size of the database, this issue is relevant for many administrators.
Physically, the transaction log file is a container for virtual logs that fill up sequentially as the log grows. The logical log containing the MinLSN entry is the beginning of the active log, the logical logs preceding it are inactive and are not required for automatic database recovery.
 If the simple recovery model is selected, then when the logical logs reach a size equal to 70% of the physical file, the inactive part of the log is automatically cleared, the so-called. truncation. However, this does not reduce the physical log file, only logical logs are truncated, which can be reused after this operation.

If the number of transactions is high and there are no inactive logical logs by the time the physical file size reaches 70%, then the physical file size will be increased.
 Thus, the transaction log file with a simple recovery model will grow according to the activity of working with the database until it reliably contains the entire active part of the log. After that, its growth will stop.
With a full model, the inactive portion of the log cannot be truncated until it is fully backed up. Truncation of the log is performed on the condition that the transaction log was backed up, after which a checkpoint was created.
Failure to properly set up transaction log backup on a full model can cause the log file to grow uncontrollably, which is often a problem for inexperienced administrators. Tips for manually truncating the transaction log are also often found. With a full recovery model, this should not be done categorically, since by doing so you will violate the integrity of the chain of log copies and you will be able to restore the database only at the time the copies were created, which will correspond to the simple model.
In this case, it's time to remember what we talked about at the beginning of the article, if the costs of a full model exceed the costs of restoration, a simple model should be preferred.
Simple Recovery Model
Now, after obtaining the necessary minimum knowledge, we can move on to a more detailed consideration of recovery models. Let's start with a simple one. Let's say at the time of the failure we have one full and two differential copies:
 The backup was performed once a day and the last copy was created on the night of the 21st to the 22nd. The failure occurs on the evening of the 22nd before the next copy is created. In this case, we will need to sequentially restore the full and latest differential backups, and the data for the last business day will be lost. If for some reason the copy from the 21st also turns out to be damaged, then we can restore the previous copy, losing another day of work, while at the same time, damage to the copy on the 20th does not prevent us from successfully restoring data on the evening of the 21st, with an appropriate copy.
Complete recovery model
Let's consider a similar situation, but using the full recovery model. We also make backups on a daily basis, according to the full + differential principle, and the transaction log is copied several times a day.
 The recovery process in this case will be more complicated. First of all, you will need to create a manual backup of the final log fragment (shown in red), i.e. part of the log from the time the copy was last created to before the crash.
If this is not done, then it will be possible to restore the database only to the state at the time the last copy of the transaction log was created.
At the same time, damage to the log copy file for the previous day will not prevent us from restoring the current state of the database, but will limit us to the moment the last copy was created, i.e. current days.
Then we sequentially restore the full and differential copies and the chain of copies of the log created after the last backup, the last to restore the copy of the final fragment of the log, which will give us the opportunity to restore the database right at the time of the accident or an arbitrary one that preceded it.
If the last differential copy is damaged, then in the case of a simple model, this will lead to the loss of another working day, the full model allows you to restore the penultimate copy, after which you will need to restore the entire chain of copies of the transaction log from the moment of the penultimate copy to the failure. The depth of recovery depends only on the depth of the continuous chain of logs.
On the other hand, if one of the copies of the transaction log is damaged, say, the penultimate one, then we can only restore data to the time of the last backup copy + period in the undamaged chain of log copies. For example, if the logs were made at 12:00, 14:00 and 16:00 and the log created at 14:00 is damaged, then having a daily copy we can restore the database until the end of the continuous chain, i.e. till 12 o'clock.
Tags:
And also: SQL backup, 1C backup.
Server 1C contains data in the database, which is located on the SQL server. Today we are considering MS SQL 2005/2008.
To ensure that data is not lost in the event of a burnt server disk or other force majeure situations, it is necessary to make backups from the very beginning.
Make pens every day Backup SQL databases 1C of course no one wants. There are automatic tools for this. Let's get to know them.
Configuring BackupSQL
Setting up Backup SQL for a 1C database is no different from setting up a backup for any other database.
To configure, run MS SQL Management Studio. This program is in the MS SQL program group.
Adding a 1C SQL database backup task
Tasks for automatic backup of SQL databases are located in the Management / Maintenance plans branch.

To add a new backup task, right-click on the Maintenance plans group and select New Maintenance Plan.

Enter the name of the task. The name matters only to you. Just in case, it is better to use English characters.

Setting up a 1C SQL database backup task
The Job Editor will open. Please note that jobs can do various operations with the database, and not just backups.
The list of options for operations is displayed at the bottom left. Select Back Up Database Task by double-clicking or simply drag to the right.

Notice the arrow. You can drag and drop several different or identical operations and link them with arrows. Then several tasks will be executed at once in the sequence specified by you.
In the settings window, select the required SQL 1C databases (you can have several or one at a time).

Select the location to save the backup of the SQL 1C database. You must select a physically different hard drive. Organizationally, you can check the "Create subfolders" checkbox.

Now let's set up the backup schedule. The default backup schedule was added by itself. But you can add multiple schedules (for example, one daily, one weekly, etc.). Click the backup schedule settings button.

The screenshot shows an example of a daily Backup SQL database 1C at 3 am.

To make the backup schedule in the list nice and understandable, you can change it.

Saving a 1C SQL database backup job
Click burn. The task will appear on the left side of the list.

It is important! Check that the Backup SQL database task was created correctly. To do this, right-click on the task and select Execute.
As a result, a backup file should appear at the specified path. If something is wrong, delete the task (Del) and start from the beginning.