By manipulating the Windows installation image, we mean adding or removing individual components of the operating system before it is installed. The point is to add components (for example, drivers or service packs) to the distribution (usually a file with the ISO extension) without the help of Microsoft specialists.
Such an operation can be carried out using a specialized software. When and why might this be needed? In a variety of circumstances and for a variety of categories of Windows users. Primarily for those who need to integrate updates into their existing Windows 7 image.
A variety of circumstances can induce a modification of the image. For example:
- You are trying to install Windows 7 on a laptop you just purchased and find that the installation process fails with an error indicating missing drivers.
- You are in the process of mass installing an OS on many computers in an organization.
- Having created a working environment that is convenient for you, you would like to save it for future use and get a suitable environment for yourself immediately after installation.
- You have a Windows distribution without the latest service packs and would like to include them on your installation disc.
 In all these cases, it would be desirable for you to obtain a modified Windows distribution image with a personalized configuration.
A bit of history and where is information about the download process stored?
From the very moment the NT operating systems appeared, tools for automatic installation of the system on one or many computers began to be supplied with them. For example, Windows 2000 contained a fairly advanced toolkit for this purpose. Those who manually installed the OS from a regular installation disk are well aware that during the installation process, the operating system requires the user to answer a number of questions regarding the installation location, type of file system, and some other parameters. Automatic installation of the system implies that the answers to these questions are pre-recorded in separate file, which is called “response file”.
 If given file included in the installation image and contains all the necessary answers - installation can occur automatically or hide its individual stages from the user. It would seem, what does all this have to do with the stated topic? The most direct.
If you add additional components (drivers, service packs, etc.) to the distribution kit, as well as tell the installer where these updates are located and what to do with them, you can get an image with the required characteristics. Those. integrate updates directly into the Windows installer.
What do "response files" look like and what is wim?
In modern Windows 7 distributions (made as an iso image), the answer file is a regular xml document called autounattend.xml located at the root of the image's file hierarchy. The installation package itself is represented by two files with the wim extension - boot.wim and install.wim. the first is responsible for the initial boot, and the second contains the actual installed system. Wim files are essentially containers for other files included in the operating system image. Therefore, individual components can be added or removed to them, thereby forming a Windows instance with the necessary internal content.
 Further work on modifying the system is as follows:
- An ISO file with Windows is unpacked by a suitable archiver into a separate folder.
- Required components and updates are added to it.
- The nuances of installing these updates are written in the "answer file"
- All this is packed back into an iso file, ready to use.
The result is a ready-made installer with the necessary updates. It should be borne in mind that in the general case this kind of integration requires certain, sometimes not small, knowledge. The response file can also be generated automatically during the installation of the system - but this is not our case, because. we want to achieve not only automatic installation, and get a distribution kit with updates.
From theory to practice
Some Windows users 7 encountered such a situation (it is very reminiscent of the story of the inability to install the "seven" on new laptop): after the next automatic update and restarting the computer - the system refuses to start in new configuration and just hangs at startup. One solution to this problem is to download the update package from the Web and integrate it directly into the OS image. No need to be scared in advance - you do not need to create and edit "answer files" for this purpose. In this case, everything turns out to be much simpler, although everything happens according to the scheme described above.
What will we need? Firstly, - good program for working with disk images, like the widespread free utility"Ultraiso". And, secondly, a little ingenuity and accuracy. Here are the step by step instructions:
- Open the image in ultraiso.
- We create a separate folder.
- We put install.wim from the iso file there. You should look for it in the /source folder.
- We put the file with the service pack there.
- We open a command prompt window and enter the command to view all editions of Windows integrated into our image (there are usually several of them). The command looks like this:
Dism /Get-WimInfo /WimFile: ...\install.wim (instead of three dots, write the path to install.wim)
And then we roll up the service pack into one or all editions at once. To integrate across all editions, in the same command window, type something like:
…\UpdatePack7R2.exe /WimFile=…\install.wim /Index=*
During the modification process, the system will display message boxes.
 We transfer the new install.wim to the iso-shnik in place of the old one.
That's the whole wisdom of integrating packages into an image.
Reinstalling Windows 10 involves several rather lengthy procedures, such as installing drivers and updates. This may take an hour or two, depending on the power of your device and the speed of your Internet connection. Why not make the program Windows installation 10 immediately added all the drivers to the system and updated it? In this guide, we will show you how to integrate drivers and updates into a Windows 10 disk image (ISO or distribution kit) so that they are automatically installed with the system.
What you need to integrate drivers and updates into your Windows 10 image
- Unpacked image of Windows 10. It can also be unpacked to any folder using some kind of archiver, for example, free 7-Zip.
- A folder with the necessary drivers for your device. You can simply.
- MSU file windows updates 10, which is possible.
- A device running Windows 7 (and older) with several gigabytes of free space on system drive and enough powerful processor. Carry out the operations described below on the tablet with Intel processor Atom and 16 GB of internal memory are not worth it.
- Free program NTLite.
The method described in the article also works for Windows 7 and Windows 8.1, but you will have to obtain their images, updates, and drivers using other methods.
How to Integrate Drivers and Updates into a Windows 10 Image
The process of adding drivers to the Windows 10 distribution can be divided into several parts.
Installing NTLite
Preparing a Windows 10 Image for Driver Integration

Add drivers and updates to a Windows 10 image
- Go to section Updates using the menu on the left.
- Click Add - Package Files.

- Specify the path to the update installation MSU file.

- Wait while the program downloads the update package.

- Go to section Drivers in the menu on the left.
- Click Add - Folder with multiple drivers.

- Specify the path to the folder with the drivers.

- Wait while the program downloads the drivers.

- Go to section Apply in the menu on the left.
- Check the box Create ISO above.

- Choose where to save the ISO file and enter a name for it.

- Label the ISO file. It doesn't affect anything, so you can call it whatever you like.

- Click the button Treatment.

- If the program asks, go to settings and disable Windows Defender.

- Wait while NTLite performs all operations. After the process is completed, the program can be closed.

You can use the resulting ISO file for . All drivers and updates will be installed automatically with the system.
In this tutorial, we will show you how to integrate new system update packages into a Windows 10 / Windows 8.1 offline installation image using the built-in system tools. Similarly, you can add the latest security patches to the distribution Windows Server 2012 R2 / 2016.
In this example, we will show the process of adding the latest cumulative security updates (dated December 2018) to the Windows 10 1803 installation image. So, we will need:
- Windows 10 installation image in ISO format or its WIM file;
- Updates in .msu format that you need to download from the Microsoft update server ().
It is important to make sure that the bitness and version of your Windows distribution and the downloaded updates match, otherwise, when installing the update, you will see: .
On your computer, create the following directory structure:
Mount the Windows 10 installation image file (install.wim) to the C:\updates\mnt directory by running:
dism /mount-wim /wimfile:C:\updates\Win10Image\install.wim /index:1 /mountdir:C:\updates\mnt
Advice. If the wim image contains several versions of Windows at once, you need to specify the index in this command desired version OS, or perform update integration for each image in turn. The list of Windows editions in a wim file can be obtained using the command:
DISM /Get-WimInfo /WimFile:C:\updates\Win10\install.wim

In our example, the image contains only one edition of the OS - Windows version 10 Pro with index 1 , so we specify install.wim /index:1 in the command.
Now you can start the process of integrating the appropriate MSU updates located in the specified directory into the Windows image.
dism /image:C:\updates\mnt /add-package /packagepath:C:\updates\msu
If the system detects an inappropriate update (does not match the OS version, bit depth, or if the update is already installed), it will be skipped, and the corresponding information will be written to the C:\Windows\Logs\DISM\dism.log log.

To reduce the image size by removing unused update files (see the article about ), run the command:
dism /image:C:\updates\mnt /Cleanup-Image /StartComponentCleanup /ResetBase /ScratchDir:C:\Temp
If you already have a computer with similar version Windows 10 that already has the latest security updates installed, you can get all the required update files directly from it. In this case, you do not need to manually select and download MSU update files from the Microsoft Update Catalog on the Internet. The fact is that Windows saves all cab files of updates received from servers windows update or server to the C:\Windows\SoftwareDistribution\Download directory.

Mount the Windows installation Wim image you wish to upgrade:
dism /mount-wim /wimfile:C:\updates\Win10\install.wim /index:1 /mountdir:C:\updates\mnt
Using the following command, you will start integrating into the install.wim image the update files that have already been downloaded and installed on another computer via the local network:
Start /w for /R \\Win10x64Patched\C$\Windows\SoftwareDistribution\Download\ %f in (*.cab) do dism /image:C:\updates\mnt /add-package /packagepath:”%f”
In this example Win10x64Patched– the name of the computer on which the necessary updates are already installed (version and bitness of the OS must match). It is natural that this computer was available over the network, and your account must have administrator rights on it. As a result of running the command, a new window will open in which you can observe the process of installing updates to an offline Windows image. DISM will try to add to your wim image Windows every found .cab file on a remote computer.
If you encounter an error while integrating updates into a Windows image: “Error 0xc0000135 An error occurred while attempting to start the servicing process for the image located at C:\Update\mount. Fore more information, review the log file.”, make sure you are using latest version DISM (for example, you are trying to change a Windows Server 2016 image from Windows 8.1. Install the latest available Windows Assessment and Deployment Kit (Windows ADK) for your OS and run DISM directly from C:\Program Files (x86)\Windows Kits\10\Assessment and Deployment Kit\Deployment Tools\amd64\DISM.
dism /unmount-wim /mountdir:C:\updates\mnt /commit
dism /Cleanup-Wim

It remains to copy the resulting image in install.wim to the source directory / virtual machine or rebuild the installation iso image, for example, using oscdimg), UltraISO or .
If the size of the received install.wim file is more than 4 GB when installing the Windows image on the system, you may encounter the error “Windows cannot open the required file D:\sources\install.wim. Error code: 0x8007000D". In this case, you need to split the original install.wim into smaller files with the command
dism /split-Image /imagefile:C:\Update\Win10Image\install.wim /swmfile:C:\Update\Win10Image\install.swm /filesize:4096
After that, the original install.wim can be removed.
DISM also allows you to manage the installation of drivers in an image. Previously, we looked at how using the DISM utility or the PowerShell cmdlet Add-WindowsDriver on the example of Windows 10 / 8.1 / Windows Server 2012 R2 / 2016 or Windows 7 ().
Now you can use your distribution with the latest security patches integrated to install on computers on your network. By regularly integrating the latest security updates into your Windows image deployed to new computers, you keep your infrastructure more secure against the latest vulnerabilities and reduce the risk of new computers being infected before they start updating from WSUS.
Today, Windows 7 is the main corporate system, de facto, taking over from Windows XP. Therefore, for system administrator the issue of its deployment is relevant, but since the last official image was compiled quite a long time ago, the systems installed with its help require a fairly large number of updates. You can avoid this if you build your own distribution containing all current system updates. How to do this, we will tell in this article.
There are two ways to get an up-to-date distribution of Windows 7: integrating updates directly into the image, and using a reference system to download and install updates.
The first method is simpler and faster, but has a serious drawback - you need to download all the necessary updates. And this, even with a list, is quite difficult to do. At the same time, there are already downloaded update sets on the network, but we do not recommend using them, since installing system components from unverified sources is a very bad idea. At a minimum, you can end up with an unstable system due to an untested or incompatible set of updates, and in the worst case, you can easily get unwanted or malware.
Using the reference system allows you to get all the necessary updates in automatic mode, install them, check the operation of the system, and only then proceed to create a distribution. Therefore, we will consider this particular method.
Creation of a reference system
For these purposes, we recommend using a virtual machine in which we will create a guest system for Windows 7 and install the OS version for which we will create a distribution kit. If you want to create distributions for multiple versions or bit depths, you will also need multiple reference systems.
When the installation is complete, take your time, when the welcome screen is displayed, click CTRL+ SHIFT+ F3
 This will reboot the system into audit mode, but if you managed to create a user and log in, then run the following command on behalf of the Administrator:
C:\Windows\System32\sysprep\sysprep /audit /reboot
When booting in audit mode, the utility automatically starts Sysprep, close this window, we do not need it now.
 It should be remembered that the system switched to audit mode will continue to boot into it until we start again Sysprep and do not change the mode. After downloading, open Windows Update and search for and install updates.
Important! On May 17, 2016, Microsoft released cumulative update package for Windows 7 SP1 KB3125574, which includes updates from the release of SP1 to April 2016, in order to reduce the volume of downloaded updates, we recommend downloading and installing this package manually. It requires update KB3020369 to be installed.
 We reboot and again we search and install updates. We reboot and repeat this operation again until the system installs all available updates.
 If your goal was only to integrate into the distribution of all latest updates, then you can end there. However, the audit mode allows you to install a variety of software, which will also be included in the distribution. This is widely used by OEMs, we think everyone has come across distributions (usually on laptops) containing, in addition to OC, a different amount of software of dubious usefulness.
Therefore, no one bothers us to include in our distribution the right software so as not to waste time on its subsequent installation. We usually limit ourselves to the "gentleman's set": archiver, Adobe Reader Java, Silverlight. You can include the whole set in it necessary software, including office suite and other software. You should not include programs that install their own drivers and device drivers in the image, since all third party drivers will be deleted when the system is preparing to capture the image. Also, you should not activate the software, this information will also be lost.
Having finished preparing the reference system, we will delete all the files we downloaded and unnecessary software (if any), Special attention should be given to cleaning the system from copies of update files, for this, use the tool Disk Cleanup:

Important! After cleaning be sure to reload system to finish working with updates, otherwise you risk getting a broken image.
Now let's prepare it for capturing an image using the utility Sysprep:
C:\Windows\system32\sysprep\sysprep /oobe /generalize /shutdown
Let's analyze the utility keys in more detail:
- oobe- starts the computer in the welcome screen mode. Screen hello windows allows end users to customize operating system Windows create new Accounts, rename your computer, and perform other tasks.
- generalize- prepares the Windows installation before creating the image. If this parameter is specified, all are unique system information are removed from the Windows installation. The security identifier (SID) is reset, system restore points are reset, and event logs are deleted.
- shutdown - Shuts down the computer after Sysprep exits.
 After completing the necessary actions, the system will shut down. You cannot turn it on before the image is captured. This completes the work with the reference system and proceeds to creating our own distribution based on it.
Creating your own distribution
For further work we need work station under Windows control 7 with installed Windows Automated Installation Kit (WAIK). Bit depth and version of the system do not play any role.
Installing WAIK should be straightforward and is done with the default settings.
 Now let's prepare the image Windows PE to capture an image of the reference system. The bitness of WinPE must match the bitness of the reference system.
Let's open Start - All Programs - Microsoft Windows AIK - Deployment Tools Command Line and execute the command for 32-bit systems:
Copype.cmd x86 e:\win_pe
or for 64-bit:
Copype.cmd amd64 e:\win_pe
Where e:\win_pe the desired location of the folder with the image. You do not need to create a folder first, as in this case you will receive an error that the folder already exists.
 Now go to the destination folder and copy the file winpe.wim to a folder ISO\sources and rename it to boot.wim. Then copy to folder ISO from a folder C:\Program Files\Windows AIK\Tools\amd64 or C:\Program Files\Windows AIK\Tools\x86, depending on the bit depth, the file imagex.exe.
Then in command line deployment tools give the following command:
Oscdimg -n -be:\win_pe\etfsboot.com e:\win_pe\ISO e:\win_pe\winpe.iso

The result of the command will be the image winpe.iso from which to boot the reference system.
 If you did not perform additional disk partitioning of the reference system, then the capture partition will have the letter D:, A boot disk E:, just in case, we check the team dir.
 Now let's start capturing the image, since the image is created file by file, it can be saved to the same partition. Let's enter the following command:
E:\imagex /capture d: d:\install.wim "Win7_ULT_x64" /compress maximum /boot /verify
As parameters we specify to capture a disk D: and save it as an image D:\install.wim, in quotation marks we indicate our own image name, we also set the maximum compression, the ability to download and check the created image. After that we can go to drink coffee, this operation takes an average of about half an hour.
 We reboot the reference system into normal mode and copy the created image to a PC with WAIK installed. Let's go to e:\win_pe and clean the ISO folder, then copy the contents of the original Windows disk 7, which we used to install the reference system.

Then we will replace the file install.wim in folder sources to the image we captured. Now you can start building your own ISO image, to do this, run the command:
Oscdimg -u2 -m -o -lWIN7ULTx64 -be:\win_pe\etfsboot.com e:\win_pe\iso e:\win_pe\Win7_ULT_x64.iso
Let's analyze the command keys in more detail:
- u2- creates an image that has only file system UDF.
- m- removes restrictions on the size of the image.
- o- replaces duplicate files with one copy, allows you to reduce the size of the image.
- l- volume label, entered without spaces, optional parameter.
- b- location boot file, also without spaces.
 The image is assembled quite quickly, the only thing is that with a high degree of probability its size will exceed 4.7 GB and it will not be possible to burn it to a regular DVD disc. In this case, you can use DVD9 double-layer discs, but they are less common on the market and may not be supported by all drive models. In this case, you can split the distribution into two parts, each of which will fit on a standard capacity DVD. You should also remember about the limitation of 32 bit systems, which do not know how to work with wim-images larger than 4 GB.
You can split the image with the following command:
Imagex /split e:\win_pe\install.wim e:\win_pe\install.swm 3000
The result will be two or more swm file maximum size in 3000 MB. Then delete from the folder ISO\sources install.wim and put install.swm there, after which we will build the image of the first disk:
Oscdimg -u2 -m -lWIN7ULTx64DVD1 -be:\win_pe\etfsboot.com e:\win_pe\iso e:\win_pe\Win7_ULT_x64_DVD1.iso
After that, delete install.swm and copy install2.swm to its place. It makes no sense to make the second disk bootable, so let's assemble it with a simpler command:
Oscdimg -u2 -m -lWIN7ULTx64DVD2 e:\win_pe\iso e:\win_pe\Win7_ULT_x64_DVD2.iso
Installation from a split image is performed in the usual way, starting from the first disk; during operation, the installer will ask you to change the disk:
 Thus, you do not have to worry about the size of the created image, especially if, in addition to updates, it is planned to include large software, for example, the MS Office package, etc. We also recommend that before proceeding with the deployment of workstations from the created distribution kit, thoroughly check its operation on a test system.
Tags:
Hello friends! It's no secret that the operating Windows system 7 is still very popular and many users whose computers are compatible with the seven keep Win 7 as the second or even the main operating system on the computer. Knowing about the enduring popularity of the old system, Microsoft released a very convenient Rollup Update (or update KB3125574) for it in the summer, which received the unofficial name - Service Pack 2, as it contains all the most important updates since 2011. This cumulative package is very convenient, because everyone knows that immediately after installation on a computer, Windows 7 starts downloading a lot of updates and installing them with a whole series of reboots, which is very inconvenient for the user. It’s another matter immediately after installing the system to roll up the Rollup Update rollup package with all the updates and work quietly. In one of our previous articles, we discussed , but I wonder if it is possible to integrate this cumulative package into the OS distribution kit so that after installation all updates are already installed in the operating system. We will talk about this in today's article.
Integration into the Windows 7 distribution of the cumulative update package "Rollup Update" KB3125574

We click on the downloaded archive with the WinToolkit 1.5 program with the right mouse and select "7-Zip" --> "Unpack"

I will unzip the program into a partition (E:).

I start the program WinToolkit 1.5.


Click on the ISO Maker button to create an image containing all Windows editions 7

Click on the top button "Browse"

In the explorer that opens, we find on the disk (E :) folder "1" with Windows files 7, select it with the left mouse and click the "Select Folder" button

Click on the bottom button "Browse"

In the explorer that opens, select the save location future Windows 7 ISO (partition E:) And give it a name"Win7", then click "Save"

Click on the "Create ISO" button
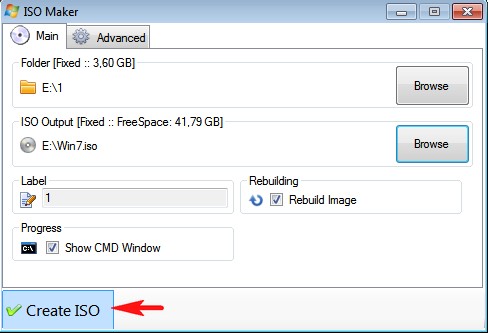
and the creation process begins ISO image Windows 7


ISO image of Windows 7 64-bit with integrated updates is ready!

and is located on disk (E:).

Installing Windows 7 with integrated Rollup Updates on another computer
After successful installation, go to "Windows Update" and look at the installed updates.

We see our integrated updates installed along with the operating system.

We return to the previous window and click on the "Check for updates" button

Windows 7 starts searching for updates.

And there are updates. Click on the "Install Updates" button

We accept the conditions license agreement and click "Done"


Updates are being installed.

After installing the updates, the system asks for a reboot.
Update setup starts.

After reboot go "Windows Update and see that all updates are installed"

Look at the Update Log.

Related article: