Sometimes, due to certain life circumstances, it is necessary to install an operating system. Quite often, users find that the sound has disappeared after reinstalling the system.
The probability of a situation that after Windows installation 7 lost sound, alas, not uncommon. Fortunately, it is solved quite simply, if you know exactly the cause.
Possible reasons
There may be several reasons for the sound to disappear. The main ones are hardware errors, that is, a violation in the sound card. In this case, specialized assistance is indispensable. Or problems in the software part, and specifically, in the absence of drivers for the sound card.
If the problems are with hardware, then you are unlikely to be able to solve the problem without special equipment and skills. Solving the problems of the software part is much simpler and does not require special knowledge and skills. To do this, you just need to confidently use a computer and not be afraid of it.
Solution options
So, if after installing Windows 7 there is no sound, then the first thing to do is to check the connection of the audio system to the computer, and also that the audio system that you are using is selected in the settings. The check is as follows:
In the event that the audio system is turned on and used, but there is still no sound, then the most probable cause, by which the sound may disappear, is that after reinstalling the seventh Windows, the drivers for the sound card or audio device were not installed. This problem is not so terrible and quite easily solved.
Finding and installing drivers
There are several ways to return sound after reinstalling Windows, the easiest way is to install distributions of control programs from the media that comes with the device, it has all the necessary drivers. But if it so happened that there is no disk, you can install the drivers using standard Windows tools.
So, in order to convince the OS to reinstall the drivers, follow the path indicated in the address bar of the explorer: " Control Panel» → « system and safety» → «». And select " device Manager».

After completing these steps, the following window will appear:

In the window that appears, select " Sound, video and gaming devices” and from the list that opens, select desired system by double clicking on the title. A properties window will appear, in which you need to select the " Driver».

In this window, you need to select the button Refresh ..., and in the window that appears, click on the item " Automatic search updated drivers". After that, Windows will start searching for the program on the Internet and update or install it, if such a need exists.
Manual installation
If the built-in Windows service told you something like “The installed software for this device does not need to be updated”, then this does not mean that you really have it installed and do not need to be updated.
If you just installed the system, then there are no audio drivers there. And the system just crashed. Also quite often the service automatic update cannot find the required software, in this case the direct path to manual search and installing the necessary programs.
To do this, the first step is to decide which sound card you have installed. If your card is integrated into the motherboard, then most likely it is from Realtek, which means that you need to go to the manufacturer's website and download the necessary software there. The device manager defines built-in maps as high Definition Audio device.
But since you may have another audio card, it's better to find out in advance which one. For this, we follow Start, we find " Run"and write in the search bar" dxdiag"and click OK.

In the window that appears, go to the tab " sound" (sound).

Line " Name» (name) will tell you which card you have installed. After that, we already boldly go to the manufacturer's website and download the latest version of the software for our card.
After installing the software, restart the computer and check for sound.
Using driverpacks
If you have already tried everything, but after reinstalling Windows 7, the sound still does not work, then you have two ways. The first is to take the computer to a service center or use a specialized software to install drivers such as . It is better to download it from the official site.
After starting, the program will diagnose the system and indicate those drivers that need to be updated. It will also select the recommended software for installation. Among other things, it will Avast And Yandex browser if you don't need this happiness for nothing, find the button at the bottom of the window Switch to expert mode and manually configure what should be installed.
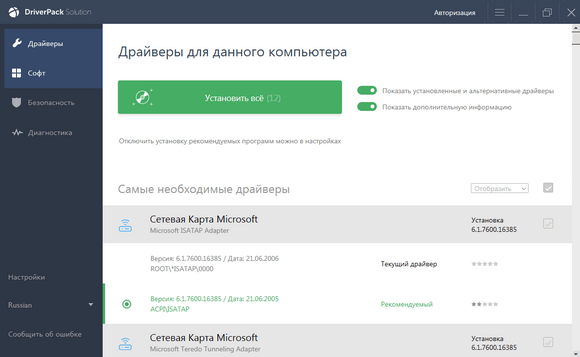
Feel free to install the recommended drivers, but the software and programs that DRP offers to delete, it is better to review and change the settings to those that suit you. The program can remove something you need.
Problems with the Windows 7 Sound Service
Sometimes the drivers are really in order, and the problems arise because the audio service does not start. First, try changing the system sound a couple of times:

Hardware problems
If all the previous methods did not bring the desired result, then most likely there are violations in the operation of the hardware. An audio card may fail due to the failure of some individual elements, and not the entire board as a whole. But this will not calm the owners of integrated cards at all. Built-in cards are not repairable, so if it fails, you will have to buy a discrete sound card.
Discrete cards are usually repairable, but try to fix it yourself this device without the appropriate skills and equipment is not worth it, most likely, you will only aggravate the situation and spend much more money than if you gave the card to professionals.
Reasons for rejection:
- overheat;
- burnout;
- raw contacts;
- breakage of conductors;
- broken plugs;
- departed soldering;
- developer error or manufacturing defect.
To prolong the life of your computer, clean it several times a year. This will allow the cooling system to perform its function most efficiently and problems such as overheating and wet contacts will most likely not affect you.
However, the lack of sound is not always the result of a failed audio card. The first step is to check the performance of the audio system, for this, simply connect other speakers to the computer.
Cords can also fail, the replacement of which is not difficult, especially for headphones.
It is not always possible to determine whether the audio card is really out of order or there are problems with another device at home without equipment. Therefore, do not immediately panic, it is best to diagnose in service center and update your computer software.
Related videos
On the computer, after each reinstallation of OS Windows 7, you have to reinstall all programs, drivers and connect peripherals. But in the century unlimited internet, man cannot imagine his existence without it. Therefore, the problem of connecting the world network after reinstallation operating system, is always up to date.
Internet connection through routers
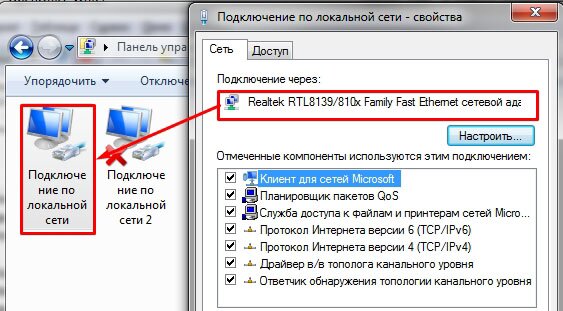
Owners of routers (routers) are more fortunate, since all settings are stored directly on a separate device, so reinstallation is not scary, and you just need to make sure correct setting network between PC and router. On Windows 7, this can be checked in the Network and Sharing Center and public access (Start - Control Panel - Network and Internet - Network and Sharing Center). Next, in the left menu, click on the link "Change adapter settings"

and check that the item "connection by local network”, for the main network adapter:
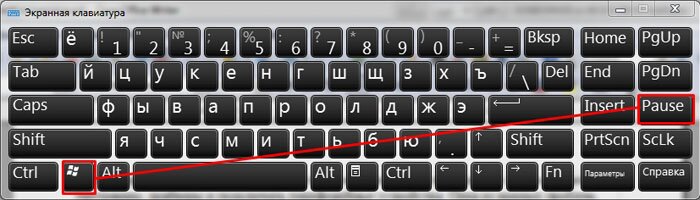
You can check the name of the main network card in the device manager. The easiest way to find it is to hold down the key combination WIN + Pause (the combination is supported in all versions of the OS, including Windows 7, Windows 8 and Windows 8.1).

and in the device tree you need to find the sub-item " Network adapters". Here you will see a list of all network cards (including virtual ones) installed in the computer.

Another question is when there is not a single network card here, but there is unknown devices- install drivers for your network equipment.
If this does not help, check that you are installing the appropriate software. Worst case - LAN card does not work and needs to be replaced.
When network connection with the router will be established - the Internet connection will be activated automatically.
Direct Internet connection using Windows 7 as an example
If you do not look at the fact that now most of the providers provide Internet services without using a login and password (using a link to MAC address and you just need to insert the cable into the PC), let's take a closer look at how to configure and connect the computer to the Internet using a login and password (PPPoE protocol).
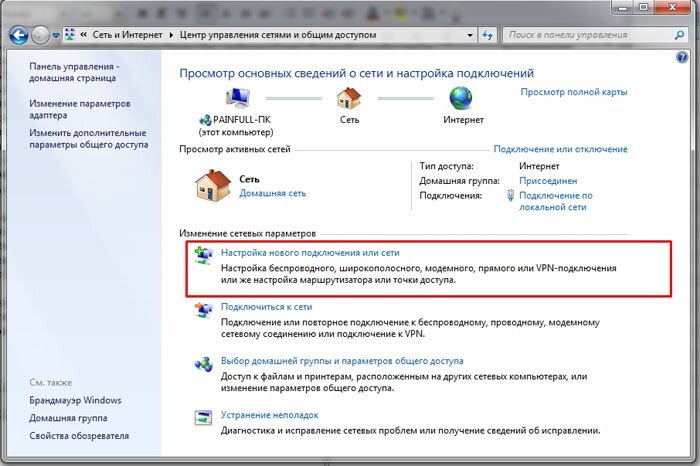
First you need to check how the network card works (checking the network connection). Next, go to: "Start - Control Panel - Network and Sharing Center".
Here we select the item according to the picture:
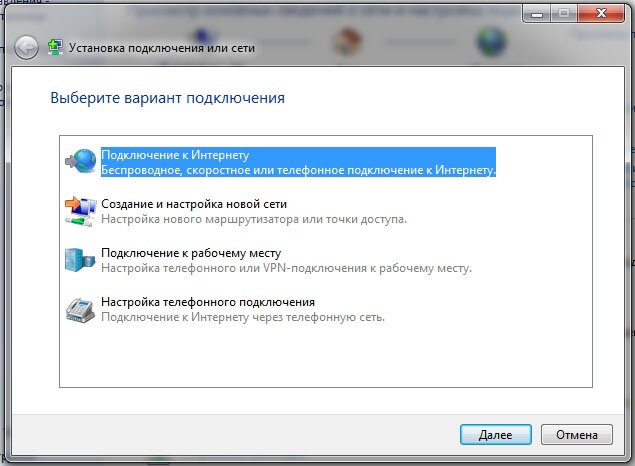
In the next step, select "High-speed (with PPPoE)":

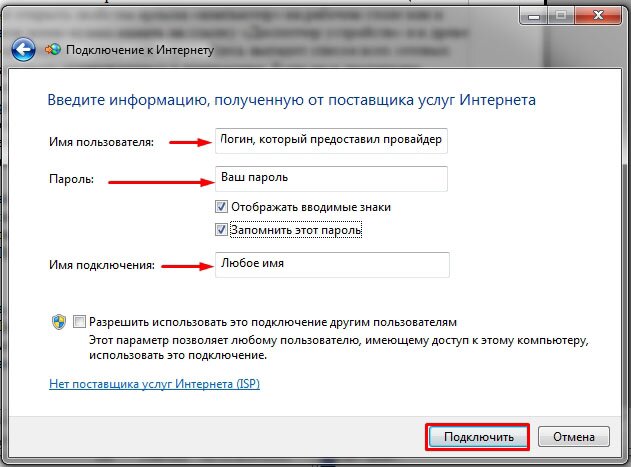
After selecting the type of connection, a window will appear with the fields that you need to fill in accordingly and click the "Connect" button:
After filling in all the fields, the computer will attempt to connect using the data entered earlier:
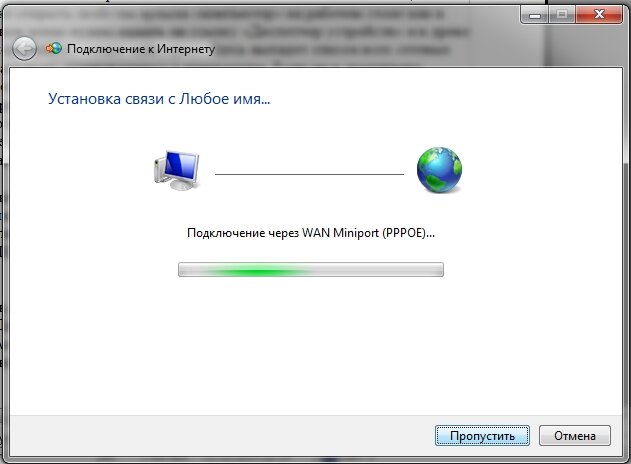
If no mistakes were made at the setup stage, it will be possible to connect a computer with Windows 7 to the global network immediately. If, after all the steps, the Internet does not work, you need to delete the created connection and repeat the process again.
Another way to set up a direct connection on Windows 7
Some providers for load balancing between servers work using another parameter called "Service Name". It improves the stability of the connection, but adds to the hassle for ordinary users.
Very often, many users who for some reason had to reinstall the "seven" complain that after the computer slows down with such force that it is simply impossible to work. Let's see what it can be connected with and discuss how to get out of this situation.
Why does my computer slow down after reinstalling Windows 7?
We will not dwell on the reasons that prompted the user to install the "seven" again. Consider the problems that arise after this. Sometimes there is very strong braking, the Internet does not work after reinstalling Windows 7, there is an increased load on system resources or too frequent access to the hard disk, etc. What can cause this?
The very first thing users of stationary computer terminals need to do is check the trims random access memory and the density of connecting cables on the motherboard. Little, maybe system unit a lot of dust has accumulated, which leads to braking and freezing of the system.
On the other hand, it may very well be that the user mistakenly installed the 64-bit version of the "seven" instead of the 32-bit one (alas, this happens), and the computer or laptop itself uses outdated hardware, which, with a big stretch, corresponds to the minimum system requirements. So it turns out that after reinstalling Windows 7, the computer slows down only for the reason that the 64-bit Windows is much more “gluttonous” than the 32-bit version. But this is, so to speak, the general case. Now let's move on to finding out the specific reasons.
What drivers are needed after reinstalling Windows 7?
A fairly common phenomenon is the presence of outdated drivers in the system, because the pure “seven” is also not the freshest product. In addition, if the user does not have the original driver disk, which must be supplied when buying a computer or laptop, the system installs the most suitable ones from its own database, which, to put it mildly, is completely irrelevant.

In this case, upon completion of the OS installation process, there is no need to rush (sometimes some drivers may not work). It is better to use special releases or upgrade programs. For example, very good option can become a database of drivers that it is desirable to always have at hand.

On the other hand, it "weighs" quite a lot. Perfect for this situation free utility to search and title driver booster. It works just fine, and updates the drivers of absolutely all devices only when contacting the official resources of manufacturers, where, as a rule, the most current versions of such software are constantly posted.
But there is one catch: if 7, it is simply pointless to install this utility, since no update will occur if there is no connection (more on that later).
Excessive load on system resources
Now we need to pay attention to one more thing. Quite often there is an increased load on the processor and RAM, which is the cause of braking or freezing. What to do? See what process is causing the maximum consumption of resources (as you know, in any Windows versions by default launched a huge number unnecessary services that can and should be stopped).

First, we call the standard "Task Manager". This is done using the familiar combination Ctrl + Alt + Del or by entering the taskmgr command in the special Run menu bar (Win + R). Here you need to sort the contents by maximum load in the processes and services sections, and then see which component loads the system.

The next step is to configure autoload. To do this, use the msconfig command all in the same Run menu and disable everything unnecessary on the corresponding tab. You can leave only the antivirus, if one is already installed, and the keyboard indicator (ctfmon process). From all other services, we uncheck the boxes without a twinge of conscience (anyway, most users absolutely do not need them).
Internet problems
Now let's see why sometimes there are problems with accessing the Network. First of all, if you are using, say, Wi-Fi, you should make sure that the corresponding module is enabled on your computer or laptop (the latter have a special keyboard shortcut (most often it is Fn + some kind of function button, say F5 - it all depends on the model ).

If everything is fine here, you need to look into the settings of the TCP / IP protocol, which can be accessed through the Internet properties menu. In most cases, it helps to set the receipt of an IP address in auto mode and disable the use of proxies for local addresses unless otherwise provided by the provider. If all parameters are entered manually, you just need to check their correctness.
Finally, it may very well be that the network card has outdated driver. Therefore, it needs to be updated. To get started, you can use the system's own tools located in the "Device Manager", or, much better, install the driver from the above package. As a last resort, you can copy the DEV and VEN values from the list of hardware IDs on the description tab, and then go to special sites to search for a driver by these values, and then download it from another terminal that has Internet access.
What is the result?
Here, in fact, we have analyzed the main reasons why the computer slows down after reinstalling Windows 7. Of course, not all situations that may arise are listed here. However, these are the most common. As for what programs are needed after reinstalling Windows 7, this issue has already been partially considered. However, here you can add another antivirus, archiver, office suite, video and audio codecs and decoders, etc. But here the user has the right to choose. By the way, as an option, you can put some kind of automatic optimizer that will monitor the state of the system in real time and unload unused or unnecessary processes from memory in a timely manner.
In this article, I will talk about how to independently install the Windows 7 operating system from a disk to your computer or laptop.
I offer detailed step by step instructions with a visual demonstration of screenshots of the installation of the operating Windows systems.
If you think that installing an operating system is something complicated and incomprehensible that only a specialist can handle, then I will disappoint you: this is not true. Now you will see for yourself.
All you need to install Windows 7 (or Windows 8) is a computer or laptop, an operating system disk (because in this article we will install Windows from a disk), detailed instructions, which I will now give you, and, perhaps, attentiveness! I hope that after installation you will not look like . 🙂
After installation, I recommend installing immediately. You understand that in our time of electronic payments, this is very important. Also now (yet) nowhere without Adobe Flash Player. Like him Right install read . You may also be interested in the very not bad. If stored on a computer private information, create a .
Important: Most of all possible problems that occur during the installation of Windows 7 is due to incorrectly prepared installation disk and (or) the quality of the “OS assembly” written to it. How to burn an operating system image to disk, you can read in the article.
Remember: if this is a disc not out of the box, that is, bought in a store, then you need to use only original images from Microsoft MSDN. It is the original image, which is also available on the Web, as well as various assemblies, that is the key to the successful installation of Windows and its normal functioning.
Do not use assemblies of unknown origin. You put all third-party fixes, fixes, homemade builds at your own peril and risk. The consequences may be irreversible.
Before installing Windows 7:
Remember two main things to do before installing Windows.
First is to decide in advance which section hard drive system will be installed. Typically, in most cases, this is the C:\ drive. Remember (or create) the volume label and size.
Remember, your desktop is located entirely on the C:\ drive, or rather, here: C:\Documents and Settings\ Username \Desktop. Think in advance about the integrity and safety of files that are archived for you, copy them from the desktop, that is, from drive C, to another drive or flash drive.
All programs installed on the C:\ drive will also be removed, but this is not a reason to drag the entire folder with programs to other drives. It is much easier to re-install these programs on a clean system. Don't be lazy, it's not every day you reinstall Windows.
Second the moment is the drivers for your computer or laptop. They need to be taken care of in advance. They are included with most laptops, but if they are not available (or need to be updated), we look for them on the official website of the manufacturer and download them in advance.
Everything you need to know about installing drivers, I recommend reading the article "Installing Drivers or Five Iron Rules", which is located.
If you miss this important point, then after installing Windows, you can be left without the Internet, because it’s not a fact that windows distribution will initially contain your network card drivers.
Installing Windows 7 from disk:
We insert the disk with the Windows operating system into the drive and restart the computer. By the way, if you do not have a drive, then you can install the Windows operating system using the usual.
Let's continue. Our task is to configure the computer to boot from a DVD. This can be done in 2 ways:
- 1. select a device (DVD) in a special boot menu;
- 2. change the boot priority in BIOS (from HDD to DVD).
The first method, choosing a device in the boot menu, is easier and more convenient. After installing Windows, there is no need to return the boot from the HDD (hard disk). However, this feature is not available on older computers, in which case you will have to go into the BIOS and change the boot priority.
Start - reboot, wait for the screen to go out and at the first sign of the system waking up (the appearance of the logo), press and hold the Delete key on the keyboard. Why the Delete key? These keys can be F1, F2, F3 + F2, F10, Ctrl + Alt + Esc, Ctrl + Alt + S, Esc.
There is no universal button to enter the boot menu or enter the BIOS, and it all depends on the computer manufacturer ( motherboard). The surest way is to read the instructions from the computer or from the motherboard. The table below shows an illustrative example of such keys.
The boot menu looks something like this:
Press F10, agree and confirm the exit with saving (Save and Exit) by selecting "Ok".
Phoenix Award
Consider the second version of the interface. To boot from a disc, you need to change the priorities so that the DVD drive is the first device. We find the item “Advanced BIOS Features” and use the arrows to switch to the first device (First Boot Device), change to CDROM.
Press F10 and confirm the exit with saving (Save and Exit).
If you have problems at this stage, I recommend watching this video.
Let's continue. If everything is done correctly, we will see the following window with the inscription: "Press any key to boot from CD or DVD".
Here you need to press any key, for example, the spacebar. This is done only 1 time and only at this stage of the installation. We see the following window with the inscription "Windows is loading files".
Files are being extracted, after which we will see the inscription Starting Windows and the Windows 7 installation window itself. Windows installation has begun !!
Select the desired language and click "Install".
Next, we need to choose edition of Windows 7. Choose the one for which you have a key or which you are going to activate. On laptops, it is usually indicated on a piece of paper with a key located on the bottom of the laptop. Entering the serial number itself will be a little later, it has been moved to the end of the installation.
A few words about the ability to install a 32-bit (x86) or 64-bit version of Windows. If you have more than 4 GB of RAM (aka RAM, RAM, Memory), then set it to 64-bit, if not, then 32-bit (x86).
Read and agree to the terms of the license. Next, we need to select the type of installation - select "Full installation".
Now you need to select the partition on which Windows will be installed.
If you have this partition reserved by the system (note that it is still in megabytes (MB), not gigabytes), for example, as in the following screenshot, then select Disk 0 Partition 2.
In order not to be so excruciatingly painful when choosing a partition, before installing Windows, look at how many gigabytes your C drive occupies.
If you have one partition on your hard disk and it is more than 250 GB, then it would be more correct to create two local disks. One section is specifically for Windows (usually about 50-100 GB are allocated), and the other is for storing your personal information (how much will remain, XXX GB).
Note: The partitions you create should be named Disk 0 Partition 1, 2, 3..., not "Unallocated Disk Space". Otherwise, the operating system simply will not see partitions with such names.
If necessary, create a section or sections and click "Apply":
Attention: problems may arise at this stage - when Windows 7 asks for a driver for further installation or when the system does not see your hard drive in order to continue the installation.
Or install (if prepared) hard disk controller drivers. If you already have two or more partitions on your hard drive, then you can skip the above paragraph. So, we have selected the "System" section, and now we need to start formatting.
The installer warns that all our data will be deleted. We need this, because we are interested in clean install Windows. We agree and wait. The whole process usually takes a matter of seconds. After formatting, we see that free space more, just click "Next".
And here is the beginning of the installation, the process is started. You can take a breath.)
We are waiting, sir ... Usually it takes 15-25 minutes. When our system installs, it will prompt you to enter a username and computer name. Enter.
If you wish, you can enter a password and a hint. Windows will then prompt you to enter serial number. Enter (if any). If not, then skip this step and uncheck "Automatically activate when connected to the Internet."

This article describes the steps to take after installing windows 7. I think you have already managed to install windows 7 using our previous articles and you now have a computer, laptop or netbook in its pure form, with a "freshly installed" operating system. The question automatically arises: What to do next? The next step can be divided into four steps:
2. Installing drivers.
4.Remove programs from startup.
So let's go through these steps in order.
1. Hard disk partitioning (if you have a new computer).
If you just reinstalled windows 7, then you can skip this step, but if you have new computer, then after installing the OS you will have access to only one local disk C, which you separated during the installation process. Most of the hard drive remained unallocated and if we do not perform the following actions, then you will have nowhere to store your data, photos, videos, etc.smash HDD into sections, you can third party programs: such as Acronis Disk Director or Partition Magic, or standard windows 7. In this case, we will use the standard method. To do this, go to Start Menu>Control Panel>System and Security>Create and format hard disk partitions

In the window that opens, you will see the C drive created during installation and the area that has not yet been partitioned. click right click mouse in the unallocated partition and in the menu that opens, select "create a simple volume".

Next, you need to specify the size of the disk to be created. If you want to create only one disk, then just click next. If you need several partitions, for example, 300GB is not marked, and you want to create three 100GB disks, in this case, specify the size of 100GB and repeat the procedure two more times.

After you have specified the size, you need to select a drive letter, and you can also specify the partition name in the "volume label" line.


Then click "next". The partitions will be formatted and we will see the newly created partition.

2. Installing drivers.
In order for all devices to work correctly and you can watch videos, play games, listen to music, work with graphics, etc. - Drivers need to be installed. How to do this - we described in detail in the article. Disks with drivers should be included with your computer or laptop, if these disks are lost, you will need to spend a little time and download drivers from component manufacturers' websites.3. Installation of the necessary programs.
A) Installing an antivirus.
Not less than milestone is the installation of programs, without which in our time the usefulness of a computer and data security is reduced to zero. So, what programs do you need to install after installing Windows 7?The first and most important (if you have access to the Internet) is to install an antivirus. Now worldwide network just "teeming" with various viruses and malware, which are designed to steal your data (passwords to Internet wallets, for example), block your computer and other actions that can bring you both material and moral damage. To protect yourself and your computer as much as possible, immediately after installing Windows 7, you must install an antivirus. There are a lot of antiviruses, as well as the viruses themselves. Exist free versions, the most reliable of them are, of course, Avira AntiVir Personal and Avast, from paid antivirus programs The most serious are the Kaspersky Lab antivirus and Eset NOD products.


Which one to choose is up to you. And we will try to analyze the topic of antiviruses in a separate article.
B) Codecs.
In order to view video in any of the existing formats, you need to install the most latest versions codecs. One of the most popular developers in this direction is SHARK 007 with . I think installing codecs will not be a big deal.
B) archiver.
The use of archivers in our time is a great necessity. Using the archiver, you can pack a lot of information, documents, photos, etc. into one file. And send them by mail without any problems. In addition, most of the information that can be downloaded on the Internet is provided in the same archives, and without an archiver you simply will not open anything. The most popular archivers are naturally Win RAR and Win ZIP.
D) office.
Now not only is it impossible to do without office applications in the office, but any student cannot imagine their studies without text editor and spreadsheet. The monopoly in this area is Microsoft Office but this product is definitely expensive. An alternative to it can serve as OpenOffice - a completely free package of office applications that are practically no different from Microsoft Office.
4.Remove programs from startup.
After installing programs, codecs, etc. most of them are added to startup and slow down the loading of the Windows 7 operating system itself. To remove them from startup, click the Start Menu, write MSCONFIG in the search bar and press Enter. In the window that opens, select the "Startup" tab and uncheck all the checkboxes, leaving only Anti-Virus.

I hope everything worked out for you and now you are not just a computer, but a multimedia center and an indispensable assistant in work and study.