With a desktop computer the situation is much easier than with a laptop, so let's start with it. So, you already know what characteristics to rely on when purchasing, so we’ll leave this topic outside the scope of today’s article.
- First of all, even before purchasing, you should have figured out what free connectors for connecting drives are available on your motherboard - the old IDE or one of the varieties of SATA (I, II or III).
- And secondly, what free power connectors are available on the .
Modern hard drives, motherboards and power supplies work with SATA connectors. However, if they are all already occupied on the power supply, then also take care of purchasing a Molex-SATA adapter to connect your second drive to Molex-type power.
If you want to use a second old hard drive connected to motherboard type “IDE”, and the last one you have is new and no longer has such an input, then we buy an adapter from IDE to SATA.
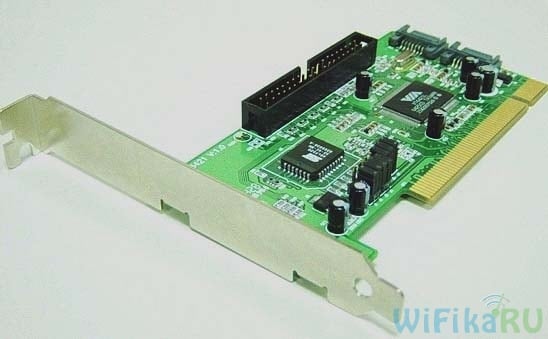
Another option is to connect HDD To a computer that does not have a corresponding connector for it, use a special IDE-SATA PCI controller. The advantage of it is that with it you can connect the old IDE disk to the new board, and the new one SATA drive to the old motherboard. It looks like an expansion card that is inserted into PCI slot on the motherboard and adds support for working with IDE devices. Let me remind you that you can connect two disks or drives to a standard cable at once.
Let's say you have already found out all your nuances, purchased second hard disk and, if necessary, adapters, and now you need to install it in the case and connect it to the motherboard and power supply. First, we secure the hard drive in a special basket in the case, or insert it along the guides and secure it with special fasteners or ordinary screws, depending on the type.

After that, we connect the “small” SATA to the corresponding connectors on the back of the drive and on the motherboard, and into the larger SATA socket (for power) we insert either an adapter connected to the cable from the power supply, or directly the power supply cable with a SATA plug. We do this carefully so as not to break the socket on the hard drive, since there is no limiter at the bottom and you can easily break off a piece of the board with the contacts of this connector.
In the screenshot below, green arrows indicate wide SATA arrows that connect the second hard drive to the power supply, and red arrows indicate narrow ones that go to the motherboard.

Yes, do not forget that all connections must be made with the power supply disconnected from the outlet, or with the power switch turned off, if there is one on it. As you can see, there is nothing complicated.
How to install a second hard drive in a laptop?
Is this really possible? Yes, today you can also increase the amount of space not only on a desktop PC, but also on a laptop. And to do this, it is not at all necessary to replace the standard hard drive that is already in the laptop, and therefore you will not have to face all the associated problems, such as transferring files and reinstalling Windows and all programs on a new hard drive.
The second hard drive in the laptop (remember, 2.5 inches in size) is connected using a special adapter, which is installed instead of the laptop one DVD drive And - you must admit, now almost no one uses this device. And if you need to view discs, you can always use an external one connected via USB.
This is what this adapter, invented (or copied?) by the Chinese, looks like:

In online stores it can be found under the name “2nd SSD HDD HD Hard Disk Driver Caddy SATA for 12.7mm CD / DVD-ROM Optical Bay”. Inside and outside this adapter there is a connector for connecting a disk and for connecting the adapter itself to the laptop board.
So, we insert the hard drive into the adapter. You may also have to screw the mount yourself to the back of the adapter, through which it will be screwed to the laptop body.


And in its place we insert the adapter and secure it with the same screw. After this, a new hard drive will appear in the “Computer” menu, which after formatting can be fully used.
How to install a small hard drive in a computer?
Speaking about connecting a hard drive, one cannot help but touch upon the problem that users sometimes encounter when they need to install a hard drive or 2.5″ SSD into a computer whose case only has mounts for standard 3.5″ drives. For this case, there are also special adapters in which such a hard drive can be secured and inserted into a regular place under disks of larger diameter.

BIOS does not recognize the second hard drive
Another common problem that you may encounter when installing 2 hard drives- the computer simply does not see one of them. First of all, if you are using an adapter, then this may be the problem. Use known-good adapters.
If you haven’t used it or your adapter is working, then the whole point is in the BIOS settings, namely the controller’s operating mode is set incorrectly hard drives.
We reboot the computer, go into the BIOS and look for the “SATA Controller” item (or SATA ATA/IDE/Raid Config, Mass Storage Controll or something else like that to set the HDD operating mode). If you connected a drive with a SATA cable to the motherboard and a modern operating system is installed on the computer ( Windows Vista, 7, 8 and above), then the AHCI, IDE, Native or Enchansed position can be activated in this item. Wherein
only in AHCI mode will be achieved maximum speed transferring data from disk.
If more old Windows, or if the hard drive was connected, then only IDE, Native or Enchansed.
The disk controllers themselves must also be enabled. Here are a couple of screenshots from different BIOSes with these settings:

If your computer has 2 hard drives (or a disk + DVD drive) and both of them are connected via IDE cables, then the problem may be that they are not configured correctly. If you have just such a connection and in the BIOS you see the following picture:

then this is your case. In this configuration (when both are connected via IDE), one disk should be Master, that is, the main one, the one on which Windows is located, and the other Slave, that is, secondary.
This priority is adjusted using a special jumper installed on the contacts on the back of the case.

All possible positions of this jumper and their modes are usually described on a sticker on the disk body. U different manufacturers they may differ.

From our table we see that if Windows is installed on the disk and it will be the main one (Master), or if it is used alone, then we put a jumper on the first 2 vertical contacts. If it is secondary (Slave), then remove the jumper altogether.
We do this with our hard drives and go into the BIOS again. Now they will be automatically detected by the motherboard and the following picture should be drawn:

Additional;
Select which hard drive will be the main one, that is, the active one from which the operating system will boot. Determine the order by installing small jumpers in the appropriate positions according to the diagrams shown directly on each hard drive.
Turn on your computer and go to BIOS settings. If the hard drives are not detected automatically, identify them manually with the appropriate command. Then save the changes and exit the BIOS.
Video on the topic
Sources:
- how to install a second hard drive
- How to connect a second hard drive
To connect to computer as a second hard disk external device, designed to work via a USB port, you just need to insert the connecting wire into the corresponding connectors on the bodies of both devices. The process of installing a stationary hard disk as the second main drive in the system unit of your computer. The sequence of actions for this option is described below.
Instructions
Shut down the operating system, turn off the computer, and disconnect it network cable. Position system unit so as to have free access to both of its side surfaces.
Remove both side panels. As a rule, to do this, it is enough to unscrew two screws connecting them to rear panel, and then move it 5 centimeters back and put it somewhere not very far.
Install the new hard drive into one of the free slots in the case. Do this carefully so as not to accidentally disconnect the wires, of which there are plenty inside the case. The connectors for connecting power should be on the motherboard side, and the hard drive is secured with four screws - two on each side of the system unit case. Use an already installed hard drive as a sample for placement and fastening.
Connect the power cable and data cable (“cable”) between the new hard drive and the motherboard. These wires differ depending on the type of hard drive being installed (IDE or SATA), but in any case, their connectors are asymmetrical in shape and the connectors can only be inserted in one way, so you cannot make a mistake. This will help you find the right slots on the motherboard. installed hard disk - the connectors you are looking for should be located next to those used to connect it. On hard drive cases that use the IDE bus, there are jumpers that are used to establish a hierarchy of disks installed in the computer - one of them must be designated as primary, and all the rest as secondary. However, in most cases there is no need to use them, since the BIOS is able to figure out the device configuration itself with the jumpers set by default.
Make sure that you have not damaged anything inside the system case during the installation process or forgotten any tools in it. Do not rush to close the case - you should first check the result of the operation performed. Connect all the necessary wires, the last of which should be the network cable. Then turn on your computer and go into the BIOS settings to make sure it can recognize the new device. After this, turn off the computer and replace the side surfaces of the system unit.
Sources:
- how to connect a drive to a computer in 2019
After you have connected the second hard drive to your computer, you need to make some settings to use it correctly in Windows. Even if you haven't installed another drive, but are interested in disk management and want to know what partitions are, this article will be useful for you.
Partitions and file systems
I will cover some technical concepts because they are important and you should have at least a basic understanding of them.
Let's start with the sections. A partition is part of disk space. In Windows terms, each partition is identified by a letter label (for example, C: or D:). Also in Windows it is customary to refer to a partition as a Volume, which in our case is the same. A hard drive can consist of one or more partitions, each of which is assigned a separate letter label in Windows. For most users, one partition is enough, although most home computers have another hidden section, where system recovery programs are stored. If you see a message when you turn on your computer "Press F2 to enter recovery mode» , then most likely there is a secret partition on your system. Some people like to split their hard drive into two partitions when system partition with Windows it’s small, and under the second one, where user data is stored, everything else is allocated free place. This scheme is very convenient, because when reinstalling Windows your information will not be overwritten. In other cases, the hard drive is divided into multiple partitions to allow multiple coexistence. operating systems simultaneously. When booting the system, you can select the partition from which to boot.
A file system is essentially a way to store data on a partition. The choice of file system is the subject of endless debate among advanced users. Windows XP uses file system FAT32 (or NTFS), Windows 7 is NTFS, and Linux and Mac use completely different file systems. Each file system has its own advantages and disadvantages. It is useful for us to know the following:
(a) If you plan to store files larger than 4 GB (for example, movies, etc.) you should use NTFS.
(b) If you want to use disks in various systems, you should go with FAT32 because Mac OS X cannot write data to NTFS drives without additional tools. On the other hand, FAT32 cannot store files larger than 4 GB.
If you installed a second disk in the system under Windows control, I recommend using NTFS. To make life more difficult for users, many drives are initially formatted with the FAT32 file system. In a word, another headache.
Creating partitions and formatting a disk in Windows
To launch the disk management application, click on Start and type diskmgmt.msc. Click on the application that appears in the search results. You should see a screen similar to this:
The top half of the screen shows existing sections. The bottom half shows the physical devices—the drives—attached to the computer. In my case, there are two disks in the system. The first is 64 GB, my main drive (labeled C:), on which Windows is installed. The second one, the one below, new disk 50 GB in size. It is marked in black because it is completely empty. The picture may be different in your case: Windows 7 often creates a hidden 100 MB partition called “System Reserved”, which can be used, for example, for system recovery. Please note that if your drive is already formatted with the FAT32 file system, Windows may assign a letter to it. Make sure that you are working with a new disk.
You can perform various operations on a partition or empty space. To do this you need to click right click mouse on the disk. If you have an existing FAT32 partition that you want to delete (but double check that it's a new drive first), right-click and select Format(Format) or Delete volume(Delete Volume). If you just want to change the file system type then choose Format. If you want to create several sections, then choose Delete volume. You can also choose Change drive letter or drive path(Change Drive Letter and Paths) if you want to change the letter mark.

Now we have deleted all the partitions (or perhaps there were no partitions to begin with), and now we can create new ones. Right click on the black empty space and select Create a simple volume(New Simple Volume).
The Volume Creation Wizard will open. Click Next. In the next window you can select the partition size. Roughly speaking, 1 GB is equal to 1000 MB. By default, the partition size is set to maximum. However I am going to create two 25GB (25000MB) partitions for storage various types data.

Next, you can select the drive letter, file system and volume name. Repeat this procedure until there is unused free space on the disk. If you are creating the last partition, leave the size at the maximum (which, remember, is equal to the amount of all unused space). Now you have more disks, which you can see if you go to My Computer:

I hope that by reading this article you have expanded your knowledge about disks and partitions. At first glance, the procedure for creating partitions may seem complicated, but in fact everything is simple. Now you can manage your disks yourself and create new partitions, rather than using what was programmed by the manufacturer. Most importantly, be careful when deleting partitions.
You can also use third party utilities to manage disks and create partitions, for example, or .
Today we want to tell you how to properly connect a hard drive to a computer. In particular, we’ll look at how to install a new hard drive in a computer, and we’ll also tell you about installing a second one. hard drive, and at the end we will superficially look at installing an external hard drive.
In fact, there is nothing difficult about installing hard drives. By the way, we talked about this in our last article. So, now let's talk about everything in order.
How to install a new hard drive
If you are building a computer or want to replace an old hard drive, the installation procedure is as follows. First, you need to remove the hard drive from the packaging; to do this, carefully cut off its edge with scissors. Remove the hard drive and make sure there are no damages or scratches - if everything is fine, then proceed to install it. It is important to note that any work must be done with the computer power off.
Unscrew the fixing bolts and remove the cover from the system unit. If you are installing a new hard drive, select its location in the hard drive bay. Its most optimal position is in the center so that it is well ventilated. So, when you have chosen a location for the hard drive, you need to secure it.
Today there are two options for mounting a hard drive: with bolts and with special rack strips. The first type of fastening is that the hard drive is inserted into the compartment and fixed on the sides with special bolts. The second option is a little simpler: to do this, you must pull out the hard drive brackets and use the clamps to secure them to the sides of the hard drive. Then we insert the strips into the grooves and insert the hard drive there until it clicks.
Now we need to connect power to the hard drive, this will not be difficult, follow the L-shaped corner on the edge of the connector. Check that the power cable is fully inserted. Next, connect the SATA cable. One end of the cable is connected to the connector on the motherboard, the other to the hard drive. It is worth noting here that if your hard drive supports SATA III, then you need to connect the SATA cable to the corresponding connector on the motherboard; as a rule, there is a corresponding marking near these connectors.
When installing a hard drive, try not just to connect the wires, but to route them in such a way that they do not stick out or perhaps bring them inside so that they are not visible. If necessary, secure the wires with plastic ties to prevent them from sticking out.

How to install a second hard drive
To install a second hard drive, you need to follow all the same steps as described above, with the exception of a few points. First of all, you will need to choose a place to install the hard drive in the system unit. We would like to note that it is best to install the second hard drive not next to the first, but so that there is a distance of 2-3 openings between them. In this case, we recommend installing a cooler for better cooling of the hard drives. When a location has been selected, follow the instructions above, insert the second hard drive into the system unit.
As for the connection, do everything as described above. When connecting a second hard drive, there is one caveat - a jumper. In some hard drives, mainly of the older modification, when connecting to a computer, you need to set its status using a special jumper. Therefore, for the main hard drive the jumper must be placed in the “Master” position, and for the second hard drive - in the “Slave” position. In modern hard drives this is no longer necessary. Please note that the main hard drive It’s better to make a more powerful and larger HDD by installing an operating system on it.

How to install an external hard drive
And finally, it’s worth saying a few words about connecting an external hard drive to a computer. To install an external hard drive, it must be connected to a USB connector. If your external hard drive supports USB 3.0, then it must be connected to this port On the motherboard connector panel, opposite these ports, there should be a corresponding designation. If your external HDD is of the type USB connections 2.0. then connect it to the port that is most convenient for you.
Today, quite a lot of people are interested in the question “how to install a second HDD or replace an existing hard drive?” Because sometimes it happens that there is not enough space on the main disk. Our article will tell you about this...
Required Tools
For this we need:
- HDD/hard drive.
- SATA power adapter or similar.
- Crosshead screwdriver.
- Free slot in the system unit.
HDD installation
Before you start working with the components of your system unit, be sure to disconnect it from the network. Open the left cover of the system unit using a screwdriver or special latches (if available). Please note that for some cases the procedure for removing the cover may differ from the standard; this is usually written in the instructions for the computer.

Inside, most likely (if you haven’t done anything with the components before) you will find a motherboard, your power supply, various buses, wires, RAM module(s) and your hard drive. Most PCs place the hard drive horizontally from the front of the computer, but yours may be a little different. Look above or below your main hard drive for an empty niche. If there are none, then there is nothing to install; it means your system unit supports only one HDD, but this happens extremely rarely.
When arranging disks, try not to place them too close to each other, otherwise they may begin to overheat and, consequently, the computer will slow down. Ideally, it is better to install a new hard drive one niche from the existing one.
Important point!!!

Many hard drives have special jumpers (popularly called jumpers) that set the operating mode. The main disk should operate in “Master” mode, and all additional disks should be in “Slave” mode. Since the jumpers are usually small, it is better to arm yourself with tweezers or something similar (be careful not to break the jumpers).

Having set the desired operating mode, you must install the HDD in its niche as carefully as possible. Do this as carefully as possible, otherwise you may damage the disk or disrupt the operation mode. Having placed the disk in the desired position, arm yourself with a screwdriver and tighten the screws. After screwing and installing the disk, make sure how securely it is secured.
HDD connection

Congratulations, you have installed the disk! But you need to connect it to the system and to the network, otherwise it will be of no use to anyone. When you bought the disk, it may have come with a cable for data transfer (needed in order to integrate the HDD with the system), but if the manufacturer did not include it in the kit, then purchase any cable at the nearest computer store.
In order to connect power from the network to the hard drive, you will need to use a SATA adapter. However, some PC models do not require such an adapter, so before buying an HDD you need to open the case and see if the main drive has such an adapter; if the SATA adapter is located at the main drive, then you will have to buy another adapter.

Before connecting, carefully look at how the main drive is connected. Your attention should be paid to the shape of the connectors and the wires connected to them, or more precisely to the color of these wires. We connect the adapter to any connector that matches the input parameters of the adapter. The process is very simple as the power cord connects very quickly.
You've plugged in the hard drive, but it's still a useless piece of metal in your case because it's not connected to the system and has virtually no interaction with the computer. In order for the hard drive to finally work, you need to connect a cable for data transfer. The cable is a small red wire a centimeter or two long. There are special adapters for connection at both ends of the wire.

Now you must connect the HDD to your motherboard. You will quickly find the corresponding input on your hard drive. On the motherboard, find a connector with a cable where the main hard drive is connected, there are 2-4 more connectors nearby. Connect to any available connector, but again, try as much as possible to ensure that the wires are not close to each other.

Finally
Congratulations, you have installed a second hard drive! Now you don’t have to worry about where to put all these files on your PC. Next, you need to close the system unit, connect power to it and start the PC. To check if the disk has installed, go to “my computer/this computer”. If you did everything correctly, the icon of your new HDD will appear there.