Formatting hard drive is the process of creating a logical markup of a data storage area located on a magnetic medium and necessary for further filling with information and working with it. Usually, formatting is carried out before working with the HDD, to completely destroy information or to eliminate damage caused by a virus.
Types of formatting hard drives
Low-level formatting is the layout of the HDD at the physical level, which usually remains unchanged during the entire existence of the media. Performed at the factory and cannot be performed at home. Programs that, according to the developers, allow you to perform low-level formatting, usually at best, are only capable of overwriting control information.
Partitioning is necessary to create partitioning on logical drives, which will allow you to store information in a more organized way. For example, the only HDD laptop, you can divide two disks, one of which can be taken under operating system, the other is for storing files. This will allow you to reinstall the OS without erasing the information stored on the non-system partition. Partitioning of non-system drives can be done from under Windows.
High-level formatting is divided into full and quick. Fast involves only clearing the file system tables, which are a kind of file location directories. Full formatting (verification), in addition to destroying the information in the tables, includes the search for broken blocks and their replacement with working ones. There are several formatting methods.
Format HDD During Windows Setup
In order to start the installation of the operating system, you should set the settings in the BIOS so that the first device from which the computer starts to boot is the installation disk. To enter the BIOS, you must restart the operating system and press the Delete key several times after the computer starts up again.
In the window that appears, go to the Boot section and specify there as the device from which the computer will boot first, the drive where you insert the installation disk.
After setting the required boot options, insert the installation disc into the drive, save the changes in the BIOS, and restart the computer. Usually, the F10 key is used for this. If you did everything correctly, you will see a window for installing and restoring the operating system.

Press the Enter key to proceed with the installation, click Windows. After that, you will see the text license agreement, press F8 to continue further work.

After that, you will need to delete all the partitions into which the hard disk has been divided in order to create a single unallocated partition on the HDD. To do this, select each of the available sections in turn and press the L key.

After you delete all partitions of the hard disk, only the single inscription "Unallocated area" will remain in the list.

Press Enter and you will be presented with options for file systems that you can format your hard drive with. Select Format partition as NTFS.

After a few minutes, the formatting of the hard disk will be completed. This method is good primarily because it allows you to format system disk, while programs running under Windows do not allow this. If you are going to format the HDD, where there is not a working operating system, but some files, then it will be much more convenient to use another method.
Formatting a hard drive using the built-in Windows program
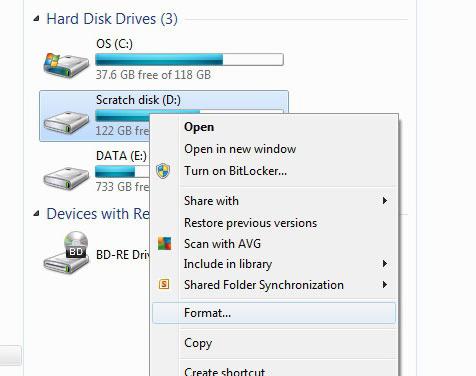
Open "My Computer" and click right click on the desired disk, select "Format" in the pop-up menu.

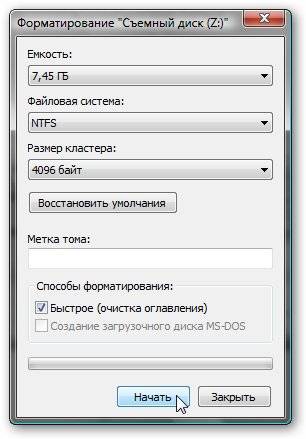
In the window that appears, you can specify the necessary formatting options. A quick format takes much less time than a full format, but without complete erasure information, which allows, if necessary, to restore part of the information with special programs.

After you set the required parameters and click Start, you will see a window warning you that all data on the disk will be destroyed. Click on the OK button and wait for the message about formatting completion.

Using Command Line to Format HDD
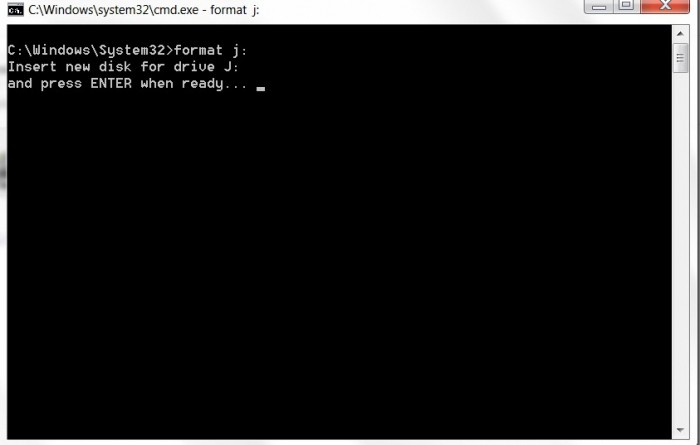
One of the simplest ways to hard formatting disk is the use of a special command on the command line. Click Start –> Run or press the Win+R keyboard shortcut. a small window will appear in front of you, where you should enter the name of the cmd program and press Enter.
In the black window that appears, type format followed by a drive letter followed by a colon, such as format d:, and press Enter. A question will appear with a warning "Attention, all data on fixed drive d: will be destroyed!" and the question “Start formatting?” Press Y and Enter to continue. Formatting will start.
Formatting with the built-in Disk Management program
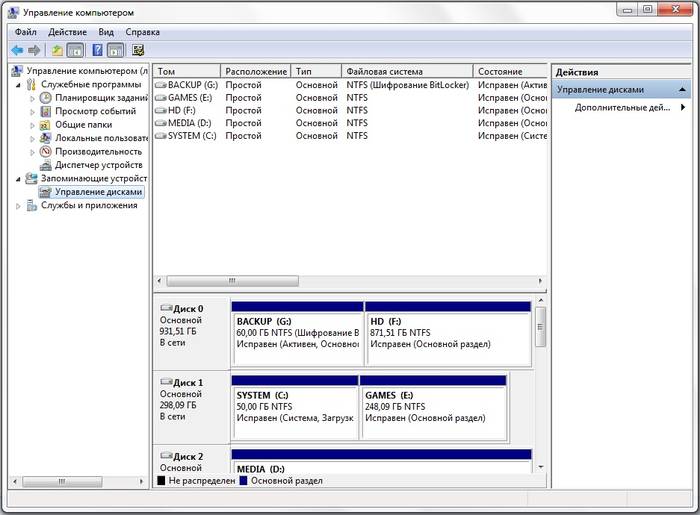
The Windows operating system has a special built-in program that allows you to perform various operations with disks and their partitions. The program is located at Control Panel -> Administrative Tools -> Computer Management -> Disk Management.

Right-click on the desired drive and select Format. In the window that appears, you can specify the formatting method (quick or full) and the type file system.
Using the Partition magic utility to format the HDD
One of the most convenient and functional programs to work with disks and logical partitions is the Partition magic utility. The program can be used even if the built-in Windows software failed.

In order to format a disk using Partition magic, you need to create a boot disk, insert it into the drive, and after restarting the computer, working in the program itself, perform all the necessary operations - formatting, as well as deleting or creating a new partition.

Standard tools do not provide a direct opportunity to format a hard drive through the BIOS. Sometime during the use of DOS, which was already an operating system in itself but booted in the same way as a BIOS, one could type in command line DEL plus the drive name and perform this action. Today's PCs do not provide such an opportunity. Therefore, to perform this operation, you must use either the operating system or special programs. The first option is not suitable if the OS does not start. In addition, Windows protects itself. If you try to format the volume, usually it is the “C” drive on which the OS is recorded, then this action will be prohibited. Therefore, a different approach is needed. But the exit to the BIOS is mainly necessary as an intermediate stage in the execution of an action. Therefore, we will figure out how to format a hard drive through BIOS, given these features.
What is formatting
The hard drive is structurally a plate on which a coating with special magnetic properties is applied. Initially, there are no guidelines for the hard drive heads on it. In order for each bit of information to be stored in a certain place, and provided fast access to it, the disk needs to be partitioned. This process is called formatting. Tracks, sectors are applied to it, and information is also written to identify the hard drive and manage it. During this operation, the physical state of the surface is also checked, those areas that have defects that preclude reliable recording and storage are marked as inaccessible.

Formatting is carried out not only on new hard drives, for which this is almost always done at the factory, but also when the system is reinstalled. Disk sectors on which Windows or another OS was written are marked in a new way in order to eliminate conflicts between programs. In addition, deleting files from storage does not mean that they are completely erased. With a quick format, only the information about the place where they were is deleted. Therefore, over time, the disk is filled with fragments of them, which does not improve the stability of the machine. Approximately the same applies to the increasingly popular solid-state hard drives (on microcircuits), the OS works with them on the same principle.
Formatting types
When reading files, the machine does not search for them over the entire surface of the disk. The disk has a service area that stores a list of files and exact addresses, that is, the track and sector number. The reader immediately addresses there, and then precisely positions the heads in the right place. There are two types of formatting associated with this feature. When considering how to format a hard drive, this feature must be taken into account.
Quick Format takes a minimum of time. When it is executed, the list of saved files is simply erased.
Standard regular formatting- a longer operation, when it erases all information, checks the disk. In this case, all service information is completely rewritten, taking into account the detected inoperable tracks and sectors.

Carrying out quick formatting, it is necessary to take into account that information previously recorded on the disk becomes inaccessible for access by standard methods. True, most of it can be restored using special utilities. With full formatting, everything is lost forever.
FAT32 or NTFS
If you want to format the drive, you can choose one of the file systems. By the way, the need to change it is also the reason for formatting the disk. It doesn't matter which system was installed before, all programs and versions of Windows work with both options. Let's see what to choose.

NTFS supports work with large amounts of data, but, as experience shows, on older machines with low performance it is slower. This is her only flaw. If choose FAT32, you must take into account that you will not be able to copy or move a file larger than 4 GB, because when the system was developed, all the computer's memory was smaller. Also, this system does not support data encryption and restriction of access to them. Therefore, if speed is important with limited hardware capabilities, then for formatting you should choose FAT32, otherwise NTFS which is more suitable for hard drives modern machines.
Using the operating system boot disk
This decision in fact, it is a disk formatting in Windows, we simply use the system not installed in the machine, but boot it from removable media. Consider the sequence of actions:

Using Command Line
There is another way, through the Command line. Then you should do the following:

Another way using a boot disk, but without booting
In this case, you do not need a boot disk, but a Windows recovery disk version 7, 8 or even XP. It's also easy to do:

The process takes several minutes. Now, using this disk, you can format the hard drive, even if the OS does not start. To do this, follow these steps:
- Install the recovery disk in the drive and reboot the machine. The system will start to boot not from the hard drive, but from the optical drive.
- After selecting the language, press Shift + F10. This will open command line.
- To determine the usual volume name, enter the command wmic logicaldisk get deviceid, volumename, size, description
- Then format the disk using the already known command format / FS: NTFS X: / q
Formatting with special programs
There are many formatting programs, but the vast majority of them are installed and run from Windows. We are interested in those that do not require a working OS, relatively speaking, they allow formatting a hard drive through BIOS. True it is double work, because after carrying out the operation with the disk on which the OS was, you still need to reinstall it, and for this you need a boot disk with Windows.
One utility that works without an OS is ERD Commander, which is intended for emergency system recovery and is actually a cropped version of Windows.

The program has many useful features, but let's consider formatting the disk. The sequence of actions, which is very similar to the work of formatting using the OS, will be as follows:

Conclusion
We will be glad if this short article helps to solve the problem of formatting disks using BIOS, if other options are not possible. The solution to this problem is presented using the capabilities of the operating system and the involvement of special programs.
Related videos
When installing the operating system, as well as when changing files, redistributing space between partitions, it is necessary to format the hard disk. This is a fairly common operation performed by PC users. If you have not done anything like this yet, then let's deal with the theoretical part of the question.
Formatting process, what is it?
The marking of information storage areas, in which some of it is deleted, is called formatting. It creates a system for accessing stored information.
Typically run for:
- changing one file system to another;
- deleting files from the hard drive.
On this moment There are a large number of different file systems. They are used on a variety of equipment, including not only computers, but also mobile devices. To work in latest versions Windows uses the NTFS file system.
Video: How to format a hard drive
Why format a hard drive?
Formatting is done to remove files from the hard disk, as well as to change one file system to another.
In most cases, they resort to it:
- before installing a new operating system;
- to create an installation Windows image, for example, on a flash drive;
- due to the need to clean the disk from files, in case they are not needed.
Formatting with Windows tools
Despite the large number of various programs for working with a hard disk, the Windows operating system has its own set of utilities.
Consider the process of formatting disks using Windows:
- select the drive you want to format;
- press the right mouse button;
- select Format;
- in the window that appears, select the file system, cluster size, and formatting method;
- as a file system, it is recommended to set NTFS, and leave the cluster size by default - 4096;
- after setting the required parameters, click Start.

Windows also includes a more complete hard drive service.
To open this menu, do the following:
- right-click on My Computer;
- select Manage;
- open Disk Management;
- In this menu, the user can perform various operations on the hard disk, including formatting.
Formatting via command line
You can also perform this operation using the command line:
- press the key combination Win + R;
- enter cmd and press Enter;
- on the command line, write the format y: command, where y is the letter of your drive, maybe, for example, c or d;
- the system will ask you to confirm the operation by pressing the Y key;
- after confirmation, the system will start the formatting process;
- this message will appear when finished.


Format HDD in BIOS
If you need to format a hard disk partition from the BIOS, you will have to tinker a little. Unfortunately, the BIOS does not have tools for formatting a hard drive, so you should use third-party programs to perform these operations.
One of the most common is Acronis Disk Director. To work with it, you need to create a bootable media in the operating system with the files of this program. But before you start creating bootable media, you should consider one more option - formatting with Windows Installer. This solution is a simpler option compared to Acronis Disk Director.

For this method you only need a disk or flash drive with a recorded installation package for the operating system.
For formatting, follow these steps:

Attention! Drive partition letters may not match. To more accurately determine the required disk, use the wmic logicaldisk get deviceid, volumename, size, description command.
Creating a bootable flash drive Acronis Disk Director
To create a bootable flash drive you will need:

Action algorithm:
- insert a flash drive;
- install and open the program;
- in the application, open the Tools section and select Acronis Bootable Media Builder;
- click next;
- select the type of Windows PE bootable media;
- in the next menu, you should mark the necessary components for recording to a USB flash drive;
- after selection, you must select the media to which the recording will be made, and click Next. The flash drive should be formatted in FAT 32 format using the Windows utility;
- you can also create an image for later burning to a flash device or disk using the Ultra ISO program.
Working with a bootable flash drive Acronis Disk Director
To download a flash drive you need:

How to format an external hard drive to NTFS
The most convenient formatting method is to perform all actions using standard operating system utilities. This solution does not require installation additional programs and creating additional boot disks.
If you do not have an operating system installed, then in this case you should use special programs, such as Acronis.
Steps describing how to format a hard drive as ntfs:

Utilities
In addition to the standard Windows programs there are various utilities used for the same purpose.
Among the most common options are the following:

What is the best program in ntfs to format drives?
Each program has its own characteristics, but the main direction for all utilities remains the same - working with disks, including creating partitions, forming into other file systems, etc. Therefore, choosing a program is a purely personal matter for each user, which depends on his preferences .
Problems and solutions when formatting
How to quickly format a disk without losing data?
Unfortunately this is not possible. All stored information will be deleted. Only part of the data can be recovered.
Which drive is better: remote or external?
Formatting external drives performed in the same way as for a conventional hard disk. At this process all information will be deleted, including windows, after execution, the disk is obtained as new without windows.

Unable to format hard drive
If you did everything according to the instructions, but did not achieve the result, you should not sound the alarm. It doesn't always mean something bad.
- format command - cannot be used for a system drive if it is in its environment;
- if the operating system is located on another partition of the hard drive, it cannot be deleted;
- settings antivirus program access to different sections of the hard drive may be closed;
- different applications and viruses can block access.
If you have removed the above factors, but you still cannot format the hard drive, you will have to resort to special programs. The most popular tool is HDDscan, which is easy to install and free of charge.

Action algorithm:
- download the utility;
- open and install;
- run as administrator;
- click on the icon in the form of a sphere located in the center of the interface;
- select Surface tests;
- check the box next to Erase;
- go to the Add test tab;
- click on Scan;
- in the right, lower corner, write down these errors;
- set the EraseWAITs option to ON and select Scan again;
- repeat until the error is gone.
You can also use Acronis Disk Director. If it is impossible to format a portable hard drive using this program, most likely the hard drive is partially out of order. And the whole procedure, sometimes it is possible to perform, only from bootable media, that is, not in the operating system.
How to force format a flash drive?
You can use the program to format flash drives HP USB Disk Storage Format Tool.

How do I format a write-protected drive?
- open command line;
- write the following commands:
- diskpart;
- list disk;
- select disk Z. Z is the number of the flash drive, the execution of the previous command is shown;
- attributes disk clear readonly;
- clean;
- create partition primary;
- format fs=ntfs;
- exit.
The operating system includes utilities that:
- provide the necessary set of functions;
- have a fairly simple interface that will be easy for novice users to work with.
First of all, you need to understand what formatting is. This is the process by which your drive is cleared of the information it contains. It is used most often in those cases when it is necessary to quickly free the disk from the contents and write other data to it. Or before installing the operating system. How can such an operation be performed? To do this, there is a program for Before using it, take care of the safety of the necessary files and documents, copy them, for example, to external drive.
Formatting Using the Control Panel
The very first way to clean up your drive is to use your computer's native capabilities. To use them, you need to use the control panel of your device. In this section, select “Disk Management” and see all the available options: assign labels and names, create partitions, do the formatting we need, and so on.
We find the drive or partition we need, point the mouse at it, right-click and select “format”. This option is convenient because we initially see all the drives connected to the computer, even those that are inactive and we will not see them in the Explorer window. Before starting the procedure, in the window that appears, it is possible to make some settings. You can change the volume label, that is, the name of the selected drive, and select the type of file system. You need to pay attention to the fact that these parameters are already pre-configured and set, so you can not touch them, except in cases where there is an exact purpose of the changes.
Next, the program for formatting the hard drive prompts you to select full formatting or fast, which are significantly different from each other. If the first option deletes data as efficiently as possible, without the possibility of recovery, then with the second option the disk will be recognized as empty, but if desired, information from it can be restored. It is recommended to use it when you are sure that the media is fully operational.
Using the Explorer Window

The method described above is not the only solution to our problem. It is possible to format the disk even faster. To do this, it is quite enough to open “My Computer”, get to all active ones. Then we select the one we need, right-click to open the menu and click on the “formatting” item.
Before us is another program for formatting a hard drive. With the help of the window that opens additional settings You can adjust various operation parameters. At the same time, remember that the actual capacity of the disk is less than the data provided to us by the manufacturer. For example, a 2TB drive would actually have 1.81TB of available space.
How to format the system disk?
If there is an operating system on the disk, then, of course, it cannot overwrite itself, so other methods have to be used. Why do it? This procedure is performed if a new one is installed on the system disk with a valid OS. To do this, insert the installation disk with the operating system into the computer / laptop. It will start and prompt you to start the installation. You will only have to follow the instructions for performing this operation.

First, from its two types, we select the installation from scratch, we ignore the option of updating the system. On the used hard disk, you can create and delete logical partitions, perform an accelerated format. Then we continue to install the OS, or by removing the disk, we continue to work on the computer.
We considered Windows 7 version. In operating rooms Windows systems Vista and Windows XP are all similar. But if you serve the system disk, then it is preferable to use third-party ones called Live CD.
Free hard drive formatter
To format any storage devices, including hard drives connected to the device, you can use the program HDD Low Level Format Tool. System Utilities- the case, of course, is good, but it is better to perform high-quality cleaning using third-party software. The above utility is small, handy, supports working with different interfaces, for example, SATA, IDE, USB, Fir, SCSI. Devices from the following manufacturers can be serviced: Seagate, Maxtor, Fujitsu, Samsung, Quantum, Toshiba, IBM. Also works with flash cards.

What else is good about this program? hard drive - its main merit. It destroys absolutely all the data that is recorded on the media, without missing and boot sectors with separated logical partitions. Remember that deleted information will not be recoverable.
How does HDD Low Level Format Tool work?
Download the distribution, run and install. This is done so simply that we will not dwell on it in detail. After we read and choose: we use the free version or pay extra three dollars and thirty cents and get an updated and more quick program. We choose the first option. The only disadvantage of this utility is that you will have to see and delete the window with the offer to pay this money every time you start it.
The interface is very simple. You will immediately see which storage devices are connected to your computer and ready to go. In the presence of various data about these devices, different reference information.
Let's do a test. Let's not experiment with hard drive, we use for this a regular flash drive with a capacity of 4 GB. Select it from the list and press the "Continue >>>" button. We will see the characteristics of the flash drive and the start / stop formatting buttons. Before starting the process, the program will clarify whether you really want to start it. In the window you can observe the progress of the operation.

Peculiarity free version- low speed (4.3 Mb / s), so everything will last about 10 minutes. HDD Low Level Format Tool will not only format your drive, but will also be able to “repair” it if the computer does not see the flash drive.
How else can you format a hard drive?
One of the most powerful and functional utilities for this is Acronis. This hard drive formatter is regularly updated and keeps up with the times. It's paid, but it's also free. trial version. So if you like the utility, you can purchase a full-fledged version. System requirements not too big, so it can be installed on almost every computer.
There are many options for proposed, the choice is yours.
IN last years computer literacy The population has grown slightly. In any case, many people know about programs, and some people can already deal with their home router, since from technical support most domestic providers can not achieve anything sensible.
But still, the vast majority of users do not know anything about the computer that would be more difficult than spending time in in social networks. In particular, in the event of some serious software failures that can only be eliminated complete reinstallation OS, they don't have a clue about how to format a Windows 7 drive.
Of course, such a need does not arise very often, but if a beginner encounters it, then there can be a lot of problems. That is why it will certainly be useful for you to read this article in order to form your own idea of \u200b\u200bthe process.
The essence of formatting. What is it for?
Formatting is the process by which the surface of a hard disk is marked. The most basic is low-level formatting, which is done only at the factory. We are interested in a high-level process that changes logical partitions on disks.
Before formatting a drive with Windows 7, the user must determine the type of file system, cluster size, and others. specifications again created partition. This should not be taken lightly, since the survivability of the media and the amount of free space on it depend on these operations.
What is the best cluster size?
In particular, if you set the maximum possible and store only text documents on such a disk, then you will waste free place. Let's assume that you have defined the volume as 512 KB. That is, by writing only one file to disk text document by 20B, you occupy an entire cluster, 99% of which will be wasted.
How to format the system partition?
If you're a little computer savvy, you'll remember the standard procedure for preparing a new partition. You can right-click on its icon and select "Format" from the context menu. But there is one problem.
The fact is that system partition(on which the system is installed) you will not be able to format it like that. If you try, you will be warned that this operation cannot be performed. How to be?
Using a boot disk
If there is already a goal to learn how to format a disk with Windows 7, you will have to get the boot disk from which you installed the system. If there is none, you need to make it yourself. To do this, you need to write the image downloaded from the network (or personally created) to
You need to insert it into the drive, restart the computer, and set the BIOS to boot from the CD / DVD drive. How to do this, you will have to find out on your own, since different manufacturers provide different versions"BIOS" with radically different interfaces from each other.
As a rule, all the information you need should be posted on the manufacturer's website. motherboard. So, having learned how to format a disk through the BIOS, you will have to find this information.
So, immediately after booting from the optical drive, you will be taken to the OS installation menu. Since we are talking about Windows 7, even the greenest beginners can relax: everything is so clear (almost at the level of intuition) that even a child can handle it.
Immediately after the first dialog box appears, select the "Install" item in it. Next, the required version of the OS is selected (if you enter the key, the installation program will select the required version itself). After that, disk work appears. Having finally understood how to format the system drive, find out its letter in advance, otherwise you can easily lose your entire collection of music or movies.

It's what we need. Select the desired section by clicking on it with the left mouse button. At the very bottom of the window there should be a link "Disk settings". Once you select it, you will see other options appear. You need the "Format" section. Select the desired file system and click OK. Then you can either continue installing Windows, or install some other operating system.
Since the system itself suggests formatting the disk during installation, in the absence of any experience it is better to leave the settings that are offered by default.
Live CD
If you have ever dealt with system administration, you probably know about Live CDs, which in the case of the Windows OS are often called BartPE. From such a carrier, you can not only boot from under the "BIOS", but also get a fully functional system as a result. Since it will not work to format the system disk from under the working OS (this is not Linux, after all), this option may be the only true one.
Since the system from the "live CD" is loaded into RAM, you can right-click on any drive (including the system drive), and then select "Format" from the context menu. All subsequent actions are no different from those that we have already described in this article.
The same can be done using installation disk with any Linux distribution. As a rule, they all have a Live CD mode, so you don't have to do any console dancing. The same Ubuntu is ideal, the interface of which is as simple and intuitive as possible.
Another variant
But it often happens that two systems are installed on one disk at once. In particular, this happens due to inexperience, when a person mistakenly puts several copies of an identical OS on one physical disk at once.
This cannot be done, because such a combination may well cause problems when loading and running programs. In addition, the human factor cannot be ruled out when users remove from under the first system system files second. Of course, it is not necessary to talk about stable operation in the latter case.
So how to format a drive with Windows 7 then? Everything is much simpler here.
Clearing via the context menu

To do this, go to "My Computer", and then select the disk on which the copy of "Windows" you do not need is installed. Do not worry that the Windows under which you are currently working will fall under the distribution. We have already indicated that in this case the system itself will not allow you to do this.
Next, right-click on the section you need, and then select "Format" from the menu that appears. A dialog box will also appear asking you to specify the file system type. It all depends on your preferences and requirements.
File system selection
The main (and most reliable) is NTFS, but FAT32 is acceptable if necessary. We have already written about determining the size of a standard cluster above. As for the type of formatting, here again everything depends only on you.
But! You need to carefully understand how to format a hard drive NTFS. It should be noted that the reliability of this file system is based on the fact that it creates a sufficiently large recovery partition.
In the case when you are preparing a disk, the volume of which exceeds several hundred GB, this can be sacrificed. But you should not mark up disks of 40 GB and below in this way. However, where can you find such "dinosaurs" now? But if you have a need to prepare the hard drive of some old computer, then our recommendations will certainly be useful to you.
If you check the box "Fast (Cleaning the Table of Contents"), the process will not take much time, but there will still be a chance that the deleted files from the disk can be recovered.

If you are going to sell this hard drive, we recommend that you uncheck this box. After clicking on the "Start" button, all data will be erased from the media, including the operating system installed there. This may take some time, which will directly depend on both the power of your computer and the size of the disk.
Performing a cleanup through Disk Management
This method is somewhat more reliable. Having understood Windows 7 by this method, you must first of all click on the "Start" button, and in the menu that appears, select the "Control Panel" item. In the Panel that opens, look for the "Administration" option.
In the dialog box that opens, select the "Computer Management" shortcut. A window for managing the utility of the same name will open, in which we are interested in the "Memory devices" item. In it, you need to double-click on the "Disk Management" line.
After all these manipulations, a window will open with a list of storage devices installed in the system. Select the disk you need in it, right-click on it. The same context menu will open, in which you should select the "Format" item. You have already been familiarized with further actions above.
Using the command line emulator

So we got to the most "advanced" method, which is used only by the most experienced users. So formatting a disk with Windows 7 is very convenient and fast, but you need to remember or write down all the commands that we will give you in the text below.
It is best to simply copy them to and then paste them into the command line using the right mouse button for this (the “Paste” item).
Once again, pay attention: carefully follow the letter of the drive that you need to format. A mistake can lead to the fact that you lose data that is of considerable value (at least for you).
First you need to run the emulator with administrator rights. This is done simply. First, click on the "Start" button, look for the "Search" field there. You drive into it cmd command, and then press the Enter key. A window with search results will open on the right side, in which you need to right-click on the file of the same name, and select the "Run as Administrator" option in the context menu.
Having decided how to format the disk partition with the system or unnecessary data, first of all write the format Y: command on the command line, where Y should be replaced by the letter of the partition you need. We repeat: make no mistake! There have been cases when absent-minded users have lost all archives with family videos.
After that, you need to press the Enter key, after which the complete formatting of the data will take place. Important! When using command line emulation mode, no warnings about possible loss important data in case of an error is not issued, so be extremely careful when entering commands!
A little about flash drives
If your external drive asks you to format it before using it, you can also use command line. All steps are exactly the same, but the main command will have a slightly different form: format Y: /Q. As in the previous case, the letter Y is the designation of your disk, which you need to change to the value relevant to your case, and the Q key stands for Quick, which indicates a quick format with a simple cleaning of the table of contents.
What is it for? The fact is that once again you should not completely format flash drives, as this once again reduces the number of rewriting cycles.