Since we all love to experiment, dig into the system settings, run something of our own making, it is necessary to think about a safe place to experiment. Such a place for us will be a VirtualBox virtual machine with Windows 7 installed.
When starting the VirtualBox virtual machine (hereinafter referred to as VB), the user sees a window with a completely Russian-language interface.
Recall that when you install the application, the shortcut is automatically placed on the desktop. If this is your first time creating a virtual machine, in this article you will find detailed instructions which may be useful at this stage.
So, in a new window, click "Create", after which you can select the OS name and other attributes. You can choose from all available operating systems.

Go to the next step by clicking Next. Now you need to specify how much RAM to allocate to the VM. For its normal functioning, 512 MB is enough, but you can choose more.

Then we create a virtual HDD. If you have previously created discs, you can use them. However, in the same article, we will focus on how they are created.
We mark the item "Create new hard disk" and move on to the next steps.


In a new window, you need to specify where the new disk image should be located and how large it is. If you are creating a boot disk containing Windows 7, then 25 GB is enough (this figure is set by default).

As far as accommodation is concerned, best solution will place the disk outside system partition. Failure to do so may result in overload boot disk.
If everything suits, click "Create".
When the disk is created, the parameters of the created VM will be displayed in a new window.
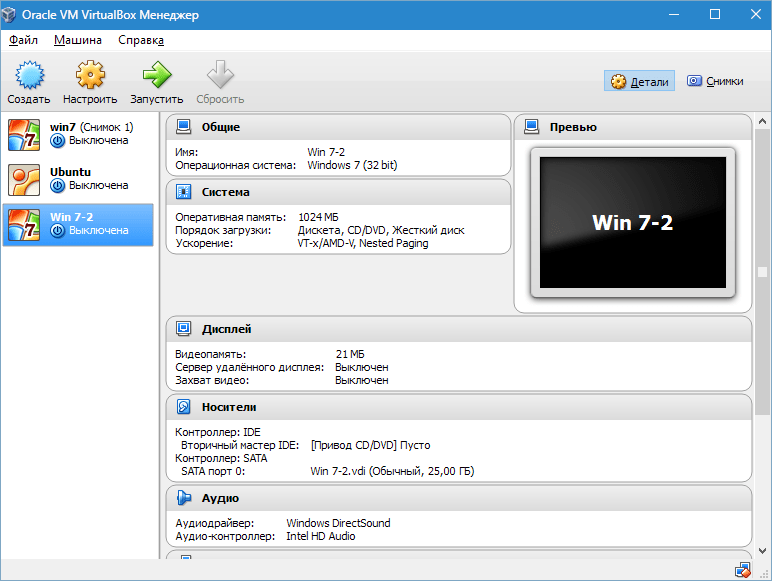
Now you need to configure the hardware of the virtual machine.

In the "General" section, the 1st tab displays key information about the created machine.
Let's open a tab "Additionally". Here we will see the option "Picture Folder". It is recommended to place the specified folder outside the system partition, since the snapshots are large.
"Shared Clipboard" implies the operation of the clipboard when interacting with your host OS and VM. The buffer can work in 4 modes. In the first mode, the exchange is made only from the guest operating system to the main one, in the second - in the reverse order; the third option allows both directions, and the fourth disables communication. We choose the bidirectional option as the most convenient.
"Mini toolbar" is a small panel that allows you to manage the VM. This console is recommended to be activated in full screen mode, since the main menu of the working window of the VM repeats it entirely. The best place for it is at the top of the window, because that way there is no risk of accidentally pressing one of its buttons.

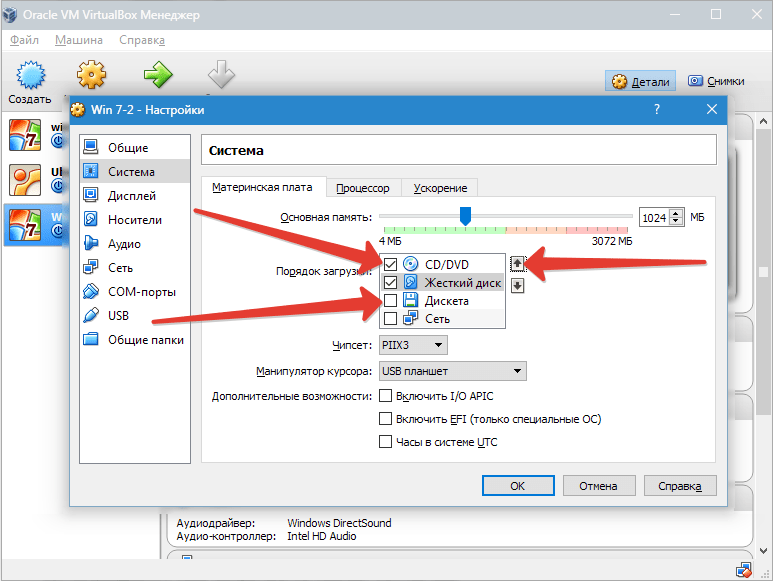
Let's go to the section "System". The first tab offers to make certain settings, which we will discuss below.
1. If necessary, adjust the volume random access memory VM. At the same time, only after its launch it will become completely clear whether the volume is chosen correctly.
When choosing, you should start from the amount of physical memory installed on the computer. If it is equal to 4 GB, then it is recommended to allocate 1 GB for the VM - it will function without "brakes".
2. Let's determine the order of loading. A floppy disk (floppy) player is not needed, turn it off. The first in the list should be assigned a CD / DVD drive in order to be able to install the OS from a disk. Note that this can be either a physical disk or a virtual image.
See the reference section for other settings. They are closely related to the hardware configuration of your computer. If you set settings that are not consistent with it, the VM will not start.
Bookmark "CPU" the user specifies how many cores are on the virtual motherboard. This option will be available if hardware virtualization is supported. AMD-V or VT-x.

Regarding hardware virtualization options AMD-V or VT-x, then before activating them, you need to find out if these functions are supported by the processor and whether they are originally included in BIOS– it often happens that they are disabled.

Now consider the section "Display". Bookmark "Video" indicates the amount of memory of the virtual video card. Activation of two-dimensional and three-dimensional acceleration is also available here. The first of them is desirable to include, and the second parameter is optional.

In chapter "Carriers" all disks of the new virtual machine are displayed. Also here you can see a virtual drive with the inscription "Empty". We will mount the installation image into it. Windows disk 7.

The virtual drive is configured as follows: click on the icon located on the right. A menu opens in which we click "Choose an image optical disc» . The next step is to add the operating system boot disk image.


We will not cover network issues here. Note that network adapter is initially active, which is a prerequisite for the VM to access the Internet.
On the section COM there is no point in dwelling in detail, since nothing is connected to such ports today.
In chapter USB check both available options.
Let's go to « Shared Folders» and select the directories to which the VM is planned to provide access.
The entire setup process is now complete. Now you can start installing the OS.
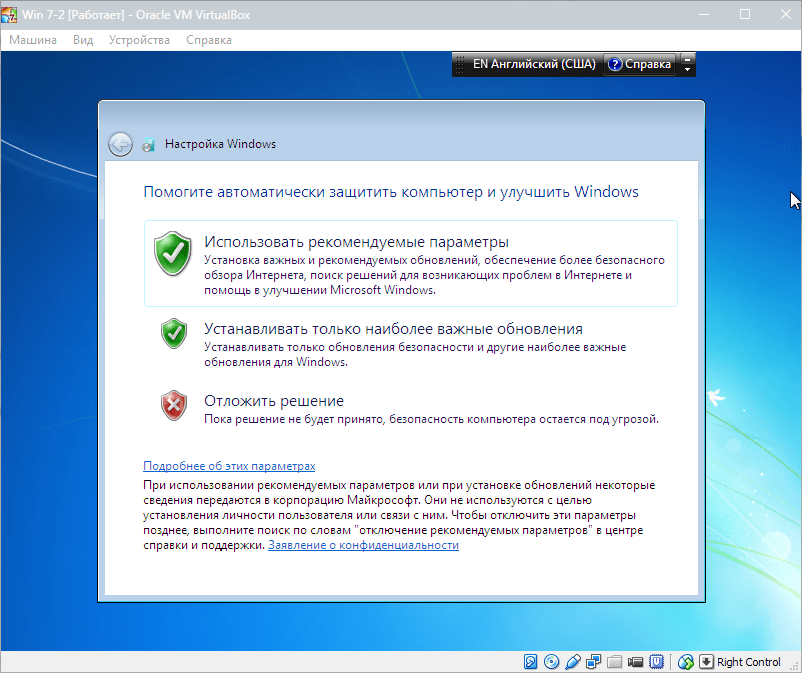
Select the created machine in the list and click "Run". The installation of Windows 7 on VirtualBox itself is very similar to a regular Windows installation.
After downloading the installation files, a window with a choice of language will open.


We accept the terms of the license.

Then choose "Full installation".

In the next window, you need to select a disk partition for installing the operating system. We have only one section, so we select it.


During installation, the machine will automatically restart several times. After all reboots, enter the desired username and computer.


Here we enter the product key, if any. If not, then just click "Further".

Set the timezone and date.

Then we choose which network to attribute our new virtual machine to. Click "Home".

After these steps, the virtual machine will automatically reboot and we will get to the desktop of a freshly installed Windows 7.

Thus, we installed Windows 7 on a virtual VirtualBox machine. Then it will need to be activated, but this is a topic for another article ...
More Windows users 7 want to try the features of the eighth version of this operating system. For these purposes, the use of virtual machines is perfect, on which you can completely install the system without harming the native system.
On this moment There are several popular virtualization software for Windows 7: WMWare, Virtual Box and Virtual PC. In this article, we will consider latest program, as compared to other virtual machines provides rich virtualization capabilities and is quite easy to set up and operate.

General algorithm of actions
- Download the installation package of the application. Virtual PC is a free program and was developed by Microsoft specialists, therefore it is fully compatible with both Windows 7 and earlier versions. You can download the installer from the official website of the corporation.

- Run the file and follow the instructions. Before installing the application, make sure that your current user has administrator rights. To avoid this situation, press right click mouse and select context menu"Run as administrator". If this is not done, then errors may occur during the installation phase (described below).

- Once installed, a VirtualPC shortcut will appear on your desktop. Run it and select "Create". After that, there may be a delay Windows work 7 and the feeling that the program is frozen. At this time, data is collected about the parameters of your system and the calculation optimal performance for the virtual machine.

- The following are the settings for the VirtualPC virtual machine. Leave the settings as they are for the first time. With careless actions, it is possible to use more opportunities than can be allocated. This will lead to general failures of the local and virtual operating systems. We change only the version of the installed operating system and at the very end of the settings select the source from which we will install (CD, disk image with hard drive, bootable flash drive).

- Attention should be paid to the installation stage, which requires you to specify shared network folders. These resources allow the system that we will install to use the resources of the local computer.

- After all the configuration steps in Virtual PC, the "Run" button will become active.
 When you click it, at the first start, the Windows 7, Windows 8 or other OS you selected will be installed into the virtual machine system, and when you repeat it, the operating system that was previously installed will be loaded. The installation steps are fully consistent with the standard installation on local computer and do not require any additional actions from the user.
- Upon completion of the process, the system that you installed will start up and will be fully available for testing. If there is a need to change the parameters of the virtual machine in the upper part of the Virtual PC interface window, we are looking for the menu item "Machine" - "Configure".
 In the window that appears, you can increase the available amount of RAM, free space, etc.
Common Mistakes
When performing the installation according to the above algorithm for Virtual PC at step 6, you may receive a message about Windows error 7 associated with the disabled virtualization feature. 
To fix it, you need to enable system virtualization in the settings panel and for some versions motherboards make BIOS settings. 
Besides this problem occurs when running antivirus software in Windows 7 with its own firewall and firewall. Therefore, before installing a virtual machine, it is recommended to disable or suspend all anti-virus programs.
Another common mistake is the lack of access to some components of the virtual machine. During the Virtual PC setup phase, after devices are connected, you may see a message that says no access. This is due to access rights in the Windows 7 operating system. Standard policy Windows Security 7 limits the access of third-party users and processes to system devices. To resolve this error, check the permissions of the current active user and permission to connect devices.
Sometimes, for various purposes, the user needs to use several systems at once. There is an option, of course, to use several computers at once or put several systems on one, but this is inconvenient and impractical. In this situation, one way out, which has long been used among programmers and developers, is to install a virtual machine for Windows. In this article, you will learn how to install "virtual" under Windows 7, 8, 10.
Which virtual machine to choose?
You may not believe it, but there are quite a few virtual machines to choose from. Each of them has its own specific functionality and features. Please note that it will not work to put a powerful virtual machine on a weak computer, and indeed, weak computers difficult to tolerate programs of this kind. If your PC has less than 2 GB of RAM and less than 100 GB free space on the hard disk, we do not recommend installing a virtual machine. First, increase the memory, and only then use it to the maximum.
For everyday tasks and permanent use, we recommend using the program VMware Workstation , which is a whole range of applications for working with a virtual OS. You can understand it, even if you have never used such programs. It is easy to use, doesn't eat up a lot of RAM, and includes the integration of a virtual system into the main one, which allows them to be used in parallel in one working environment. Let's take a closer look at the VMware installation process.
We have tested the 11th version of this software, it supports everything that will be necessary for both a novice user and an experienced one.
VMware Workstation installation process
This completes the installation process, now let's move on to how to install the OS on a virtual machine for Windows. Please note that any OS that has an installation file is suitable for installation. Consider an example of installing Windows 7 Ultimate on VMware Workstation.
How to Install an Operating System on VMware Workstation
First you need to download the OS installation file to your computer. You can use the search and find this file, or you can just ask someone installation disk(homemade) and download from there.
After downloading "Windows" to your computer, we will begin the process of installing the OS.
- We create a new virtual machine. To do this, go to the menu "File - New Virtual Machine";

- The coordination of the parameters of the future VM will begin. In the first window, you will be asked how you want to install it. We offer to choose "Selective" configuration type and click "Further";

- In the next window, also click "Further";

- In the next window, you will be prompted to select the source to install. "guest" OS. If you took the installation disk, specify the drive, and if you downloaded from the Internet, specify the path to the file using the button "Review". After that click "Further";

- Now you need to provide the product key and OS user details. We only recommend choosing "Windows 7 Ultimate" and skip the rest;

- Enter a name for the new virtual machine or leave the old one, and then define the parameters. Let's start with the type of firmware - leave the BIOS, and the number of processors is 1/4 of what you have available. We have 4, so we put 1, but with two cores. With RAM, it's about the same, but 1/3 of the total available memory. We have 4, but about 3 are available, so we put 1 GB;


- Now let's deal with the Internet for the virtual machine. We leave everything as it is and further, where they ask about the controller, the type of virtual disk;

- Recommended put 20-30 GB for the hard disk of the virtual OS, and then specify the path where the virtual machine file will be stored;

- Check all the set parameters and the OS installation will start;


- Next, the standard OS installation will take place. Just follow the course of events and, if required, enter user data;
- After successful installation, start the virtual machine and check if it works;

- After the successful start of the virtual machine, the system will start up. Wait for completion;

- After downloading, you will be taken to "Desktop" virtual machines and you can start working;

- To manage a virtual machine for Windows, you need to click on the desktop;
- When the work in the guest OS is completed, it is necessary to shut down the virtual machine in the same way as when using a permanent system - "Start - "Shutdown", otherwise you might "break" it. Good luck using VM for Windows 7, 8, 10!

The concept of a virtual machine (from the English. Virtual Machine) is understood as a software or hardware system that emulates Hardware a certain platform (guest platform) that executes programs for the guest platform using the host platform.
Also, a virtual machine can virtualize a certain platform, creating on it independent, isolated environments for the operation of operating systems and programs.
Virtual machine for Windows 7 - we offer you an overview of popular programs.
In simple terms, a virtual machine provides an opportunity on one real, physical computer, create multiple virtual computers, install on them various operating systems, programs, etc.
This technology came to the masses from the world of server infrastructure, where virtual machines are used to create maximum server load and reduce equipment downtime.
Virtual machines are used to solve a range of tasks such as:
- Optimizing the use of server resources.
- Information protection, as well as limiting the capabilities of some programs, the so-called sandbox idea.
- Research into new computer architecture or software.
- Emulation of various computer architectures (for example, to emulate game console PlayStation by Sony).
- Creation malicious code.
For example, the SubVirt rootkit, created in 2006 by Microsoft Research (MSR), created a virtual desktop environment in which the user's operating system was placed along with antivirus, firewall, and other software, (software) designed to protect your PC.
At the same time, the rootkit itself remained outside and therefore did not fall into the field of action of antiviruses, providing remote control over a virtual machine to an attacker. - Modeling computer networks.
- Software testing and debugging.
We bring to your attention short review the most popular virtualization programs.
Virtual Machine for Windows 7: Virtual Box
Oracle virtualization software for operating systems Linux, Mac OS X, MS Windows, etc.
The program is quite popular and below we will not consider everything, but only its key advantages:
Free.
Cross-platform.
Support for 64-bit guest systems on 32-bit host platforms. To do this, the host platform must support virtualization technology at the processor level.
Support for audio devices and various kinds network interaction.
The ability to create a chain of backup states (backups), to which you can return in case of problems with the guest system.
Russian-language interface.
Important! The disadvantages of the program are not significant, but for the sake of objectivity of the assessment, they should also be mentioned - VirtualBox is poorly compatible with Win 95/98 (slow system operation is noted) and Mac OS X (problems with sound).
As you can see, the shortcomings of the program are not significant and rather nominal.
Virtual Machine for Windows 7: Xen
Virtual machine monitor (hypervisor), developed at the University of Cambridge and distributed open source source code(GPL license).
Using paravirtualization technology (PV mode), Xen achieves very high performance by emulating real hardware platforms.
A feature of the PV mode is the absence of the initial moment of booting the computer (imitation of the BIOS code, bootloader) and the guest OS kernel starts immediately in the desired mode, like ordinary programs.
It is worth noting that Xen can be compared to enterprise-grade software due to its rich functionality.
Advantages:
Free.
Cross-platform.
High performance of running virtual machines, which is very close to the performance of real systems.
Ability to migrate running virtual machines between physical hosts.
High degree of support for emulated hardware.
Perhaps the only drawback of the program is its relative complexity compared to similar software from other companies.
Virtual Machine for Windows 7: Virtual PC
Initially this program was developed by Connetix for Mac OS, back in 1997. After 4 years, a version for Windows was released.
Later, in 2003, the rights to the program were acquired by Microsoft Corporation, and in 2006 the program became free.
In the future, Virtual PC has not received development and currently contains the functionality of 2007.
Advantages:
Free.
Simple, user-friendly interface.
Flaws:
The program works only in the Windows OS environment, but is not compatible with Windows 8 and above.
The program, unlike Virtual Box, is not compatible with AMD processors.
Virtual Machine for Windows 7: VMware Player
A product from the largest American developer of virtualization software Vmware.
Vmware products are primarily aimed at the corporate segment of the market, therefore full version programs - VMware Workstation - paid.
The license price is about $250. For non-commercial use, the manufacturer offers a program with limited functionality VMware Player.
It should be noted that the restrictions generally apply to software developers and IT specialists; the program is quite functional to perform the tasks of an ordinary user.
Advantages:
Free.
Fast.
Simple, user-friendly interface.
ThinPrint technology allows you to print any document opened in the guest OS without installing additional drivers.
Working with multiple monitors in the guest OS.
File exchange between guest systems using Drag & Drop technology (drag and drop).
Flaws:
Limited functionality of the free version.
Installing Windows 7 x64 on VirtualBox (virtual machine)
Virtual machine for Windows 7: multiple operating systems on one machine
Good afternoon.
Why might you need a virtual machine (a program for running virtual operating systems)? Well, for example, if you want to test some program, so that if something happens, do not harm your main operating system; or planning to install some other OS that you don't have on a real hard drive.
In this article, I would like to dwell on the key points when installing Windows 7 on a VM Virtual Box virtual machine.
1. What will be needed for installation?
1) A program that will allow you to create a virtual machine on your computer. In my example, I will show the work in VM Virtual Box (more details about it). In short, the program: free, Russian, you can work in both 32 and 64-bit OS, many settings, etc.
2) Image from the operating room Windows system 7. Here you choose for yourself: download, find in your bins desired disk(when you buy new computer, often the OS is bundled on disk).
3) 20-30 minutes of free time ...
2. Setting up a virtual machine (VM Virtual Box)
After launch Virtual programs Box, you can immediately click the “create“ button, the settings of the program itself are of little interest.
If you already had a virtual hard disk before, you can select it, if not, create a new one.
A dynamic hard disk is preferred. Because its occupied space on a real hard disk will increase in direct proportion to its fullness (i.e. if you copy a 100 MB file to it, it will take 100 MB; if you copy another 100 MB file, it will take 200 MB).
At this step, the program asks you to specify the final size of the hard disk. Enter here how much you need. It is not recommended to specify less than 15 GB for Windows 7.
This completes the configuration of the virtual machine. Now you can run it and start the installation process...
3. Installing Windows 7. What to do if an error occurs?
Everything is as usual, if not one but ...
Installing an OS on a virtual machine, in principle, is not much different from installing on real computer. To get started, select the desired machine to install, in our case it is called "Win7". You launch it.
If we have not yet indicated in the program boot device, then it will ask us to specify what to boot from. I recommend that you immediately specify the boot iso image, which we prepared in the first section of this article. Installation from an image will go much faster than from a real disk or flash drive.
Usually, after starting the virtual machine, a few seconds pass and the OS installation window appears in front of you. Next, you act as when installing the OS on a regular real computer, more about this, for example,.
If during installation an error with a blue (blue) screen got out, there are two important points that could cause it.
1) Go to the virtual machine RAM settings and move the slider from 512 MB to 1-2 GB. It is possible that the OS did not have enough RAM during installation.
2) When installing the OS on a virtual machine, for some reason, various assemblies behave unstable. Try to take the original OS image, it usually installs without any questions or problems ...
4. How to open the VHD disk of a virtual machine?
A little higher in the article, I promised to show how to do this ... By the way, the ability to open virtual hard drives appeared in Windows 7 (Windows 8 also has such an opportunity).
To get started, go to the OS control panel, and go to the section administration(you can use search).
On the right in the column there is the possibility of connecting a virtual hard disk. We only need to indicate it location. By default, VHD drives in Virtual Box are located at the following address: C:\Users\alex\VirtualBox VMs\(where alex is your account name).
More like about it all - .

That's all, successful installations! 😛