In the process, you will format local disk, which contains the current Windows version. In other words, before installing new system, you will have to erase all the old data from it. The contents of the remaining disks should remain unchanged. But it is better to play it safe and first copy to the cloud or to physical media absolutely all the data from the computer that you are afraid to lose.
If paid programs are installed on your computer, do not forget to read the rules for working with licenses when reinstalling Windows in their documentation, otherwise you may lose them.
2. Create a boot disk or flash drive
If you want to install/reinstall a licensed version of Windows, make sure you have the appropriate activation key. Even if you are already using an activated system and just want to install the same version again, the old activation key may come in handy again.
- If you already have a bootable USB flash drive or disk with the version of Windows that you are going to install, you can proceed to step 3. Otherwise, you need to download the Windows image from the Internet and burn it to any of the listed media according to the instructions below.
- Decide on the version of Windows you'll be installing and make sure your computer meets its system requirements. This information can be found on the official Microsoft website or on the disc with the purchased Windows. Don't forget to also check that your computer supports bit depth. new version: 32 or 64 bits. In order not to miscalculate, you can install a version with the same bitness as your current version of Windows.
- To create bootable flash drive with anyone way Windows found on the Web, you can use the program (with UEFI support) and proceed to step 3.
And below I will tell you how to create a boot disk or USB flash drive with an official system image using Windows 10 as an example.
3. Boot the system from a disk or flash drive
Now that you have the physical media with the desired Windows image, you need to go into the special BIOS software environment and select the disk or USB flash drive as the boot source here.

Perhaps instead of the classic BIOS you will see a more modern one GUI. Moreover, even in various old versions BIOS settings may differ. But in any case, the procedure will be approximately the same: go to the boot menu, select the desired media as the source and save the changes.
After that, the computer should boot from the selected disk or flash drive.
4. Run the installation wizard
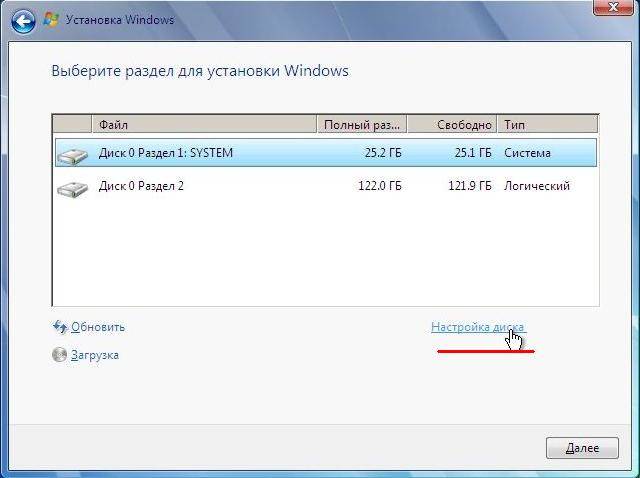
 If you did everything correctly, a wizard will appear on the screen. Windows installation. Further actions do not exceed the complexity of installing an ordinary office program. You just have to follow the prompts of the system and wait until the files are unpacked. Unless you have to select a local drive for installation operating system and format it.
 Also, be ready to enter your activation key during the process. But if you reinstall an already activated one on your Windows computer 10, then the step with the key can be skipped.
After installation is complete, your computer should boot into normal operating mode.
5. Install drivers
Modern versions of Windows load drivers on their own. But if, after reinstalling the system, you notice that the video card, speakers, or anything else is not working correctly, you can use the driver autoload utility. Suitable, for example, free Driver Booster.
After completing all of the above, you can get to work. The computer must be ready.
There will inevitably come a time when the operating system will need to be reinstalled. For most users, this situation is not a very favorable moment. Some are calm about the problem, others, on the contrary, are horrified because they do not know how to reinstall Windu through BIOS. As a rule, the unlucky one stops at the option that saves the situation: “Hello, this is a service computer help? As a result, it wastes time, patience and money. From now on everything will be different. Right now you will learn the "great secret" that Windows OS installs itself. The user only needs attention and a few confident clicks on the appropriate buttons. Have you got an interest? Then go ahead!
Meet the chief PC manager - Mr. Bios!
Incredibly, the Bios firmware is primarily responsible for the functionality of the computer, the abbreviation of which stands for “basic input / output system”. If any of you, dear reader, believed that Windows is responsible for the "omnipotence" of the PC, then you were wrong. Accept the title of the paragraph as an important fact of reality. You will soon realize that resolving the issue of how to install Windu will first of all require an appeal to some Bios program preinstalled by the motherboard manufacturer. Moreover, you should be aware that the underlying system may have different versions, since competing firms in the IT industry each in their own way represent the beauty, convenience and efficiency of the BIOS “micromonster” involved through the ROM chip (Read Only Memory). Nevertheless, despite the individuality of the graphical shell of each separately existing program for managing the hardware computer, the functioning of embedded systems "iron level" becomes intuitive when entering their environment directly, since they all use the same notation in the form of standard terminology.
How to reinstall "Windows" through BIOS: finger to the start!
We will not rush, because you know that "hurry is needed only when fishing ...". Before you get into the PC, that is, when the BIOS interface opens in front of you, know that carelessness in actions, which is expressed in thoughtless keystrokes and changing "incomprehensible" parameters, is critical, and in poetic language it is like death at all!

Nevertheless, you still have to make some "editing" yourself.
The only right choice: one among many
You can activate the BIOS firmware when you turn on or restart your computer. In order to do this, you need to press the corresponding button on the keyboard several times with a short interval. As a rule, this is the "Delete" or "F2" key. If it doesn't work, the user can always see on home screen download the name of the "responsible" button (lower part of the display or upper left corner).
Why "boot"?

The most common method of installing the OS is a practical solution to the question: "How to install Windows from a disk?" However, the method of introducing the system through a flash drive is gaining more and more popularity, but more on that later.
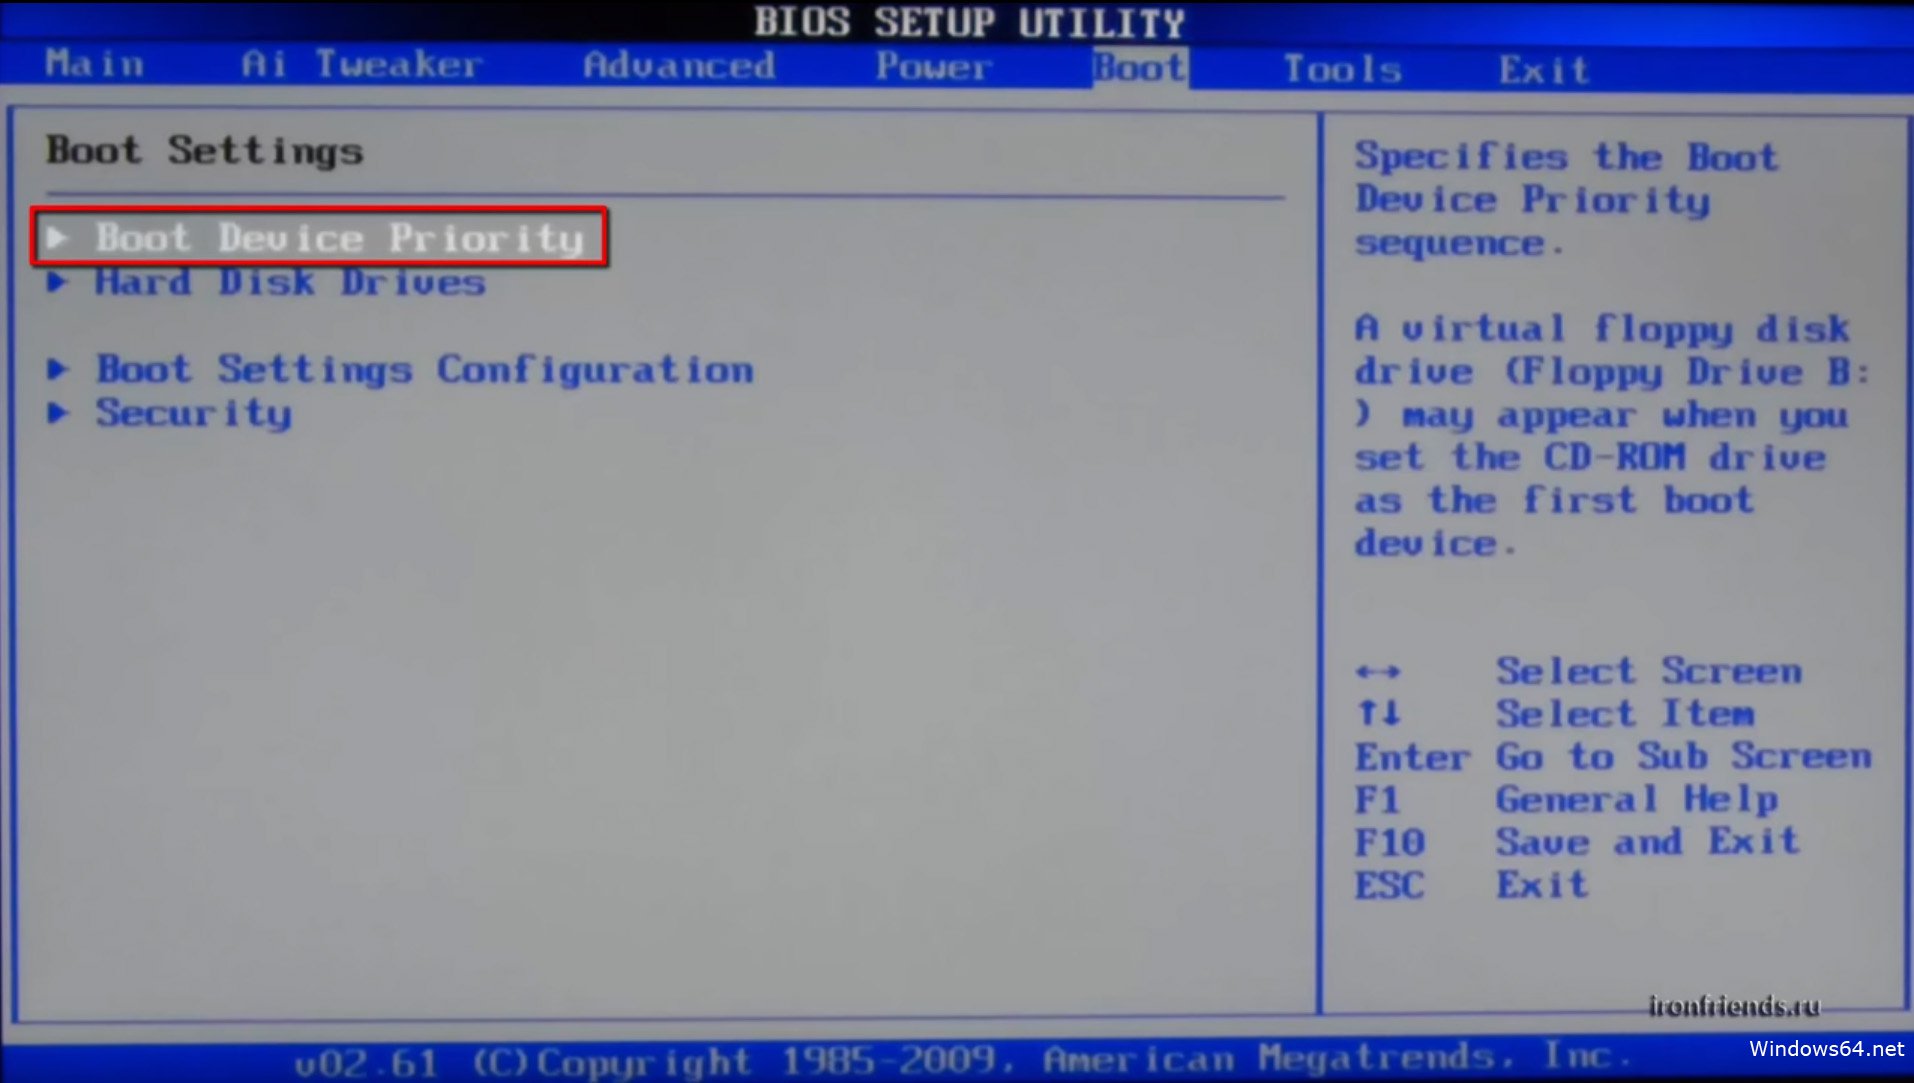
- Depending on the BIOS version, the tab responsible for boot priority may be called differently. However, the English word "Boot" will mean that you are on the right track.
- By opening the above menu or by activating the "Advanced BIOS Features" item, pay attention to the "Boot Device Priority" item. Or lines that indicate the order in which devices are loaded. Usually these are Floppy, HDD and CDROM (DVD R/RW).
- Set the boot priority to your drive (drive).
- You can save your changes by clicking hot key F10 or just agree: "Yes" (if you used the "Esc" button).
We reboot and proceed to the next stage of the project "How to reinstall Windu through BIOS".
Where does Windows come from?
It may seem to some of you that this point should have been placed at the beginning of the described process. Meanwhile, this “inconsistency” in the presentation of the material in no way violates the sequence of actions; moreover, it is the most acceptable option to learn how to do everything according to the rules. Now insert the Windows distribution disc. If you are using licensed software, and the disk with the system image you bought is original, then you have nothing to worry about. When you have a free "Windows" downloaded from a dubious Internet resource, then the chances of a long-term and fruitful "cooperation" with the OS are negligible.

However, there are exceptions. Perhaps you will be one of the lucky ones, and the "cracked" system will be quite suitable for work. But do not forget that from correctness changes the final result depends on the BIOS settings - the success of the OS installation. It is the firmware that monitors the “fairness of the game” of the user. Therefore, often the installation of a system distribution kit from Windows environments fraught with software failures and usually goes wrong. As a result of using the "treacherous" method when solving the question: "How to reinstall Windows XP?" the efforts of an uninitiated user becomes just time wasted. Moral: put "Windows" from under DOS, that is, through Bios!
When the disk "whispers" - the user drinks coffee
After you have assigned a drive boot device#1 and then inserted the Windows disc and restarted the computer with the Alt+Ctrl+Delete key combination, it's time to watch. As promised, the system will "become" automatically.
- When the message “Press any key…” appears, press any button.
- After the initialization process is completed, a window will open in which you need to assign the OS installation directory.
Attention: do not thoughtlessly press "Enter" on an inoperative Windows OS, which usually takes up space in system partition HDD and is marked with the letter "C". “How to reinstall Windows XP?”, you ask, if the required disk area is occupied by an old copy? Easily! To do this, simply format the partition, after erasing the old data.

- On the selected OS, press "D", which means delete.
- Then use the "L" button to confirm your intentions.
- After the unallocated area appears, press "Enter" and format the created partition into the NTFS file system.
You don’t have to do anything else, except at the end of the installation to make some adjustments regarding the system language for using the operating system, as well as user data. As you probably managed to make sure, everything is quite simple and transparent, and the solution to the question “How to install Windows through BIOS?” - not a laborious process at all.
Spectacular Windows 7 and "flash royale" in the download
So it's time to enlighten the attentive reader about the method of installing the operating system via a flash drive. The promised installation method is something more practical as it doesn't require any input. However, the feasibility of this method greatly outweighs the traditional boot from CD or DVD disc A. Especially today, in our age of compactness, when modern electronics takes on ultra-thin features, and the technology gets rid of devices that unnecessarily “devour” time and energy.
Modern solution to the issue: through Bios?

First of all, you need to make it easy, it is worth considering that the capacity of a compact storage medium must be at least 4 GB. "Why?" - you ask. The thing is that the standard distribution of the seventh OS "weighs" almost 3 GB, so the minimum size of the flash drive must correspond to the above value.
From words to deeds
- Format the Flash media using standard Windows tools. file system NTFS should be selected.
- Then you need to prepare the system distribution kit for recording. That is, if the installation files are located on optical disc- insert it into the drive, when it is data in the form of an image - load it onto a virtual device.
- The next step is to use the WinSetupFromUSB program. This software- freely distributed on the network, you should not have any difficulties with downloading it. After you install and run the specified program, you will be literally a stone's throw away from the moment when you can consider yourself a professional in solving the question: "How to install Windu?"
- In the upper checkbox, select the flash drive installed in the PC.
- Check the corresponding item (Windows 7) and, by clicking the button, specify the path to the OS distribution kit next to it.
- After activating the "GO" toolbox, you just have to wait a few minutes. Upon completion of the process, the program will display a corresponding message.
It's time to start the practical solution of how to install Windows through Bios!
Flash start!

Configuring boot options is done in almost the same way as in the case described at the beginning of the article. The only difference is the choice of media. At this method installation your choice - USB Drive, that is, a flash drive. There is another way to boot from the desired data source, bypassing the main one. Such a scenario of actions is possible when the user presses "F8" to call the Boot menu, so to speak, hot option base system. Of course, in different PCs, this option can be activated using a different key.
After reboot, follow the instructions:

You must now understand that the previously described method of how to install Windows from a disk is somewhat outdated. Flash drives are an incredibly convenient invention of mankind!
Finally
The article described two main methods Windows families. It's up to you to decide which one is best. However, there are many programs that allow you to do backups working systems, that is, in the event of an operating system crash, the user has the opportunity to restore a clean copy (duplicate) of the OS with workable programs and previously made settings in a matter of minutes. Incredible convenience, because the user does not need to install the software again and remember forgotten passwords. However, a new question will appear: “How to run Windu through BIOS?”, Which, in principle, is just as easy to solve as in the case when a reinstallation is necessary. But that's a topic for another article. Don't learn from your own mistakes...
You will also need device drivers installed in the computer (chipset, sound card, video card, webcam, etc.)
Burning the Windows XP installation disc
To burn a Windows installation disk, we need a disk image, a disk burning program from an image, a CD writer, and the actual CD itself.
Image Windows disk XP SP3 Professional download
Any disc burning program that supports burning from an iso image will do, such as Nero or DeepBurner, which can be downloaded for free.
So, downloaded the disk image, installed the DeepBurner program. Now consider the process of burning a disc.
Paste blank disk CD-R into the drive and start DeepBurner. After launching DeepBurner, it prompts you to select the type of project to be created.
Choose Burning an ISO image and click Next.
I don’t know about you, but my project window opened in a compressed form. Therefore, you need to stretch it by grabbing the lower right corner with the mouse or expand it to full screen so that it looks like in the figure below.

In the project window, press the button with three dots (Browse) and select the file of the downloaded iso-image installation disk Windows XP. In our case, this is the file ZverCDlego_9.2.3.iso.
Now you need to select the recording speed and press the button Burn ISO. In order for the disc to record better, the speed should be selected slightly less than the maximum. Now it remains to wait for the disc to be written. After the Windows XP SP3 installation disc has been burned, the drive tray will pop out by itself. The disk is ready!
Windows XP(internal version - Windows NT 5.1) is an operating system (OS) of the Windows NT family of Microsoft Corporation. It was released on October 25, 2001 and is an evolution of Windows 2000 Professional. The name XP comes from the English. eXperience(experience).
Unlike the previous Windows systems 2000, which came in both server and client versions, Windows XP is a client-only system.
According to web analytics from September 2003 to July 2011, Windows XP was the most used operating system to access the Internet in the world. As of February 2013, Windows XP was in second place after Windows 7 with a share of 19.1%. The maximum of this value was 76.1% and was reached in January 2007.
How to install Windows XP from a disk through the BIOS
Now it's time to consider the process itself installing Windows XP on a computer from a disk.
First of all, you need to configure boot from the drive in the BIOS. To do this, go to the BIOS menu. How to do this may differ depending on the motherboard model. In most cases, this menu can be accessed by pressing the button. Del(on some models of motherboards, you need to press the F2) after turning on the computer (during the startup splash screen). It is better to press this key several times to be sure.
The BIOS menu differs depending on the manufacturer and version. There are two main BIOS type: AMI and AWARD.
Below are screenshots of the AWARD BIOS. Need to go to the menu Advanced BIOS Features.

Here in the menu item First boot device press Enter and select CD-ROM

After that, press the Esc key to exit to the previous menus, where select the item Save and Exit Setup. Everything, now the DVD drive will be the first device to boot the computer. You can go to the process installing Windows XP from a disc.
Now let's look at how to install boot from disk in AMI BIOS
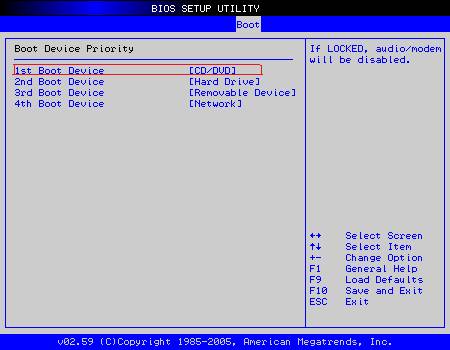
Choose a tab Boot, and in it we go to the menu Boot Device Priority

We put the first boot device (1st Boot Device) CD-ROM or DVD-ROM (your drive model)

In some BIOS versions, the first device is selected after pressing the Enter key on the desired item and selecting the device, in others, devices are moved up and down using the F5 and F6 keys or + and -
After that, you need to exit to the main menu with the Esc key and go to the tab exit. Select an item Exit and Save Changes to save changes and exit.
Now let's look at the process itself. install windows xp from disc to computer.
Insert the installation disk into the drive and restart the computer. The disc menu shown below will appear.

Choose an item Installation Microsoft Windows XP SP3 in manual mode and press Enter.
It should be warned that installing Windows XP SP3 on a computer takes about 40 minutes. So be patient.
On the first screen, press the Enter key to continue the installation.

In the next step, read license agreement and press the F8 key
Now select the disk partition where you want to install Windows XP. If the hard drive is new and not yet formatted, you need to create a partition by pressing the C key.
Select a partition and press Enter. If section already existed, you need to confirm the installation in this section by pressing the key WITH.

The next step in the installation program is to format the drive. Choose an item Format partition to NTFS system(Fast) and press Enter.

Press to confirm formatting. F
After formatting, the process of copying the necessary files to the hard drive will begin.

After the files are copied, the computer will restart.
When you boot your computer, it will start again from the boot CD. In the disk menu, select the item
A window for selecting driver packages for unpacking and installation will open. These are built-in drivers for many devices included in this assembly. If you are installing Windows XP from a Microsoft distribution, this window will not appear.

Select the required driver packages by ticking the boxes and click OK. If you don't know exactly which drivers needed and which are not, select all. If you have driver disks for all devices ( motherboard, video card, etc.), then uncheck all the boxes to speed up the OS installation process. In this case, you will need to install the drivers manually from the discs after Windows Setup is complete. Read more here: How to install Windows drivers xp.
After pressing the OK button, the unpacking of the driver packages will begin, and when it is finished, the Windows installation will continue.
The next language and region selection window will appear. If the distribution kit of the Russian version of Windows XP, then nothing needs to be changed here.


In the next window, enter the product key and click the button Further.
A window will appear asking you to enter the computer name and administrator password. You can change nothing in this window. Then the administrator password will not be set.
In the time and date settings window, set the correct date and time, as well as the time zone.

In the window network settings OS choose Regular options and click Further.

In the window working group write the name of the workgroup or domain in which the computer participates. If you don't have a home or office network, you can leave everything as it is and click Further.

After that, Windows installation will continue, after which the computer will automatically restart.
We go into BIOS and set the first boot from the hard disk, as described at the beginning of the article. Exit BIOS and save changes.
Now before how to completely install windows xp on a computer the last minutes left.
When you boot, the system will prompt you to automatically adjust the screen resolution. We press OK.
In the window hello windows XP push Further.

A window will appear asking you to select the Windows update mode.

Choose Postpone this action to disable automatic update system and press the button Further.
The next window will prompt you to set up an Internet connection. Click Skip.
We refuse the offer to register by selecting the item No, some other time and press Further.

In the final window, click Ready.
That's all! Now you know how to install windows xp from installation disc on your computer.

It remains to install drivers and programs, but this is already beyond the scope of this article.
Many laptops are offered for sale with a pre-installed version of Windows 8, which, as practice has shown, does not suit a large number of users. In addition, OS Windows any version sooner or later "clogged" and also requires reinstallation. Also, reinstallation is often caused by various problems, with computers, for example, if it does not turn on or if it is blocked. Despite the rather large number of steps when reinstalling Windows, even the most inexperienced user can install the OS using this instruction.
Preparing to reinstall
The first thing to do is to select a disk partition for installing Windows. As a rule, there is a section hard drive at least 50 GB in size.
If your computer already has an operating system, you should save all the necessary documents in order to reinstall the OS without losing data.
To install the OS, you will need an 8 GB DVD disk or flash drive, on which a bootable installation will be created.
OS version selection
The most common and stable version The OS from Microsoft is Windows 7, in some cases reinstalled on Windows XP. The most decisive factor Windows selection is the presence of the necessary drivers. To check for which OS version your laptop has drivers, you need to go to the official website of the developer and look in the support section.
Most modern laptops have drivers only for Windows 88.1, some of them are also suitable for Widnows 7, unfortunately, the correct operation of all devices cannot be guaranteed. For correct functioning, it is recommended to install exactly the system for which the manufacturer provided the drivers.
If your laptop has more than 4 GB random access memory you should select the bitness of the system - 32 (x86) or 64 (x64). To use more than 4 GB of RAM, it is recommended to choose Windowsx64.
After choosing the version of Windows, you need to download it. It is advisable to upload an image as close as possible to licensed version without adding additional software. This version of Windows will be more stable and will not cause additional problems during the installation of the operating system. The most common option is the Windows 7 Ultimate license.
Video: How to install Windows 7
Create a boot disk or flash drive
You need to download the image in ISO format, most of the options are provided in this extension due to the convenience of working when creating a bootable USB flash drive or disk.
Required to create Windows program 7 USB/DVD Download Tool, which can also be downloaded from the Microsoft website.
Install the program and proceed to the main steps:
- run the program;
- Click "Browse" and specify the location of the Windows installation image in ISO format. Clicks "Next";
- in the next menu, you must select the type of media on which the Windows installation will be recorded - USB or DVD. If the drive does not work or it is missing, then there is only one option left - USB stick;
- Next, you should select the disk on which the recording will be made. After selecting, you must click "Begin Copying";
- for a flash device, the program will ask for formatting confirmation, for which you need to click “Erase;
- the program will display the corresponding inscription about successful recording.
How to reinstall Windows 7 on a laptop completely
After creating a disk or flash drive, you can reboot the computer. Do not forget that all data on the drive on which you will install Windows will be deleted. You should also take care of the Internet connection settings, you can contact the provider or record the data yourself.
To start the installation, you must restart your computer and install the boot from your device with the Windows installation files.
BIOS setup for installation
When reinstalling the operating system from a flash drive, it is necessary to set the boot priority from a specific device, in this case, to a flash drive or DVD drive. This operation is performed for installation on a computer both without an operating system and with it. Fortunately, most modern laptops have a function quick select download devices. To call this menu when the laptop is booting, a certain key is used.
Using this table, you can select a button for your device:
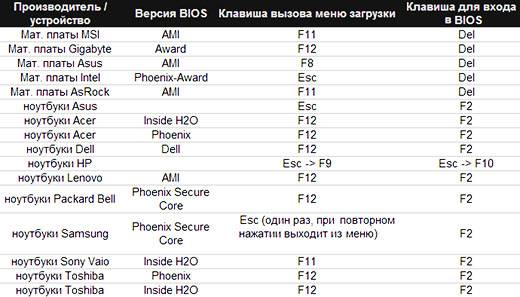
By clicking the button, the computer will present a window for selecting the device from which it will boot first. In our case, we select a DVD drive or a USB drive.

There is a more complicated installation option via BIOS on an empty laptop or with an installed OS. To do this, when starting the devices, we go into the BIOS (the button is indicated in the provided table). BIOS from different manufacturers has some differences, so the location of the settings may differ from those shown.
In the BIOS, go to the "Boot" or "Advanced BIOS Features" section and set the First Boot Device parameter to your device - USB drive or DVD drive. To save the settings, press F10 and select "Save and Exit". Thus, installation is performed from Dos via a USB flash drive or via BIOS from a disk.
Reinstall process
After making all the settings in the BIOS, you can proceed to install the OS. If all actions are correctly performed after booting, the system will display the inscription "Press any key to boot from ...". To continue, press any key and wait for the download.
In this case, we will consider the installation of Windows 7, other versions have minor differences, but the principle of operation remains the same:

- in the first Windows installation menu, you must select the language, and then click "Next";
- in the next section, click the "Install" button;
- if the downloaded image includes several OS configurations, for example, "home base" or "maximum", then the installer will prompt you to select one of the options;
- in the next menu, you must confirm the agreement with all items.
Selecting the type of installation
- the program has the ability windows updates, in which all files will be saved to a separate folder. Despite this convenience, it is recommended to select the " Full installation". This option provides the installation of the most stable and "clean" operating system;

Partition Formatting
- after selecting the installation, the program will prompt you to select the disk partition into which Windows will be installed. In this menu, you can format or allocate space between your hard disk partitions by opening a set additional options Disk Setup.
Unfortunately, during these operations, all information from the disk will be deleted. This function allows you to create disks of the required size, for example, if your laptop was purchased without its axis HDD not "broken". Don't forget to format all empty disks after performing operations on hard disk partitions. After completing all the steps, select the disk and click "Next".
- after copying, the system will prompt you to enter the username, computer, and password;
- select "Recommended settings" as the security settings to protect your computer;
- after selection, set the time, date and select " home network” in the Internet connection menu.
Attention! When you restart your computer, you should remove the disc or flash drive to avoid having to reinstall Windows.
On this stage the installation of Windows can be considered complete. Now you can install drivers, as well as various software and utilities. If you have changed the computer startup settings in the BIOS, we recommend that you set the startup from the hard disk first.
Nuances of reinstallation if there is another OS
How to install Windows 7 on a laptop after Windows 8? Reinstalling the OS from Windows 8 does not make any difference if another OS from Microsoft is present on the hard drive. The only recommendation is to install the new operating system on the same partition as the current OS.
Video: Why Windows won't install
How to reinstall windows 7 with problems? If your Windows does not start, you will need to use another computer to create a disk or flash drive. Since the installation is performed without Windows startup, then problems with the previous OS will not interfere with the installation.
This article details the process of how to reinstall Windows 7 on a laptop without a disk, formatting your hard disk partition. Thanks to detailed description, even users with little experience will understand the principles of installing Windows 7 instead of 8. Reinstalling a new operating system allows you not only to get the desired version of the OS, but also to get rid of a large amount of reinstalled software by the laptop manufacturer.
>If you download an ISO image with a Windows distribution and even burn it correctly to a DVD disc or create a bootable USB flash drive using the same UltraISO, it is practically not difficult for anyone. Then with the second stages, directly installing the operating system from a disk or flash drive on a PC, many have difficulties.
There are three ways I know how to start installing Windows.
1) the simplest and most unreliable is to open an image through a virtual drive with Windows already running and start the installation, but there are many factors that can interfere and give an error at some stage of such an installation.
2) Insert the flash drive we created into a USB connector or a DVD with Windows into your drive, no matter which version, either windows 7 or windows 10, or even win95. This works for everyone. Then, when you turn on the PC, call BOOT menu, this is a list with media from which you need to boot, select the media we need and press ENTER. You can read more about how to install Windows through the BOOT menu here.
3) It differs from method 2 only in that we specify what we want to boot from not through the boot menu, but in the BIOS of our device.
In this article, we will talk in detail about how to install Windows from a USB flash drive via BIOS or Windows boot 7 from the BIOS flash drive.
Booting Windows 7 from a BIOS flash drive
Installing Windows from a USB flash drive through the BIOS begins by calling the BIOS menu or it's also called Setup, this is most often done with the Delete button immediately after turning on the laptop or computer, press continuously until you see blue screen with some text, but it happens that you need to press another button, it's F2 or F10 or Esc. You can try all the options until you see the desired result, or you can read a text like "Press DEL to run Setup" in the welcome window of the mother firmware, it tells us that in order to get into the BIOS, you need to press DEL.
And so, after we got into the BIOS SETUP UTILITY, we look for the Boot tab and use the arrows to go there. We need the line Boot device Priority
Here the logic is simple, the higher the device in the list, the higher the priority in the download queue. That is, the top one in the list is loaded first, and so on in turn until the system boots.

And so, using the arrows, select the first drive in the list and press ENTER, we see a list of all possible devices from which the computer can boot.

If we want to choose to load the BIOS via a USB flash drive, then we select the USB interface, this is Removable Dev or something with the inclusion of the text "USB" or if the USB flash drive is already inserted, then the name of the flash drive manufacturer will be written. If you need to select a DVD drive, then usually this line begins with the words CDROM: or DVDROM: or it can also be written by the manufacturer of the DVD drive.
If you make a choice, then press ENTER and in the same way select the second device in turn, the second in the list should be your hard drive on which Windows will be installed. If the BIOS does not see the USB flash drive, then try inserting the USB flash drive into another USB connector and do everything again.
In order for all changes to be saved in BIOS Setup, you need to go to the Exit tab before leaving and select the Exit & Save Changes line and press ENTER.

After that we can windows bios install via flash drive or dvd drive. bios with a blue screen is no longer available for everyone. In 2017, more and more often you can see the new generation BIOS, it is more graphically thought out, there are pictures of the icon for an understandable association, if you are not strong in English so as not to be mistaken. But essentially all the settings are the same.
Attention!- after our changes in the BIOS, now the computer will always boot first from the USB flash drive, then from the hard drive, so it is important when installing Windows after the first stage of installation, when the laptop or PC reboots, YOU MUST HAVE TO PULL THE FLASH DRIVE FROM the USB connector, or pull out the disk from DVD-roma. Otherwise, the first stage of the installation will be repeated indefinitely.
Now we know how to set up the BIOS to install windows from a USB flash drive. And with a bootable flash drive with way WINDOWS 7 or 10, we will be able to install or reinstall the OS on any device without any problems.