Or a separate PC workspace, which the user selects independently or sets in the program settings. Screen is needed in order to save a certain error in the picture, system information, a notification that will then be provided to a specialist for analysis and further resolution of the problem. This is the main purpose of screenshots. However, users can often use them to share photos and pictures in social network. Therefore, we propose to consider ways to take a screenshot on Windows computer 10 using a regular utility and third-party programs.
How to take a full screen screenshot in Windows 10?
Take a screenshot of the desktop or the whole windows screen 10 can be done in several ways. Consider those that can be done without using third party programs.
Method 1. Take a screenshot using the keyboard
To take a picture of the entire desktop in Windows 10, you should click on the "Win + PrtSc" button. The file will be placed at: "This PC", "Pictures", "Screenshots".
If the captured screen needs to be immediately sent to another person, you need to press "Win + H". On the right side, a small window will appear with a list of programs that can be used to transfer the image.
If you need to take a full-size picture and immediately edit it, then you just need to press "PrtSc". Photo go to clipboard. We open Paint program, press "Ctrl + V" and edit the photo.
IMPORTANT! If you do not create a screenshot using the keyboard, then you need to enable in the settings this function. To do this, open "Settings", "Accessibility" and select "Keyboard" in the menu on the left. Here we drag the slider to the "On" position.


Method 2. Taking screenshots with the desktop app
Microsoft has developed a tool that you can use to take screenshots. It is a screenshot manager called Snip or better known as Snipping.
If the first application in Windows 7 and 8 previously allowed you to take screenshots of the whole screen and parts, then Snip in Ten also allows you to record video from the screen.
In order to use the Scissors in Windows 10, you need to enter Snip in the search bar.


We save the file.
How to take a screenshot of a specific part of the screen on a Windows 10 computer?
If you do not need the whole picture, then you can save only part of the screen. To do this, you can go to the Notification Panel and select "Screen Fragment" (or through "Start", "Accessories").

Also from spring windows updates 10, users were able to select the area of the screen that they want to save. To do this, press the key combination "Win + Shift + S". The screen will turn gray. Only a cross will appear to highlight the desired area.
In Windows 10, pressing the Win + G key combination while a game or program is running and maximized to full screen launches the game bar with multiple buttons. You can click on "Screenshot" or type the combination "Win + Alt + Print Screen».

It is no longer possible to select a separate area for screening using regular means. Unless, create a whole picture, and then edit it in Paint.
Third party screenshot programs
There are many ways to take a screenshot on Windows laptop 10 using third-party programs. Among these we highlight:
To take a full-length screenshot or snapshot of the active window, you need to install any of the above programs on your laptop, computer, tablet or phone, and then, by clicking on the "PrtSc" button, select the desired area.

For example, we used Lightshot. This program allows you to create a screenshot and edit it using frames, text, lines, colors, and deleting elements. It also allows you to save the file, send it by link, print it.

In addition, Lightshot is compatible with Windows 10, and therefore there will be no problems installing and using the software.
How to edit a screenshot on Windows 10?
Most programs designed to create screenshots already provide for the possibility of their initial processing. In such programs, which are presented above, it is already possible to highlight the desired area with color, lines, letters, and remove unnecessary elements. If you need to radically change the screenshot, then you need to turn to Photoshop.
Consider an example of editing a screenshot in the PhotoInstrument program (of course, you can take any other).
- We open the program. Click "Open" and select the file.

- The menu on the left will present photo editing tools. At the top there will be a functional menu.

- If you scroll with the mouse wheel, you can zoom in and out of the photo. This is convenient if you need to edit a qualitatively small detail.

- To delete an object, select the eraser.

- To adjust the brightness and contrast, select the first two tools or one row below.

- In order to flip a photo or cut out a part of it, you need to select an element in the form of scissors (as indicated in the screenshot).

As you can see, this is the most simple program, which allows you to edit the screenshot. It is not suitable for professional photo editing. However, in this topic, we are looking at ways to edit screenshots, not digital photo models. Therefore, PhotoInstrument satisfies these needs completely.
A screenshot (from the English screen - screen, shot - snapshot) is an image (photo) of the contents of a computer screen by software or hardware of the computer itself. By coverage, a screenshot of the entire screen area, a screenshot of the active application and a screenshot of a selected screen area are distinguished. There are both universal (working on almost all computers) ways to take a screenshot, and specific ones that require the installation of a specific operating system or a specialized program. Universal ways have only basic screen capture functions. Special programs have many additional special functions and settings. In this article, I will talk about some of the most convenient ways to take a screenshot on a Windows 10 laptop or computer.
Multiple memo " How to take a screenshot of a computer screenwith Windows 10“:
Method 1: Instant Screenshot Using Print Screen (PrtScn)
The “Print Screen” button on the keyboard allows you to take a screenshot on the computer and save the result to a file, get a screen image without saving the image to a file, and even take a screenshot of the active application (not the entire screen). The labels on this button may differ depending on the keyboard. Instead of "Print Screen" it could be "PrtScn", "PrntScrn", "Print Scr" or something similar. Usually this button is located in the top row to the right of F12, but to the left of “Scroll Lock”. To use this button to take a screenshot of the screen on a laptop, you may need to simultaneously press “Fn” (or “Function”) and the button that performs the Print Screen functions.
After clicking on "Print Screen" you might think that nothing happened. But, in fact, a screenshot of the screen has already been taken and saved to the clipboard.
Take a screenshot and save it to a file on your computer
On a laptop or desktop computer, press the button with the Windows logo and “PrtScn” at the same time. If you are using a tablet with installed Windows 10, press the Windows logo button and the volume down button at the same time. On some laptops, transformers and others mobile devices you may need a more exotic keyboard shortcut: “Windows + Ctrl + PrtScn” or “Windows + Fn + PrtScn”. Please refer to the manual for your laptop or tablet model for more information. 
If you've used the correct keyboard shortcuts, the screen will briefly darken a little, and a Screenshots subfolder will appear in your user's Pictures folder (if it didn't exist before), and you'll find the screenshot you just took in there. File names will be automatically numbered. 
Comment: The screen will dim slightly only if the “Animate windows when minimizing and maximizing” function is enabled on the computer. To enable this visual effect, you must enter in Windows search 10 “Tuning the presentation and performance of the system” and open the corresponding settings window. On the tab " Visual effects"You need to enable the item" Animation of windows when minimizing and expanding.
Taking a screenshot without saving the file
Press the "PrtScn" key. A screenshot of the entire screen area will appear on the clipboard. Now open your favorite imaging program, Word, or any other application into which you can paste pictures. Choose Edit > Paste from the menu, or try the keyboard shortcut Ctrl + V. The dimensions of the inserted image will be exactly the same as the screen resolution. Comment
How to quickly take a screenshot of only one program
Click on the window of the program you want to capture. Press "Alt + PrtScn". The screenshot of the active window will be placed on the clipboard. You can do it in exactly the same way as I described in the previous paragraph. Paste it into your favorite image editor or document editor. Comment: On some laptops and other devices, you may need to press the keyboard shortcut “Alt + Fn + PrtScn”. Please refer to the manual for your laptop model for more information.
How to take a screenshot of a specific part of the screen on a Windows 10 PC
Use the keyboard shortcut "Windows + Shift + S". The computer or laptop screen will turn gray and the mouse pointer will change. Click left button mouse in the upper left corner of the area you want to image, and without releasing the button, drag it to the lower right corner of the area. This will select the part of the screen that you want to take a picture of. Release the mouse button. A screenshot of the selected area of the screen will appear on the clipboard. Now you can paste it into any application that allows you to work with images from the clipboard. Use the menu item "Edit" > "Paste" or the keyboard shortcut "Ctrl + V". 
This trick only works when Windows installation 10 Creators Update. In older versions Windows combination shortcuts for taking a screenshot of the selected area of the screen worked only in Microsoft program one note. After the Creators Update, Microsoft integrated this feature into the operating system itself. Windows system 10.
Method 2: Get More Power With the Snipping Tool
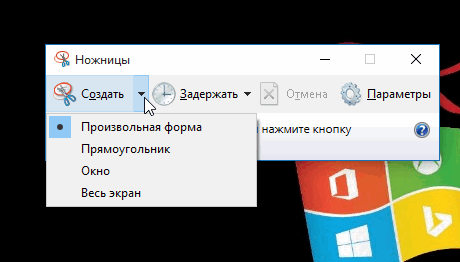
The Scissors tool has long been included in the set of standard Windows utilities. He first appeared in Windows Vista and since then little has changed, except for the correction of minor errors. In addition to taking a screenshot of the entire screen, Snipping Tool in Windows allows you to take a screenshot of the active window, a rectangular area, or a freeform area. You can annotate cutouts or make highlights with colored pencils, save them as graphics or MHTML files, and send them by email.
In Windows Vista, 7 and 8, this tool had one limitation: it could not take screenshots of active elements called by the mouse. To photograph items such as context menu or hints, you had to use the “Print Screen” button in the old fashioned way.
In Windows 10, Snipping Tool has a “Hold” option that allows you to take a snapshot of pop-up menus, tooltips, and more. So, open the Scissors (to find this tool, enter its name in the Windows 10 search). If we want to take a screenshot of the element associated with the mouse hover, click “Hold”. In the drop-down list, select the delay period in seconds. 
Select the type of screenshot in the drop-down list "Mode". Among the options here are an arbitrary shape, rectangle, window, full screen. 
If a delay has been set, the screen will not turn gray immediately. Depending on the selected period, you have a few seconds. This time can be used to activate a pop-up window or something else that needs to be filmed. After the specified period, the screen will turn gray, after which you can select the shape of the capture area (if the appropriate mode was selected). If a window or full screen was selected, the screenshot will be taken immediately. 
Method 3: Use preset keyboard shortcuts in Windows 10 Game Bar
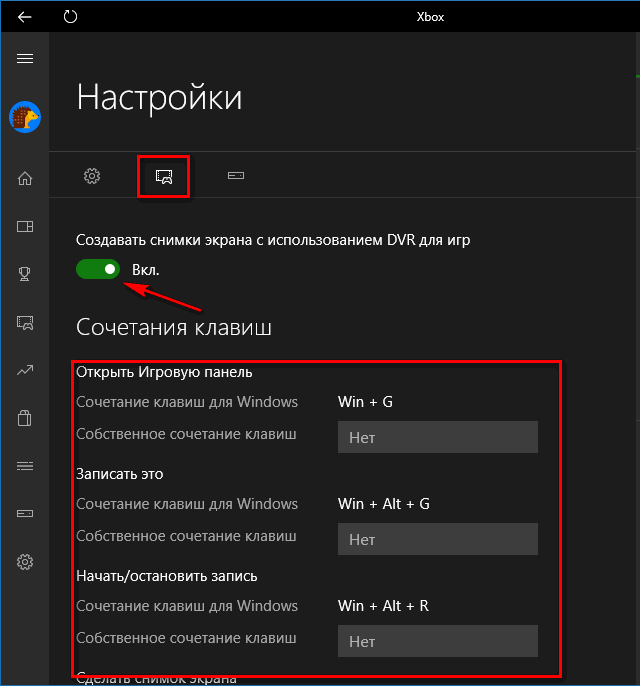
Windows 10 has a Game Video Recorder (DVR) feature that lets you record your gameplay as well as take snapshots. Screenshots in Windows 10 taken using the Game bar are saved in PNG format in the folder “C:\Users\[username]\Videos\Captures”. Before you start using Game Bar, launch the Xbox app that comes standard with Windows 10 and open its settings. In the “Record” tab, activate “Record to background” and choose a convenient keyboard shortcut.
After these settings, you can press the assigned keyboard shortcut (by default “Windows + G”), then you may have to click on “Yes, this is a game” if prompted. Now click on the camera icon or the keyboard shortcut “Win + Alt + PrtScn” to take a screenshot. Comment: The assigned keyboard shortcut will only work if you have confirmed that this is a game for running game. After completing the steps, you should see the message “Screenshot saved”. Clicking on this message will open Xbox > Game DVR > On This PC for viewing.
Method 4: A More Powerful and Easier Way to Take a Screenshot on a Windows 10 Computer - Snagit
The methods built into the operating system have their pros and cons. If you take screenshots often and want something more powerful and flexible than standard solutions, then you should pay attention to specialized programs.
If you don't mind financially thanking the developers for their work, then download Snagit from Techsmith. This is a first-class tool that simplifies the process of capturing an image on the screen, has a huge number of settings and additional features. With this program, you can not only take a screenshot of the entire screen or a single element, but even copy the entire text by scrolling the window (just like you can do on a regular web page). 
If you want, you can make a video of what is happening on the screen, annotate shots, draw arrows and geometric shapes, and do many more things that you would not immediately think about. As such, Snagit is a great way to take a screenshot on a Windows 10 laptop or desktop. I would definitely recommend it to anyone who takes screenshots more than once every few weeks.
If you want to try this program, then there is a free trial version, Snagit, which can be downloaded from the developer's website. But be warned: once you've tried it, it's going to be very hard to go back to the crappy utilities that come standard with Windows 10.
Many people know how to take a screenshot on a computer on Windows 10.
- Click PrtSc (top right of the keyboard). The screenshot will appear not on the hard disk, but in the RAM, in the clipboard. This is a kind of "pocket" in random access memory. When the computer is turned off, the buffer is cleared and the picture will disappear. Therefore, extract the screenshot from memory and write it to a hard drive or USB flash drive.
- Find a drawing program. The simplest is Paint. Use the Windows search bar.
- Click on the "Insert" icon (top bar) or press Ctrl + V or Shift + Insert (keyboard). The snapshot appeared in the program window and now it can be transferred to the media or changed.
Another way is Win + PrtSc on the keyboard

Here you can do without special software. However ? You can find the screenshot at My Documents/Pictures/ Screenshots/

If you are lost and do not know how to take a screenshot on a Windows 10 laptop , then a close look at the keyboard will help you. The same keys, right?
How to take a screenshot of the active window
Sometimes we need not the whole screen, but only a screenshot open window. To take a screenshot on a computer, you need the key combination Alt + PrtSc:
- Open the window you are photographing.
- Click on it and the bar at the top will turn blue - you have made it active.
- To take a screenshot on a Windows 10 computer, use the Alt + PrtSc combination. Do not try to press them at the same time: first ALT, and then, while holding it, Printscreen.
- Repeat steps 2 and 3 from the previous section.
How to take a screenshot of part of the screen
This is what scissors are for. 
- Type "Scissors" in the search bar. The name and icon of the program will appear below it. Click to open.

- Click on the "Create" button and select a form.
- The mouse pointer will turn into scissors, and the picture itself on the display will become translucent. While holding the left button, circle the desired part.

- To transfer to media, click the "Save As" command in the "File" menu. Any format: JPG, PNG, GIF and MHT.

Setting up Print Screen Windows 10 on a laptop in case clicking on PtrSc does not create a screenshot is done with the Fn button. Hold it down and then printscreen again. And everything will work out.
In this manual, we will look at the tools built into the OS with which you can take a screenshot in Windows 10, and for free and without the use of third-party programs. Some of them will also work on previous versions Windows OS.
How to take a screenshot in Windows 10
There are three ways to take a screenshot in Windows 10. Let's start with the simplest and most traditional method - the Print Screen (PrntScr) key. Next, consider the built-in OS, simple and slightly updated tool "Scissors". Finally, I'll show you how to use the Xbox Game Bar feature, which can also capture screenshots. There is another tool called Microsoft Snip which we will also cover at the end of this article.
1. Standard method with the Print Screen key
The PrntScrn key allows you to take quick screenshots and saves it as a PNG image. This works not only in Windows 10, but also in earlier versions of the Microsoft OS. The key is located in the upper right part of the keyboard and can have one of the following names: PrtScr, PrntScrn, Print Screen, or something similar.
When you click it, a screenshot of the entire screen is saved to the temporary memory of the computer, called the clipboard, which can then be used in a text or graphics editor (Word, Paint, Photoshop or any other editor that can work with images) by running the command from the Paste menu ( or hotkeys CTRL+V).
If you want to immediately save the snapshot as an image file, use the combination "Win (Windows logo) + PrtScn". Your screen will go blank for a moment and your screenshot will be saved to the Screenshots folder, which is located in the default Pictures folder.
If you need to take a screenshot of one window instead of the entire screen, use the Alt + Print Screen keys, after preparing the window on top of the others (i.e. making it active). After that, your screenshot is also placed in the computer's memory, from where you can paste it into any editor that can work with images.
2. Screenshot using the Scissors program
The Scissors program appeared in Windows in early versions of the OS, and had one small drawback: it could not capture snapshots of pop-up menus and windows, which in new Windows 10 has been corrected by adding new feature"Delay".

When pressed, you are prompted to select the amount of time in seconds from 0 to 5 to delay the screenshot. For example, if you want to take a screenshot of the Start menu, open Snipping Tool and set the delay time to 3 seconds. Next, click the "Create" button - from this moment you have 3 seconds to prepare the screen (in our case, open the Start menu). After this time, you can take a picture, depending on which form you have previously selected (the small black arrow next to the Create button reveals a list of 4 forms).
3. Xbox Game Bar in Windows 10
The Xbox Game Bar that comes preinstalled with Windows 10 also lets you take screenshots and even record videos. An application can only capture snapshots of the active window.
To get started, open the app, go to its settings, and make sure the "Create screenshots using Game DVR" option is enabled. Here you can also change the default keyboard shortcuts to your preferred ones.
When you're done setting options, press Win (with the Windows logo) + G (or whatever you've changed to) to open the Game bar. If prompted, click Yes, this is a game. Then you select the camera icon and a screenshot of the active window will be saved to: C:\Users\[your username]\videos\clips.

4) Microsoft Snip Tool
Most recently, Microsoft released new program to work with screenshots Windows users 10 - Snip Editor. In many ways, the program is similar to the Scissors mentioned above, but unlike it, Snip is not built into the OS, you need to download it from the official Microsoft website.
In addition to working with screenshots, the program also provides you with advanced features such as annotations for screenshots, notes, and even audio with your voice with the ability to share them. You can download the program on the official website:
Once installed, Snip will be minimized at the top center of your screen, and will expand on hover.

Select the rectangular dot icon to capture a screenshot of your screen. You can then add annotations and voice memos if needed. There is also a pen icon that opens the Editor, and a camera icon that opens the Webcam.
I have listed the best ways in my opinion to take screenshots on Windows 10 without using any third-party tools, which you can also learn and try. But in this article I decided not to write about them, because I think that this is a topic for a separate article. For basic tasks and most users, the above methods are more than enough.
There are no ways to take a screenshot in Windows! Obviously, it is precisely this diversity that confuses beginners, who, among the many tips, cannot figure out how best, easier and faster to take a screenshot. This article will explain to you how to take a screenshot in Windows 10, where it is then saved, and also describe alternative ways get a screenshot for your convenience.
To quickly and easily take a picture Windows screen, in the tenth version of the operating system, a whole key combination is provided, the screenshot will be saved automatically. This is the only really convenient way to take a screenshot, which only appeared in Windows 8. Previously standard means system, a screenshot was placed on the clipboard, after which the time-consuming procedure of pasting it into some graphics editor and conservation. Now it's much easier:

Method two, built-in
Yes, the appearance of this combination has greatly simplified the process of creating screenshots, but if you approach this from a practical point of view, you can find disadvantages: it is unlikely that you often need a snapshot of the entire contents of your screen, more often you need to point to some detail and take a picture of only the active window or part of it. If you rarely take screenshots, you can afford to edit the resulting picture and crop the excess. If, however, taking screenshots is put on stream, like the authors of articles on this site, for example, then it is better to use special software. Starting with Windows 7, in the package standard programs there are scissors.

Alternative methods
The Prt Sc button has been on the keyboard since time immemorial. Then she did exactly what it says on it: Prt Sc = Print Screen = “print screen”. Yes, after clicking on it, the contents of the screen in the form of an ASCII code were output to the printer. In later versions operating systems like Windows XP, for example, the purpose of the button could generally be a mystery to the user, since the screenshot was quietly copied to the clipboard, and that's it. Now the creators of the third-party software we took care of the convenience of users, relieving you of the need to edit the screenshot in Paint.