
We'll take the package text editor as an example. This editor is by far one of the most popular. It can be immediately noted that this one has a huge functionality and each of its functions does not represent anything complicated in terms of use. But still, many users have various questions when working with documents. Microsoft Word. today we will analyze another question related to this text editor. The question is: How Microsoft document Word make one page portrait and another landscape.
A task that some users find difficult is actually extremely simple. So, first of all, you need to open the Microsoft Word document itself. After opening, go to the page that you need and put the cursor on it. Now in the document toolbar, look for the tab " Page layout"and in it go to the menu" Page settings".
Here we select the landscape orientation of the page and click on the item " Apply to end of document". We confirm our actions by clicking on the button" OK".

If you need a book view of the document page, then you need to select it in the "Page Setup" menu. But what if you need only one, for example, a landscape page for the entire document? As you understand, using the above method, all your subsequent pages will have a landscape view. The way out of this situation is also quite simple.
All you need to do is change the page orientation of the document after the page you made landscape to portrait. That is, you need to place the mouse cursor on the page from which you will have a portrait page orientation, and perform the above steps, only selecting the portrait page type. After that, all pages of your document will again take a book view. If you need to make one page portrait and another landscape in a Microsoft Word document, then this is quite realistic. All you need is to follow the recommendations given in this article.
And vice versa. But, the button that is responsible for changing the orientation changes the orientation for the entire document at once. Therefore, if it becomes necessary to change the orientation for only one page, then you have to resort to different tricks. In this article, we will look at two ways at once, how to make one page landscape and the other book in Word.
The instruction is written on the example of Word 2010, but it will also be relevant for Word 2007, 2013 and 2016. And with due skill, the information from the article can be applied in Word 2003.
How to make one page landscape with section breaks
Perhaps the easiest way to make one page landscape and the other portrait is to use section breaks. To do this, you need to separate the page you want to make landscape with two section breaks. One section break should be before this page (at the end of the previous one) and one section break after this page (at the end of the page, which should be landscape).
So let's say you have Text Document. And you need to make one of its pages landscape, while the rest of the pages of the document should remain portrait. To do this, position the cursor at the end of the previous page, go to the "Page Layout" tab, click on the "Breaks" button and select the "Next Page" option. After that, place the cursor at the end of the page that you want to make landscape and click "Breaks - Next Page" again. If you have Word 2003, then to insert a break, use the "Insert - Break" menu.
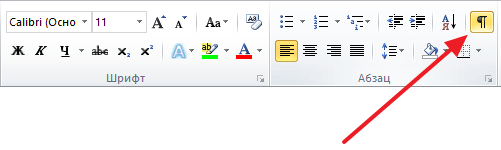
This way you will separate the desired page from the rest of the document using two breaks. To make sure the section breaks are in the right places, go to the Home tab and turn on Show All Characters.
You should then be able to see where the section breaks are set. They should be located immediately above the landscape page and at its end. If the breaks are placed incorrectly, you can edit the pages so that the breaks fit properly. In the screenshot below, you can see what the break should look like at the end of the page.

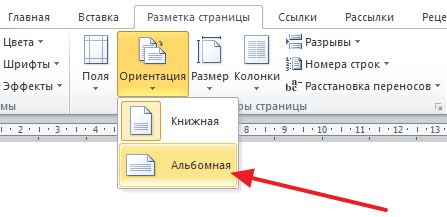
After the section breaks are set to the desired positions, you need to place the cursor on the page that should be landscape, go to the "Page Layout" tab, click on the "Orientation" button and select the "Landscape" option.
If everything was done correctly, then you will get one page landscape, and the rest of the book. If something does not work out, then most likely the problem is in the placement of the gaps.
How to make one page landscape through page options
There is also another way to make one page landscape and the other portrait. It's a little more complicated than the one above, but it can also be used.
In order to use this method, you need to place the cursor on the page that comes before the one that should be landscape. After that, you need to go to the Page Layout tab and use the small button to open the Page Setup window. If you have Word 2003, then in order to open the Page Setup window, use the menu File - Page Setup.
After that, you need to select the orientation "Landscape" and apply this setting "To the end of the document".
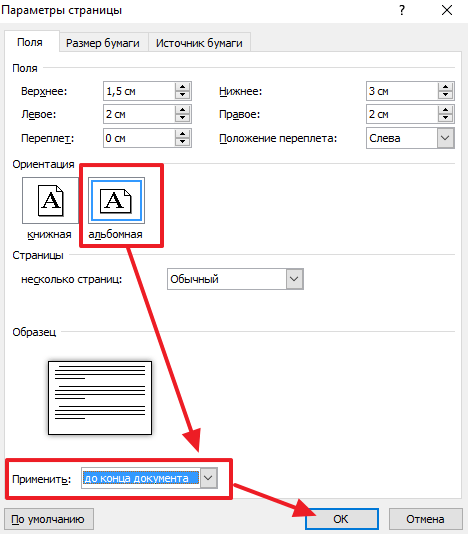
After saving the settings using the "Ok" button, all pages below the selected one will switch to landscape orientation. Now you need to place the cursor on the page you want to make landscape and open the Page Setup window again. This time you need to select portrait orientation and apply it to the end of the document.

After saving the settings with the "Ok" button, you will get one page, and landscape orientation, and the rest in portrait.
Page orientation in an MS Word document can be portrait or landscape. Most often, when formatting text, portrait orientation is used for pages. But it also happens that a drawing, graph or inscription in large print does not fit on the page in width. In this case, you can make one or more landscape pages in Word. This is what I will talk about in this article.
How to make landscape orientation of all pages in Word
This is the simplest question. Open the desired document, then click the tab "Page layout". In chapter "Page settings" click on the "Orientation" button and select the appropriate item from the menu. After that, all pages of the document will become landscape orientation.
How to make landscape orientation for several pages in Word
Now let's imagine that you have several pages in a Word document for which you need to make landscape orientation. All other pages must remain portrait orientation.
To do this, select all the text on desired pages, go to the tab "Page layout" and in the section "Page settings" click on the small arrow in the lower right corner.

A dialog box will open. In it, in the "Orientation" section, put "Landscape". Then in the "Apply" field, select "to selected text" and click OK.

Selected pages became landscape orientation, and all the rest remained portrait.

You can make several landscape pages in MS Word in another way. To do this, put italics at the beginning of the text, on the page from which the landscape ones begin, go to the tab "Page layout", click on the "Breaks" button and select from the drop-down list "Next page".

Now put italics at the beginning of the page from which the sheets with portrait orientation begin again, and repeat all the steps. When non-printable characters are enabled, the inscription will be displayed "Section break (from next page)".

Put italics on one of the pages that will be landscape, go to the tab "Page layout" and in the section "Page settings" click on the arrow. In the next window, select landscape orientation, and in the "Apply" field, select "go to current section". Click OK.

All pages that were in the current section have become landscape orientation.

How to make one landscape sheet in Word
If you need to make one landscape page in Word, then you can use the methods described in the previous paragraph. Just apply them to one page.
Now you can easily make book or landscape pages in your document. Moreover, you can change the orientation for both several and for one page.
Rate article:
In Microsoft Word, as in many other similar programs, there are two types of page orientation - this is portrait (set by default) and landscape (it can be set in the settings). Just the second will be discussed in our today's article.
Often, work with documents is carried out in a vertical (portrait) orientation, but sometimes the page needs to be rotated horizontally, that is, like in an album. This can be done both with the entire MS Word document as a whole, and with its individual elements. We will describe each of the available options in more detail below, but before proceeding with this, let's clarify one nuance: the content of the document, if any, will also be rotated in the selected direction (relative to the page orientation), but its positioning on the screen will remain the same, that is, horizontal .
Important: The instructions below apply to all versions. word processor Microsoft Word. Using it, you can make landscape orientation of pages or pages in the program 2003, 2007, 2010, 2013, 2016 and 2019. We use the current version as an example. Microsoft package Office 365. The steps described below, or rather the elements that you need to access, may differ visually, but only in minor details that we will indicate.
Option 1: Landscape orientation for all pages
Most often, you need to change the page orientation from portrait to landscape for the entire document (future or existing, it's not so important). This is done in the following way.

Option 2: Landscape orientation for some pages
If in a text document you need to have both vertical and horizontal pages, that is, to combine two types of orientation, you will need to do the following.

Printing a Document with Reorientation
Some users are wondering how to print a text document in which the page orientation has been changed to landscape or is adjacent to portrait. What may seem like a problem to someone, in fact, is not such - both Microsoft Word and operating system and the printer connected to the computer absolutely does not care in which direction the entire document as a whole or its individual elements are rotated. That is, you simply send a document for printing, and then pick up and collect its paper copy. For more information on how to do this, see the article linked below. 
More.
Sometimes, while working with libreoffice, it is necessary that a document containing several pages has different orientation these very pages. For example: first page with bookstore , and the second with landscape orientation.
Menu organization and menu item names in libreoffice they do not always give a clear definition of what and where is located, so users are often lost when looking for seemingly not the most complex functions.
Let's create a document with different page orientations.
Open LibreOffice and create a text document.

The first page is in portrait orientation.

Since I have an empty document, I will create a second page in it using the hot key combination Ctrl + Enter

We now have a document with two pages in portrait orientation. Change the orientation on the second page from portrait to landscape. To do this, put the cursor on the page where you want to make changes. On the menu "Format" select item "Page ".

The Document Styles window will appear. We are interested in the tab " Manage", In which you need to change the style value to " Landscape", Then click" Ok".

As a result, we get a document with different page orientations.

I hope this article was useful to you.
Dear reader! You might be interested in the following articles: