In the last big windows update 10 Creators Update, microsoft expanded the features" disk manager", which is designed to work with hard drive, partitions, file system. The main difference is that you can now split the flash drive into sections without third party programs and in this article we will analyze a good example.
Partition a USB flash drive using Disk Manager
To create partitions for USB stick, do backup all content. Next click Win+X and select the item Disk Management.
In the disk management window we see our hard drive disk 0 and flash drive disc 1. Click right click mouse on the flash drive, in this case disk 1, and select Compress something m.

Specify the size for the second partition to be created on the flash drive.


In the Create Simple Volume Wizard, click next all the time. If, for example, you do not have a flash drive, but an external ssd or hdd, then select in the paragraph Format this volume as follows, file system NTFS. In the volume label, you can think of a name for your new partition.

Partitions on a flash drive are created and deleted by programs - disk managers. The choice of a particular disk manager depends on its user. All modern disk managers can work with flash drives.
Accessing sections of a flash drive
Access to sections of a flash drive in Windows is limited. The operating system "does not see" more than one partition on the flash drive. The working (available) section of a flash drive in the operating system is classified as a logical drive or volume. Its main feature is the letter designation. If several partitions with letter designations are created on the flash drive, then the first of them will be selected as the logical drive. All other sections of the flash drive, for Windows - an empty phrase.
In theory, access to desired section partitioned flash drive is implemented by selecting it as a volume - assigning a letter to an available partition while removing the letter designation for all other partitions. To move to the next section, the procedure is repeated - the letter is assigned to the desired section, and the letter is deleted from the previous one. Letter reassignment operations are carried out manually using the disk manager. The letter is chosen to be unique (non-repeatable) within the computer. If the USB flash drive is not bootable, it must first be deactivated partitions.
Note. Do not confuse the letter and label of the logical drive (volume).
Creating partitions on a flash drive
We will “cut” the flash drive into sections with the BOOTICE program.
This is a free, open source program.
1. Run BOOTICE. In the main window, on the "Physical Disk" tab, in the "Destination Disk" window, select your flash drive. We focus on the volume of the device. If similar inscriptions “shine” - close everything, look for and turn off unnecessary flash media and start over. Such a precaution will save you from using an accidental third-party flash drive. In our case, a flash drive is used, with a volume of 4 (3.7) GB. The media has one partition, labeled with the letter I.

3. On the "Partition Management" tab, you can clearly see that we are dealing with a single-partition flash drive, FAT 16 standard, 3.7 GB. In the same window (item 2), press the "Repartition" button and call the "Repartition Removable Disk" window.


5. In the next window that opens, you can configure the parameters of future partitions - select the size and standard of the file system. The size is entered "by hand", starting from the first window. The fourth value is not editable, it is filled in automatically. If the maximum value of the size of the entire flash drive is entered in the first window, the rest will be automatically filled with zeros. For clarity, I chose the sizes for my partitions: 700, 800, 900, the fourth one was filled in automatically - 1424 GB. And, clicked "OK". The program issued a warning window - a standard procedure before formatting any media.


7. Returning to the BOOTICE tab "Partition Management" (see paragraph of article No. 2), we see that the partitions have been created. Now we are dealing with a four-part flash drive, FAT 16 standard, with a total capacity of 3.7 GB. Sections, respectively, have the volume specified during repartitioning. In this case, the first section has a letter label (I) and is marked as active (this is important). This section is available on this stage. As already mentioned, Windows stubbornly “does not notice” the remaining sections. You can rename the available partition directly in Windows Explorer, in the "My / This Computer" folder - right-click on the device, in the menu that opens - select "Rename".

Understand the limits it sets Windows system. Partitions on a flash drive can be created using third-party programs, but Windows will only work with one partition. In the same programs, you can specify the active partition, but it will be the only one. There is no way around this Windows limitation.
- Partitions on a flash drive cannot be created using the built-in Disk Management utility - for this you need to use a third-party program.
- In Mac OS and Linus, you can work with all sections of the flash drive.
Back up important files that are stored on a flash drive. When creating partitions, all data stored on the flash drive will be erased, so copy it to your computer's hard drive.
Download bootice. Using this program, you can create several partitions on a USB flash drive, as well as specify the active partition that Windows works with.
- Download Bootice at majorgeeks.com/files/details/bootice.html .
Unzip the downloaded file to extract Bootice. To do this, you need an archiver that supports the RAR format.
- 7-Zip is free archiver, which supports the RAR format. This archiver can be downloaded from 7-zip.org. After installing 7-Zip, right-click on the downloaded archive (RAR file) and select "7-Zip" - "Unpack here".
- Trial WinRAR version(rarlabs.com) supports RAR format, but works for a limited time.
Launch Bootice. It is located in the folder that was created when the archive was unpacked. Most likely, Windows will prompt you to confirm the launch of the program.
Choose the correct flash drive. Open the Destination Disk menu ( Target disk) and select the flash drive. Make sure that your computer's hard drive is not selected so you don't lose any data stored on it. To choose a flash drive, be guided by its capacity and the letter that indicates the flash drive.
In Bootice, click "Parts Manage" (Partition Management). The "Partition Manager" window will open.
Click Re-Partitioning. The Removable disk repartitioning window will open.
Select the USB-HDD Mode (Multi-Partitions) option and click OK. The "Partition Settings" window will open.
Set the size of each partition. By default, the available space will be evenly distributed across the four partitions. But you can manually set the size of each partition. If you don't need all four partitions, set the extra partition size to 0.
Assign labels to sections. They will help identify the different sections. Keep in mind that Windows only displays one partition, so partition (volume) labels are especially useful.
Specify the type of each section. At the bottom of the window, select "MBR" or "GPT". MBR is suitable for storing data or for creating a boot partition for older systems. GPT is suitable for working with UEFI or for creating a boot partition for new systems.
- If you plan to create a GPT boot partition, check the "Create ESP partition" box.
Click "OK" to start the formatting process. The system will notify you that all data stored on the flash drive will be erased. The formatting process will take some time.
Hello Vladimir! I have Windows 10 installed on my computer, I also have a 32 GB flash drive with personal files, formatted as a file NTFS system. I want, that is, create a second partition on it, and place a bootloader on this partition for the second operating system Windows 10. Is it possible?
Hello friends! You can split a flash drive into sections using free program AOMEI Partition Assistant Standard Edition . Well, you can place a bootloader for any operating system on a flash drive using command line.
So let's look" Disk Management» my computer and see three connected drives.
Disk 0 - solid state drive SSD with installed Windows 8.1.
Disc 1 - HDD(2 TB) that contains the Windows 10 operating system (partition G :), I deployed the Win 10 files to it using DISM, but I have not yet created the bootloader.
Disk 2 is our USB 32 GB flash drive (drive letter H :) with data files (nothing bad will happen in the process of dividing the flash drive into sections with my personal files, they will remain intact).
Divide flash drive (H:) into two partitions and on the resulting new partition we will create a bootloader for the operating system located on section (G:).
Select the flash drive with the left mouse (H :) and click on the "Resize" button

Move the delimiter to the right, freeing free place, about 300 MB, at the beginning of the flash drive and click "OK".

Click on the "Apply" button

"Go"

" Yes"

A small unallocated space of 336 MB is created at the beginning of the flash drive.

" OK"

We select the unallocated space 336 MB with the left mouse and click on the button " Section creation»
" Yes "

Select the FAT32 file system and click "OK"

« Apply »

« Jump »

" Yes »
The partition we created on the 336 MB flash drive is being formatted into the FAT32 file system.

" OK »
So, at the very beginning of the USB flash drive (H :), we created a small 336 MB partition formatted in the FAT32 file system.
- In order for the flash drive to be bootable in UEFI systems, as well as in a regular BIOS, it must have an MBR created with the bootloader code BOOTMGR (Windows NT 6.x) and an active partition with PBR ( boot record partition) BOOTMGR. Download and run the program Bootice, we prepare the USB flash drive for installing the bootloader of the operating system on it.
In the main window of the Bootice program, select our flash drive and click on the button " Processing MBR»

We mark the item "Windows NT 6.x MBR" and click on the button " Installation/Configuration»

"Windows NT 6.x MBR"

"OK"

"Close"

In the main window of the Bootice program, select our flash drive and click on the button"PBR Processing"

Mark the item " Boot record BOOTMGR"and click on the button" Installation/Configuration»

"OK"

"OK"

"Close"

"Partition Management"

We select the first partition on the flash drive 336 MB, FAT32 with the left mouse button and click on the "Activate" button

"OK"

The first partition on the flash drive is 336 MB, FAT32 is now active and you can create a bootloader for the operating system on it.
Create a bootloader on a flash drive
At the administrator command prompt, enter the command:
bcdboot G :\windows /s H: /f all
(which means - create a bootloader for Windows 10 located on the partition hard drive(G :) and place this bootloader on the flash drive, drive letter (H :)),
parameter /f all stands for - including boot files for a computer with UEFI or BIOS!
Now let's see the contents of the Boot Configuration Data (BCD) file, enter the command:
bcdedit -store H:\efi\microsoft\boot\bcd(where H: the letter of our flash drive). As you can see, the UEFI bootloader was created on a flash drive (H:) for Windows 10, located on the disk partition (partition G:).

Our flash drive now has two partitions and the first partition is 336 MB, FAT32 is bootable, but if you open the window“This computer”, then only this particular section will be available, the second section (29 GB) with our files will not be available. Let's make it available using the familiar Bootice program (the flash drive will remain bootable).

In the main window of the program, select our USB flash drive and click on the button " Partition management»

We mark with the left mouse button the second partition on the flash drive, the size is 29 GB and click on the "Set available" button
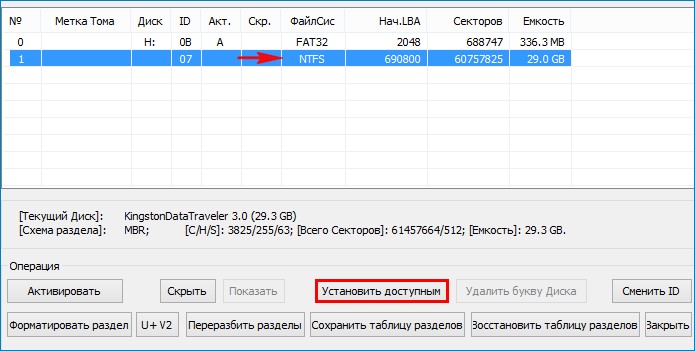
The second partition on the flash drive, the size of 29 GB has become available.
"Close"

In the window "This PC" is now available on the second partition on the flash drive (size 29 GB) with our files.

If you now restart your computer and enter the boot menu, then select our USB flash drive to boot,

then Windows 10 will boot, for which we created a bootloader on a USB flash drive.

Let's enter the command in the command line:
bcdedit
the boot storage will open, in which you can see that the bootloader for Windows 10 installed on the disk (C :) is located on the first partition of the flash drive (336 MB) or on partition 7 ( partition=\Device\HarddiskVolume7)


Important to know: The bootloader created in this way on a flash drive is universal and includes boot files for a computer with UEFI enabled and regular BIOS, and can boot Windows 10 installed on a computer or laptop with UEFI enabled, as well as regular BIOS. To prove my words, I will enable the UEFI interface in my BIOS

And I will enter the boot menu, as we see, our bootable flash drive is a UEFI flash drive and can boot in UEFI mode.

I select a USB flash drive to boot, boot into Windows 10 and enter the command on the command line:
bcdedit (as you can see from the screenshot, Windows 10 no longer launches the winload.exe file, but winload.efi. Why?)
All of you know that Windows 8.1 and Windows 10 have 2 startup files, they are winload.exe and winload.efi.
We created an EFI bootloader and an MBR bootloader on our flash drive, bootloader is small program, whichstarts (transfers control) to the BIOS, then the bootloader(loads) the operating system.
BIOS works by device (hard drives, external HDD, flash drives, floppy drive)
If we point the BIOS to our flash drive in Legacy mode, then the BIOS will transfer control to the MBR bootloader, which will launch the winload.exe file.
If we point the BIOS to our flash drive in UEFI mode, then the BIOS will transfer control to the EFI bootloader, which will launch the winload.efi file.
In other words, in our case, the layout of the hard disk (MBR or GPT) on which Windows 10 is installed does not matter.

That is, in simple terms, the second Windows 10 operating system installed on our computer is loaded both in a regular BIOS and in UEFI, although it is installed on an MBR disk.
Also, our flash drive with the bootloader is seen by a laptop with the UEFI interface enabled and secure boot, and this once again proves that the bootloader on our flash drive is capable of running operating systems installed on an MBR (regular BIOS) and GPT (UEFI interface) disk.
Here, the algorithm for low-level formatting will be described, followed by the creation of partitions on a flash drive.
First, what do I mean by low-level formatting. For this, first of all, overwriting all available user information without the possibility of recovery. Those. that part of the drive that is reserved for data will be "zeroed out". Standard Windows formatting does not do this, but only applies quick format, which consists only in repartitioning the drive.
I decided to use BOOTICE (v. 0.9.5.2011.0512 by Pauly) for this - one universal utility that allows you to do many wonderful things. freeware. Works on Windows. Although later I found out about standard way creating partitions using DiskPart, now it is with the help of it that I recommend splitting a USB flash drive.
Of. website. (Yes, it's in Chinese). You can download or.
Briefly about BOOTICE tabs:
physical disk- Working with a physical disk.
Disk Image- Work with disk images in .IMA, .IMG and .VHD formats
BCDEdit- Editor BCD Windows Vista/7/2008
Utilities- Utilities Start Menu Editor for GRUB4DOS and Disk Filling
command line- A little help on command line parameters
Why is it necessary at all low-level formatting, is it possible to get by with the standard Windows formatting?
Standard formatting does not delete all information on the flash drive, but only the first 512 bytes (1 sector), it is recommended to completely clear (zero) the flash drive, destroy all data on it, including boot code and partition information, and only then format it into the desired file system. Thus, we will delete unnecessary (extra) information left over from previous actions, exclude the possibility of unforeseen situations and errors the first 5000 sectors (why so many? but I don’t know, otbolds, with a margin). Note: BOOTICE does not yet know how to select a range of erased sectors.
Note 2: new BOOTICE learned to select the range of erased sectors.
Why do we need several sections on a flash drive?
Multi-partitioning provides the following benefits (taken from Wikipedia):
- one physical hard disk can store information in different file systems, or in the same file systems, but with different cluster sizes (for example, it is beneficial to store large files - for example, videos - separately from small ones, and set a larger cluster size for storing large files );
- you can separate user information from operating system files, separate programs from data;
- You can install multiple operating systems on one hard drive.
- manipulations on one file system do not affect other file systems.
- reducing the impact of fragmentation, as When dividing a hard disk into multiple partitions, each file can only be located within one partition.
How to clean a flash drive and split it into sections?
3 way. Using diskpart.
1. Run DiskPart from the command line.
2. We look at the disks with the command
3. We select our flash drive with the command
Where
# - number of your device, guided by size
4. Check if you have chosen correctly, an asterisk (*) should appear next to the selected device, again
5. Reset the device
6. We are waiting for a successful completion:
DiskPart: Disk cleanup completed successfully.
7. Exit DiskPart:
2 part. Creating multiple partitions on a flash drive.
1 way. Using BootICE.
1. Open BOOTICE if closed.
2. Select your drive in the "Destination Disk" line.
3. Click "Parts Manage". We see the following window:
4. Click "ReFormat USB disk". We see the following window, where we select "USB-HDD Mode (Multi Partitions)", we also specify "Align to 1 MB" to set the offset 2048 for the first partition relative to the beginning of the disk.
5. Click "Next". Set the required partition sizes and their file systems, as well as section labels, like so:
6. Click OK. We agree with the warnings.
7. We see successful completion formatting:
8. Click OK. Let's see what happened:
9. You can also specify a flag here active partition, or hide (make visible) the partition at the MBR level.
10. You can close BOOTICE.
2 way. Using diskpart.
Note: to create 2 or more partitions on a flash drive in this way, you need to replace the flash drive driver with the HDD driver. Cm.