In this note, we will talk about the implementation and subsequent maintenance of the print server (according to other print servers) a useful server role in Windows Server 20xx for efficient, centralized control of all printers in an organization.
Implementing a print server, compared to a typical client printer installation, offers the following benefits:
- Opportunity centralized control all printers in the organization, print queue, drivers.
— Ensuring the general access to printers through the publication in the Active Directory;
- Ability to deploy printers using group policy;
- Create pools, which allows you to combine several physical printers into one logical one.
Our initial conditions are such that we have a certain fleet of HP and Kyocera network printers, and we need to configure access to them in such a way that the user can independently choose the printer closest to him and install it in his system. To do this, we as administrators need to first deploy a print server, add all our printers to it, publish it in Active Directory, teach users simple steps to install / add a printer, or install them in automatic mode using group policy. During work, perform simple steps system administration and troubleshoot printing issues, which are discussed below.
1) Installing the Print and Document Services role ( Print and Document Service);
So we have a car with installed Windows Server 2012R2, although it may be 2008 and the latest Windows Server 2016 at the moment, because the service installation process does not differ much from version to version and comes down to just a few clicks on the Next button. We launch server manager, choose Add Role and Features Wizard(Add Role and Component Master).
 Then we agree with the first paragraph Role-based or feature-based installation(Basic installation of roles and features) click Next.
 On the next screen Select Destination server select a server from the pool or located on a VHD disk. Since we have only one local server so far, we click Next.
  Select a role to install Print and Document Services, we agree with the installation of additional features - Print and Document Services Tools. Click Next.
  On the next screen Features, optionally select the components to install if necessary. Click Next.
 Next, we are invited to take a look at useful information by press service Print and Document Services. Let's get acquainted and click Next :)
 Then select specific services to install. By past Print Server(Print Server) you can select more Distributed Scan Server(Distributed Scan Server), Internet Printing(Supports printing over the Internet) and LPD Service(UNIX Print Service). As part of this note, we are only interested in the print server, so select it and click Next.
 On the final screen, we agree with the installation of the selected components by pressing the Install button.
 Close the wizard with close.
The same actions, but in Powershell, can be performed in just a few commands:
Fipmo ServerManager add-WindowsFeature Print-Server
After installing the service, you do not need to restart the server. But, before we start adding printers to the server, let's add it to the domain, which will later allow publishing printers directly in Active Directory.
We use the classic gui version of adding, or using a simple command in PS:
Add-Computer -DomainName test.ru
Restart the server with the command:
Restart-Computer
2) Print Management Console. Adding drivers and printers to the server;
Launching the management console Print management. To do this, go to Start\Administrative tools\Print management. Or run on the command line: printmanagement.msc
 Here, the topmost node Print Management allows you to add / remove local and other print servers for administration, as well as migrate printers.
Custom Filters filters printers by category: All Printers, All Drivers, Printers Not Ready, and Printers With Jobs. Also, on the right button, you can set your own filter if you do not have enough current ones.
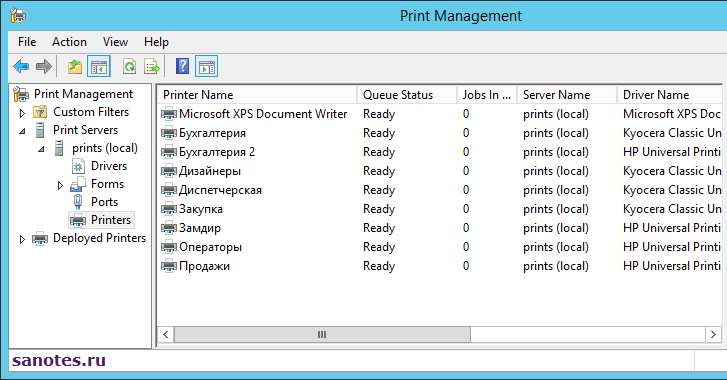
Print Servers displays the current print servers. In this case, you can see that we have only one (local) print server, where Drivers (Drivers) shows all drivers on the current print server, Forms (Forms) - all supported paper sizes, Ports - local and network ports on the current print server, Printers - all installed printers on the current print server.
Deployed Printers- Printers that have been deployed using Group Policy.
To add a new printer to the server, go to the node Print Servers, select our local server prints (local) In chapter printers. Right click and select Add Printers. The Add Printer Wizard will launch Network Printer Installation Wizard, where four installation methods are available. First and most fast way discover network printers is to search in automatic mode - Search the network for printers, the second item is the ability to add a TCP / IP printer or web printer by its IP address or host name - Add a TCP/IP or web services Printer by IP address or hostname, next comes the ability to add a new printer using an existing port - Add a new printer using an existing port, and the last point is creating your own port and then adding a new printer - Create a new port and add a new printer.
 If you select the first item and let the wizard add the printer automatically, then a situation will arise when the printer driver can also be added automatically from the operating system distribution kit, which is not desirable, because, firstly, the driver will be far from fresh, and secondly he will be right under this model printer. If there are not many printers, then there is no tragedy in this - everything will work, but since we have a print server, where as a rule there can be n-th number of print devices, it makes sense to use the most current version of the driver from the manufacturer's website. It is better to use a universal driver for several models at once, which will avoid in the future all sorts of conflicts associated with the operation of several disparate devices on the same server and will reduce time costs during future updates. Read more about benefits universal driver you can follow the following link.
And all of the above implies that for the system to work correctly, we first need to install the correct driver on the server, and then add the printers themselves. Therefore, we download a universal driver from the manufacturer's website, for example, for HP, and for Kyocera As for the type of driver, PCL5 or PCL6, then decide for yourself. Someone says that PCL5 is more stable, but personally I did not notice much difference. In theory, PCL version 6 is just HP's newer implementation of the PCL driver, so it makes sense to use it.
To add drivers, in the console Print Management go to our local server in the section Drivers and right-click to launch the Add Driver Wizard - AddDriver. On the next screen, select the type of processor architecture. If you need support for 32-bit client operating systems then we also mark the x86 checkbox. Click Next.
 On the screen Printer Driver Selection select the printer driver. Click Have Disk And Browse to review and add drivers.
 Select the previously downloaded driver. In our example, this is the Kyocera universal driver, click Next and Finish. We repeat the operation for your other devices.
 Personally, on my server, only HP and Kyocera printers are used, respectively, and drivers are used only by these manufacturers. True, it should be noted that when using the universal driver from HP, not all printers are supported or not all functions are supported correctly, although most of the enterprise-class printers work without problems. You can view the list of supported devices here. After adding the drivers, we get something like the following picture.
 Let's take a look at the tab. Driver Isolation(Driver isolation), where we have, by default, drivers are marked with the “shared” flag, i.e. are in some isolated mode with shared access. Driver isolation technology or Printer Driver Isolation (PDI), allows you to display the work of printers in a separate process PrintIsolationHost.exe, separate from the spoolsv.exe print manager, and other drivers on the server, i.e. if a problem occurs in a driver, then it affects only the process that loaded this driver, but not the spoolsv.exe print service itself, which remains operational.
And in case of shared mode ( general access) all printer drivers are configured to work with one, common process instance PrintIsolationHost.exe, but separate from the Print Manager. This mode is recommended by Microsoft. In case of problems with drivers, incompatibility and frequent crashes of printers, especially in terminal mode, you can try using isolated mode, where each printer driver is already configured to use its own process instance PrintIsolationHost.exe and also separate from the print manager (spooler).
If the "none" flag is set, the printer drivers are loaded as usual, using the print manager (spooler), i.e. if the spoolsv.exe process crashes, it affects the operation of all printers on the server at once.
Now after adding correct drivers you can start installing printers. To do this, we again launch the wizard for adding printers already familiar to us, select add a TCP / IP printer or web printer by its IP address. Then select the device type: Auto detect - automatic detection parameters or TCP / IP Device, in the field "host name or IP address" enter the IP address of the network printer. Check mark Auto detect the printer driver to use ( Automatic search printer driver), leave the default active or remove it. In this case, it does not prevent the process of adding the "correct" driver. Click Next.
 On the next screen, select the previously installed HP or Kyocera generic driver from the list or add a new one. Click Next.
 Then, we name the printer and add it to the public, specifying the name of the shared resource, the physical location and the comment. With this information, users will be able to identify the printer they need in the directory service and add it to their system. Click Next.
 We agree with the proposal to install a printer. Click Next and wait for the installation process to complete.
 Then, in order for the printer to be available in Active Directory for selection, it must be published. To do this, go to the printer properties on the Sharing tab and check the List in Directory checkbox and click Apply.
 We perform the same operation for all printers in the organization. You can select all printers at once and right-click to say: List in Directory. As a result, you can get something like the following list.
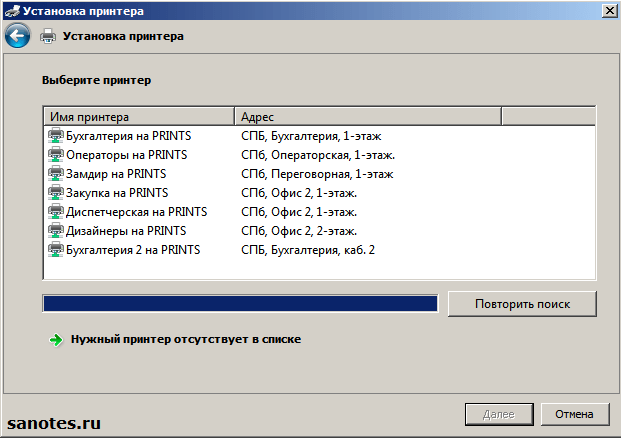
 Now, on a client computer in the domain, the user will be able to see the printer he needs in the list and install it.
 But that's in theory, or at least that's how it used to be! In practice, when adding a network printer under a domain account, you can often get the following error:
Connecting to a printer. Installed on this computer The policy does not allow connection to this print queue. Contact your system administrator.
Or the English version:
Connect to Printer. A policy is in effect on your computer which prevents you from connecting to this print queue. Please contact your system administrator.
 This is due to the fact that on July 12, 2016, Microsoft released security update KB3170455, which eliminates a critical vulnerability in the printing system, which entailed new security requirements for printer drivers, namely:
1. The printer driver must be trusted and digitally signed. The installation process checks for hashed files in the driver package, and if it finds unhashed files (without a digital signature), it displays a message about the limitations of the existing policy. In the case of the generic driver from HP, checking for digital signature The files in the package are successful and the printer is installed without problems, but when you try to install a printer from Kyocera on the client, where the Kyocera Universal Classic Driver is used as a driver, which, by the way, is listed as 'signed' on the site, the error above comes up.
 2. The printer driver must be packaged, specification (package-aware v3). When trying to install a non-packaged driver (non-package-aware v3), we get a message about the printer being untrusted and a request for elevation, which allows you to install the driver with an administrative account.
 You can check whether the printer driver is packed or not in the Printer Management console in the Drivers section, Packages column. As you can see, the Konica Minolta driver is in the false state.
 To solve the problem with installing untrusted printer drivers on client computers, we can help enable group policy: Point and Print Restriction (Point and print restrictions), which is located at:
Computer Configuration\Policies\Administrative Templates\Printers (Computer Configuration\Policies\Administrative Templates\Printers).
Check the boxes next to Users can only point and print to these server (The point and print function can only be used on these servers) and, separated by a semicolon, indicate the full domain names print servers (FQDN). In our example, this is: prints.test.ru. In the field Security Promts (Security Requests), the parameters "Then installing drivers for a new connection" and "Then updating drivers for a exsiting connection" (When installing / updating drivers for a new connection) set: Don't show warning or elevation promt ( Don't show warning or prompt for elevation).
 It would also not be superfluous to include the policy: Package Point and Print - Approved servers (Function of specifying and printing for packages - Allowed servers) which is also located at the same address: Computer Configuration \ Policies \ Administrative Templates \ Printers. This policy is completely independent of Point and Print Restriction and applies only to batch drivers, which ultimately helped to remove the error that occurred during the installation of the universal driver from Kyocera.
In the Enter fully qualified server names field, enter the name of the print server. Click apply. On the print server and on client PCs, we launch a forced update of policies using gpupdate / force. After that, the installation of printers should occur without questions.
 3) Print Management Console. Adding printers to the pool (Print Pooling);
Print Pooling is a technology that allows you to combine multiple printers into one logical printer, which can be useful in organizations with a large volume of printing and a large number of printing devices. For example, in a situation where there are 5 identical printers and it is not clear which one is loaded with printing and which is free, one logical printer installed in the system allows you to automatically determine the free printer in the pool, which ultimately saves time between the decision to send a print job and in fact the seal itself.
In order to pool several printers, go to the Printers section of our print server and add a new printer to the system as usual, or select an existing one. Then go to the tab Ports (ports) and add a new TCP / IP port corresponding to the IP address of another printer in the future pool.
 Select Standard TCP / IP Port and click New Port ... Then we write the printer's IP address, click Next and Finish. We add as many ports as we need in the pool.
 Now go to the properties of the future logical printer, on the tab Ports (Ports) and mark the checkbox Enable print pooling (Allow printers to be pooled), then additionally select the previously created port 192.168.0.210 and click Apply;
 Thus, we added two physical printers to the pool, and got one logical one at the output.
4) Print Management Console. Installing printers using group policy;
What if there are 50-100 or more computers in our organization, and users, as it often happens, do not want / do not know how or do not know which of the printers in the catalog they need to install? In this scenario, the printer installation tool using Group Policy will help us. For example, if it is known that specific user or group, a specific printer must be installed, then you can automatically deploy the necessary printers in advance, imperceptibly to the user and without direct intervention by the system administrator. To do this, you need to log in to the print server under a domain account with Print Operators rights or higher, then go to the Print Management console, mark the desired printer and right-click to select Deploy with Group Policy (Deploy using Group Policy). As an example, let's perform this operation for the "Operators" printer. In the GPO name field, select the GPO to which the policy will apply automatic installation printer. I will select a pre-created Operator object, which in turn is tied to the Operators subdivision, inside which there are user objects for which the printer is installed.
 Check the box to whom the printer connection policy will apply, to users or computers. Click Add, Apply, OK.
 We restart the client computer and see that the Operators printer has been successfully added to the system.
5) Transferring configuration from one print server to another;
In the event of a print server replacement or emergency, you may need to quickly restore the existing configuration to another server. And in order to reduce recovery time, it is advisable to already have a backup machine in stock with the print service installed and a pre-exported file backup in a special .printerExport format. This file contains a complete copy of all installed printers, ports and drivers allowing you to deploy a similar configuration on another server. In order to get such a file, you need to go to the root local server Print Management utility, in our case ‘prints (local)’, right click and select Export printers to a file…. Follow the instructions of the wizard and get the backup file as the output.

Within the framework of this article, the current (source) server we have has a network name: prints, new, final, where the configuration is transferred: prints-new, so the steps for transferring data from one print server to another will be as follows:
- On the backup (new) server, we raise the role of the print and document service, if it has not been added earlier.
- On the old server, cancel the publication in Active Directory by unchecking the List in Directory checkbox in the properties of each installed printer, or select all printers at once and right-click select: Remove from Directory;
- Output if possible old server from the domain, change the network name to prints-old, reboot. If this opportunity is not available, for example, in the event of a physical failure of the server, then we delete the computer / server on the controller, for example, from the Active Directory Users and Computers snap-in in the Computers container. We answer in the affirmative to the proposal to delete all nested objects (Confirm Subtree Deletion).
- On the new server where we transfer the configuration, we change the network name to prints, add it to the domain.
- Restoring the previously exported .printerExport file on the new server. (Import printers from a file…). During the import process, it is possible to immediately publish printers for public access in the directory service (List in directory). After that, we check the operation of printers on the new server.
6) Troubleshooting the print service;
With regards to the problems that arise during the operation of the print service and their elimination, there is nothing special to write here, because. it all comes down to just a few steps, to stop the print service, clear the print queues in %windir%\System32\spool\PRINTERS and then start the service, which is known to almost every admin and not only. For completeness of the review, and for completely "green" comrades, I will give a well-known sequence of commands :)
We launch command line cmd.exe
Stop the print service:
Net stop spooler
We clean the print queue by deleting *.SHD, *.SPL, *.TMP files inside the directory with the command:
Del /q /f %windir%\System32\spool\PRINTERS\*.*
Starting the print service:
Net start spooler
Or we do a preventive restart of the service, without clearing the queue:
Net stop spooler & net start spooler
You can make a batch file to run in automatic mode. We save the file, for example, under the name spool.cmd.
Setlocal net stop spooler del /q /f %windir%\System32\spool\PRINTERS\*.* net start spooler
You can also restart the service using the gui interface, in the “services” snap-in - services.msc, and clean up the \ PRINTERS folder in Explorer, but as for me, in the console or a batch file is faster.
Very often there are problems with network printing to printers connected to
for example, to a computer with Windows XP on a computer with Window 7 installed, not on Vista,2003,2008
The essence of the problem often lies in the fact that under these "modern" systems, manufacturers
"outdated" printer models do not bother to release drivers.
Here is my situation:
A friend asked me to set up printing in the office from a freshly bought laptop.
1. Of course - the laptop was with operating Windows 7
2. Of course - Home (see below what is the problem)
3. Of course - it (the system) was 64-bit.
4. Of course - the printers in the office were not new: HP1320 and Canon MFxxxx
5. Of course - the printers were connected and "shared" on machines with WinXP.
6. And no one will change the structure of the network for the sake of one laptop
How did I solve the problem?
First I went the wrong way:
I downloaded and tried to install drivers from official sites - it was not there:
Canon generally does not supply drivers for 64-bit systems for which models.
I am generally silent about the MFP.
For the MFxxxx series, a crutch was recommended - use drivers from the MF57xx series. Tried - system
shows that the driver is signed, but refuses to install, referring to the fact that it is not signed.
Brr, brad. Installation of unsigned firewood on Home will not be allowed (no gpedit.msc). Ugh.
HP seems to have provided a PCL5 driver for the HP1320 - but it didn't work.
When trying to install, unintelligible errors were issued, which Google found
poor people like me.
One comment on the forum especially smiled (I don’t remember exactly where, but in my opinion on the HP website):
"HP1320 is a business model so we don't provide weekend phone support"
By the way, scammers climb into all the cracks like cockroaches: you can always "google" and download ANY
any printer driver for any system. But the result will certainly not be what is expected.
Also, "Google" revealed to me another terrible fact: STILL in the server operating systems of the well-known
companies HAVE problems with the print subsystem in terminal mode. And even outsiders
solutions do not solve problems permanently.
“Enough with nonsense” - I thought and did this:
1. Downloaded virtual Free PDF Printer from www.bullzip.com. There are a lot of them (PDF printers), but my choice fell on it for the following reasons:
a) this one works under 64x bit systems
b) free (in principle, it would not be a pity to give ~ 20 bucks, BUT not to give them
for EVERY PC with Windows 7 64x!)
c) he was found first :)
2. Installed a virtual PDF printer and configured it (C:\Program Files\Bullzip\PDF Printer\gui.exe) so that no dialog boxes were displayed to the user, and a .pdf file was created in the \\compxp\printer1\ folder
3. Installed Foxit Reader on the compxp computer, “shared” the printer1 folder and placed a simple vbs script in autoload:
copy source | Copy HTML
- "On Error Resume Next
- "Automatically print PDF files that appear in a specific folder
- "Global Variables
- Set gFSO = CreateObject("Scripting.FileSystemObject" )
- Set gShell = CreateObject("WScript.Shell" )
- "Folder where the script waits for PDF files (this folder(s) must be network accessible)
- gWatchFolder = "E:\master\printer\"
- "Main Loop
- while true
- Set lFolder = gFSO.GetFolder(gWatchFolder)
- Set lFiles = lFolder.Files
- For Each lFile In lFiles
- PrintFile(gWatchFolder & lFile.Name)
- Next
- WScript.Sleep(1)
- Wend
- "Function to print a specific pdf file
- SubPrintFile(pFileName)
- "We are waiting for some time (until the file is completely written)
- WScript.Sleep(3)
- "msgbox(pFileName)
- "We are (no longer) afraid of spaces :P
- s= """E:\master\foxit\Foxit Reader.exe"" /p """&pFileName&""""
- "msgbox(s)
- Call gShell.Run(s,0,true )
- gFSO.DeleteFile(pFileName)
- If gFSO.FileExists(pFileName) Then
- "You never know what can happen, it's better to let Ivan Ivanovich stop printing than one file goes to the printer many times
- "msgbox("Failed to delete file "& pFileName & "! Call Vasily at 123-456)
- WScript Quit
- "Else
- "Unrealized yet
- "ToLog("File " & lFileName & " deleted.")
- End If
- end sub
I ask you not to kick me for the script - it was written quickly and to make it work.
Voila:
The user simply presses the "Print" button in the program - and in a minute takes the document from the printer.
You can install several virtual printers and name them arbitrarily. The main thing is that when renaming the printer, the settings must be done again.
Additional benefit from this solution:
For especially paranoid bosses, a cunning admin can create an entire logging system
printing with folding into the archive of everything that the workers printed out.
P.S. Those who hate adobe can do bullzip->BMP(JPG)->irfan - but there will be problems with landscape orientation (it will be necessary to determine the orientation in the script).
To download, follow the simple instructions.
- To start downloading the installation file, click on the blue button "Download from server" located just above.
- After that, the server will prepare and check the installation file for viruses.
- If the file is not infected and everything is fine with it, a gray “Download” button will appear.
- By clicking on the "Download" button, the file will be downloaded to your computer.
We do not ask you to go through a tedious registration process or send any SMS for confirmation. Just download and enjoy =)
How to install
To install the program, follow the simple instructions that apply to most programs.
- Run the downloaded file by double-clicking on it. All installation files are taken from the official websites of the developers.The file was last updated on January 09, 2017 at 5:49 AM.
- Accept the license agreement in the window that appears. Also check out license agreement You can also visit the official website of the program developer.
- Select the required components you wish to install. Clear the checkboxes that may be required to install additional programs.
- Select a folder on your computer where you want to install the program. In most cases, the program automatically selects a folder, for example, in Windows it is C:\Program Files\
- Finally, the program's installation manager may offer to create a "Desktop Shortcut" or "Start Menu Folder".
- Then the installation process will begin. After completion, the installation manager may ask you to restart your computer for the program to work more correctly.
Very often there are problems with network printing to printers connected to
for example, to a computer with Windows XP on a computer with Window 7 installed, not on Vista,2003,2008
The essence of the problem often lies in the fact that under these "modern" systems, manufacturers
"outdated" printer models do not bother to release drivers.
Here is my situation:
A friend asked me to set up printing in the office from a freshly bought laptop.
1. Of course - the laptop was with Windows 7 operating system
2. Of course - Home (see below what is the problem)
3. Of course - it (the system) was 64-bit.
4. Of course - the printers in the office were not new: HP1320 and Canon MFxxxx
5. Of course - the printers were connected and "shared" on machines with WinXP.
6. And no one will change the structure of the network for the sake of one laptop
How did I solve the problem?
First I went the wrong way:
I downloaded and tried to install drivers from official sites - it was not there:
Canon generally does not supply drivers for 64-bit systems for which models.
I am generally silent about the MFP.
For the MFxxxx series, a crutch was recommended - use drivers from the MF57xx series. Tried - system
shows that the driver is signed, but refuses to install, referring to the fact that it is not signed.
Brr, brad. Installation of unsigned firewood on Home will not be allowed (no gpedit.msc). Ugh.
HP seems to have provided a PCL5 driver for the HP1320 - but it didn't work.
When trying to install, unintelligible errors were issued, which Google found
poor people like me.
One comment on the forum especially smiled (I don’t remember exactly where, but in my opinion on the HP website):
"HP1320 is a business model so we don't provide weekend phone support"
By the way, scammers climb into all the cracks like cockroaches: you can always "google" and download ANY
any printer driver for any system. But the result will certainly not be what is expected.
Also, "Google" revealed to me another terrible fact: STILL in the server operating systems of the well-known
companies HAVE problems with the print subsystem in terminal mode. And even outsiders
solutions do not solve problems permanently.
“Enough with nonsense” - I thought and did this:
1. Downloaded the virtual Free PDF Printer from www.bullzip.com. There are a lot of them (PDF printers), but my choice fell on it for the following reasons:
a) this one works under 64-bit systems
b) free (in principle, it would not be a pity to give ~ 20 bucks, BUT not to give them
for EVERY PC with Windows 7 64x!)
c) he was found first :)
2. Installed a virtual PDF printer and configured it (C:\Program Files\Bullzip\PDF Printer\gui.exe) so that no dialog boxes were displayed to the user, and a .pdf file was created in the \\compxp\printer1\ folder
3. Installed Foxit Reader on the compxp computer, “shared” the printer1 folder and placed a simple vbs script in autoload:
copy source | Copy HTML
- "On Error Resume Next
- "Automatically print PDF files that appear in a specific folder
- "Global Variables
- Set gFSO = CreateObject("Scripting.FileSystemObject" )
- Set gShell = CreateObject("WScript.Shell" )
- "Folder where the script waits for PDF files (this folder(s) must be network accessible)
- gWatchFolder = "E:\master\printer\"
- "Main Loop
- while true
- Set lFolder = gFSO.GetFolder(gWatchFolder)
- Set lFiles = lFolder.Files
- For Each lFile In lFiles
- PrintFile(gWatchFolder & lFile.Name)
- Next
- WScript.Sleep(1)
- Wend
- "Function to print a specific pdf file
- SubPrintFile(pFileName)
- "We are waiting for some time (until the file is completely written)
- WScript.Sleep(3)
- "msgbox(pFileName)
- "We are (no longer) afraid of spaces :P
- s= """E:\master\foxit\Foxit Reader.exe"" /p """&pFileName&""""
- "msgbox(s)
- Call gShell.Run(s,0,true )
- gFSO.DeleteFile(pFileName)
- If gFSO.FileExists(pFileName) Then
- "You never know what can happen, it's better to let Ivan Ivanovich stop printing than one file goes to the printer many times
- "msgbox("Failed to delete file "& pFileName & "! Call Vasily at 123-456)
- WScript Quit
- "Else
- "Unrealized yet
- "ToLog("File " & lFileName & " deleted.")
- End If
- end sub
I ask you not to kick me for the script - it was written quickly and to make it work.
Voila:
The user simply presses the "Print" button in the program - and in a minute takes the document from the printer.
You can install several virtual printers and name them arbitrarily. The main thing is that when renaming the printer, the settings must be done again.
Additional benefit from this solution:
For especially paranoid bosses, a cunning admin can create an entire logging system
printing with folding into the archive of everything that the workers printed out.
P.S. Those who hate adobe can do bullzip->BMP(JPG)->irfan - but there will be problems with landscape orientation (it will be necessary to determine the orientation in the script).
Good afternoon, dear blog readers, today we will analyze the question of how the windows server 2012 R2 print server is configured. We have already installed a print server in Windows Server 2008 r2, and this article is somewhat similar to it. I think for beginners system administrators it will be useful in organizing a new infrastructure and having slightly improved functionality, I am waiting for all questions on this topic in the comments, I am ready to answer them as detailed as possible.
What is a print server
How do you understand this server or virtual machine, on which the role is located and with the help of it there is a centralized administration and distribution of printers to devices and users in local network. Below is an example of what it looks like.

windows server 2012 print server
Let's start setting up, I will do it on a domain controller, since this functionality does not load the server at all, the first thing you need to do is open the Server Manager and in the upper right corner click Manage > Add roles and features, in 2012 and in 2008 r2, everything was set through the master data.

You will see the wizard for adding roles and components, you can not read anything on the first window, there is only water, click next.

We leave the choice on Installing roles and components, since we will install on one server

Select a server for installation.

put a check mark against Slyzhba print and documents and click next.

There is no need to install additional components, so we simply skip this step.

At this step, the wizard will tell you in more detail about the network print server, if you are interested, then read it.

Now you will have 4 checkboxes to choose from
- The print server > selects it because our role is
- Printing via the Internet > here, as it were, everything is clear from the name
- Distributed Scan Server
- LPD Services > For Linux Platforms

We all click install.

The process is pretty fast.

Note that you will not be asked to reboot upon completion.

all the role is installed, open Tools in Server Manager and then Print Management.

We continue to make our windows server 2012 print server. In the mmc snap-in that opens, open Print Servers > then yours > Printers. As you can see, you only have a standard Microsoft XPS printer. It is logical that you need to install all your network printers. I have a bunch of HP LaserJet 400 MFP M425dn network printers configured on my network

Open Control Panel > Devices and Printers. Click Add Printer at the top.

In the window that opens, a search will be made for available printers in the Active directory. if you didn't find anything, then click Desired printer missing from the list.

Now windows print server setup will ask you to add local or network printer on behalf of the administrator.

Choose to add a printer by its TCP / IP address or name. I advise you to always use dns names and do not bind to ip addresses.

- Device Type > TCP/IP Device
- Name or IP address > DNS name
- Port name > whatever you understand, I have this location in the office

Now the driver will be installed, you can install your own, but it was enough for me to use the recommended one.

And set the name by which it can be searched.

Specify whether there is a public access to it or not.

This is what my list looks like

Open File Explorer now and type \\name of your server and you will get a list of all the printers it has.
Since you can put it manually when it is required at a time or to one person, but if we are talking about departments, then GP is simply not replaceable.