To format (format) a disk with Windows 7, you can use four different action algorithms. Each of them has its own advantages and disadvantages, which we will display in the article.
Standard method
Method 1: Use for formatting standard tools operating room Windows systems. This method is the most convenient in terms of implementation, but the formatting process occurs in most cases according to fairly simple algorithms. This results in a superficial cleaning of your computer's hard drive and simplifies the task of data recovery.
To implement the method, we proceed as follows.

Command line
Method 2. Using a window Windows consoles for formatting. The advantage of this method will be the simplification of the action to achieve the final result. Of the minuses, you can list all the same disadvantages as the first method, since the formatting method is the same.

The Windows format command, like most service commands of the Windows operating system, has a number of additional options and attributes. For a call complete list you can type "format /?" in the console window.
Of the most significant options, you can list the "format / FS: filesystem" command for explicitly setting file system disk after formatting the computer and the "format / X" command to force disconnect all connected handles. This is necessary to get full access to disk and execute all algorithms of the format command.
Using the installation disc
Method 3: Formatting the computer disk using the installation windows disk. This method has the same standard shortcomings in the small depth of information formatting as the format command, but it allows processing any disk and partition, including the system one.
To start the procedure, you must start the computer with installed disk Windows and set in the BIOSf settings to start the system from CD-Rom. When starting the installation process, you will be prompted to format the disk before installing the system. By selecting this item, it is enough to simply perform a quick format of the desired partition.
But you should be careful. When using the first three methods, when trying to format a disk with the Windows operating system installed on it, a warning will appear with a prohibition of actions. In this case, this prohibition will not occur and it is enough to simply remove important information and disrupt the entire operating system. 
When you run format, you will be prompted to choose one of two ways to format your computer: quick and full. Quick format deletes information but does not correct system errors and checking the physical space, which can be critical for installing Windows. 
Third party software
Method 4: Use a helper software for Windows OS. There are a huge number of specially designed applications with which you can carry out this operation on your computer. Their advantages include the highest possible level of disk cleaning and the use of complex formatting algorithms. Of the minuses, this is the fact that the almost universal requirement to pay a certain amount in order to obtain the full functionality of the program. We will not describe these applications because of their diversity.
Formatting is a process complete cleaning and markup local disk. The bulk of the owners of computer, and indeed any other digital equipment, have resorted to a similar procedure more than once. Basically, a similar procedure is carried out in order to remove unnecessary data from hard drive or change the file system (NTFS, FAT, FAT32). But the most common option, without a doubt, is formatting, as preparation of a place for reinstalling the operating system. If you look, formatting hard drive D does not require much intelligence. Another thing is system C. Inexperienced users will have to tinker with it. The problem is that to delete all data from the C drive while in Windows interface XP, 7, 8, 10 - impossible.
But do not worry, the procedure is not as scary as it seems. After all, in fact - "break not build." Therefore, first of all, move all important files. CDs, flash drives, even a local D screw, are great for this purpose. If it does not await the same fate. While the dummies are thinking, how is the non-system format formatted? HDD Let's remind them of this.
In order not to get confused in this complex process, we will analyze everything point by point.

In this way, it can easily be cleaned like any removable storage, and already forgotten CD-RW "blanks". Four simple steps and mission accomplished. Trust me, don't download unnecessary programs, this method is quite reliable and efficient. But on the formatting methods, let's dwell in more detail.
Cleaning up the system local disk
Cleaning the system hard drive (C) will delete your operating system. In other words, you will not be able to go to your usual desktop. Therefore, it is necessary to carry out such a process only if you know what to do next. But today is not about that.
To clean up the hosted OS, you will need:
- Bootable flash drive or CD;
- Superficial knowledge of the bios environment;
- Smooth hands.
If all of the above is available, say goodbye to old Windows XP, 7, 8, 10 and restart the computer. At the very beginning of the computer boot, press the Delete key, after which we get into the BIOS. In different operating systems, this environment may differ slightly, but if you wish, you can figure it out (see the third paragraph). Go to the Boot tab, then press Enter in the Boot Device Priority line.

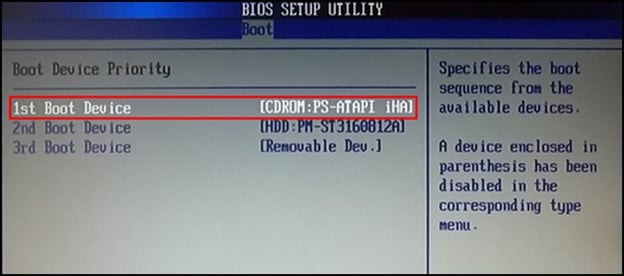
The order in which they are located determines when your computer accesses them. That is, in the first line, you need to select from the devices the one in which there is a boot cloud and through it the system will try to download. In our case, this is a CD-ROM. After completing this simple action, we are looking for F10 on the keyboard and exit the BIOS, saving the changes made.
Now you know how to set BIOS options to boot your computer from a hard disk image that is installed - on removable media. Please note that such actions are equally effective in all Windows versions, including the new 10.
After exiting the BIOS, booting via removable storage will start automatically, the next steps depend on which method you choose below.
Acronis Disk Manager
Having booted through a similar utility, installing Windows XP, 7, 8, or 10 will not work, but formatting the hard drive can be done without any problems. But there are exceptions. Mostly, boot disk Windows of all versions (even 10) contains an extensive list of various utilities. Acronis Disk Director, can easily be in it.

One way or another, after launching the application, select the line "Start the management console".

After that, the contents of our computer will appear with all the available screws.

Next, nothing new! Hovering the cursor over the disk of interest and clicking right button mouse, an extensive context menu will appear. Here and cutting, and renaming, much more, but we choose what we were looking for - "Formatting". And we see the following.

Familiar parameters isn't it. After setting the settings as in the picture, click "ok". To start formatting, you need two more clicks. Apply scheduled operations first.

Secondly, actually start formatting by clicking on "Continue".

After a few minutes, the disk will be cleared. And once the deed is done, then we say goodbye to the utility.
Formatting with Pseudo OS Installation
If you do not know how to reinstall Windows XP, 7, 8, 10 operating systems, then you will have to explain this to several stages of the procedure. After all, it is here that you can cheat and achieve the same goal - to clear drive C.
In fact, such a process requires a minimum of actions. We boot through the cloud hard drive and see the following.

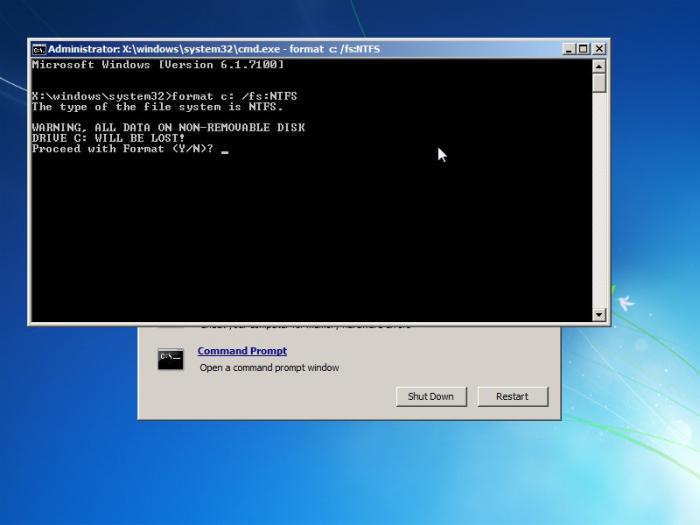
If at this stage you hold down the combination "Shift + F10", you will have access to the command line. And here some commands will come to the rescue:
- "format/FS:NTFS X: /q";
- "format/FS:FAT32X:/q".
The first one will perform a quick format in NTFS system. The second, respectively, in FAT32, instead of X, enter the drive letter and press "Enter". However, be careful, because the BIOS environment may give incorrect disk designations. By entering the following command, this problem will be solved - "wmic logicaldisc get deviceid, volumename, size, description".

If this method is too problematic, then when choosing the language of the installed OS, click "Next". Then " Full installation” and get to the final destination.

By selecting the desired hard drive and clicking on the "Disk Setup" line, some options will appear that apply to it. Here you can both format and delete the disk, or expand its volume.
ERD Commander
Another tool with which you can quickly clean up the system hard drive. To do this, boot through the hard disk image and go to the MicroSoft Diagnostic and Recovery Toolset section. Next, in the windows that appear, click "next" (2-3 times) and get into this menu.

Selecting the "Disk Cleanup" item, select the disk, after which it is formatted.
That's basically it. In addition to those listed, there are many more utilities of this specialization, but the principle of their work will not change much. The main thing to understand is that the next step after formatting the system hard drive will be installing Windows XP, 7, 8, or even version 10. Therefore, take care of its presence on the bootable media in advance, because you cannot install the OS through the formatting utility.
In contact with
Not all users know how to format a hard drive with Windows 7. Particular difficulties arise when it comes to the main partition (usually denoted by the letter C), on which the operating system is installed.
Unable to format hard drive with Windows 7
If in the case of additional disks it will be enough to open the menu and select "Format", then when you try to do this with drive C, a message of one of two types will appear:
- this volume cannot be formatted because it contains the this moment OS;
- this disk is being used by one of the programs or by a previously launched process, the system will, of course, ask if you really want to quickly format the hard disk, but after an affirmative answer, access will still be denied.
The reason for this is quite understandable, because the operating system cannot start the process of formatting itself. And in any case, on the first, main partition, there will be a bunch of files necessary to boot the OS, and the BIOS, when turned on, starts starting from there.
Conclusion, if you start formatting a hard drive in Windows 7, then this involves the subsequent installation of a new operating system. There can be no other reason.
Formatting methods and necessary "tools"
Before formatting a hard drive on Windows 7, you will have to boot from another media. good option can become a bootable USB flash drive, for example, with a free Linux OS or any other media ( external drive, CD, etc.) with one of the LiveCD programs recorded on it, Hiren's Boot CD, or Bart PE, which is popular among beginners today.
Of course, there are a number of professional solutions, such as Acronis Disk Director or the multifunctional Paragon Partition Magic, but we will not consider them in detail. Firstly, they are paid, and secondly, for banal formatting, the use of such programs is unnecessary. They can only come in handy if you bought new hard disk and want to set it up initially.
Formatting using a bootable USB flash drive or installation Windows
Probably the only easy way. We boot from the media, and at the installation selection stage, select "Full". A window will appear with a choice of the location of the future OS, in the lower right corner of which there is a "Disk Setup" tab. It is in it that you can not only format the disk, but also split it into several virtual partitions if necessary.
You can directly format the hard disk when installing Windows 7. After the first boot window, a menu will appear that will list all the disks in the system, any of them is formatted at the request of the user in the selected file system. For example, fat32 under windows 7 may be required for the correct operation of some programs designed to quickly restore a damaged OS.
Possible problems
If you see a message stating that the system could not complete formatting the hard drive, then it is most likely a problem with the hardware itself. The first thing you can try is to format again from the very beginning. But if at windows installation Since such a problem began to appear regularly, then be prepared to buy yourself a new hard drive soon.
Below is an instruction for computers on Windows 7 for formatting disks.
The first section of this manual describes the methods for formatting the logical partitions of a hard drive and additional hard drives connected to a PC, and the second section is completely devoted to formatting the system volume on which the OS is installed without removing Windows.
Instruction
Formatting is a responsible process and only strict adherence to the recommendations below can guarantee the subsequent normal functionality of Windows 7 and the preservation of user information stored in the computer's memory.
Depending on the goals set, the user can immediately begin to perform the described actions from the paragraph of interest to him (1st or 2nd).
It should be noted that there are rarely difficulties with following the instructions from the 1st section and even beginners can easily cope with them, but in order to format the system volume of the computer without uninstall Windows 7 (Part 2), much more diligence and care will be required, since failure to comply with the requirements described below is very likely to lead to the subsequent inoperability of the system.
Preliminaries
Before the procedure, you should copy all the important information that the PC owner wants to keep from the formatted disk.
If the amount of stored information is small, then copying can be done on external media, such as a CD or flash memory.
If the amount of stored information is calculated in gigabytes, then it is recommended to use an external hard drive or cloud storage.
Part 1: Working with logical partitions and additional drives
To format a volume that is not a system volume or a connected separate physical hard drive, follow these steps:

Attention: We remind you that after formatting the files will be erased, so if the user does not intend to delete them permanently, then you must first copy them to another disk, external media or to the cloud (as already noted in the preliminary measures section).
4. Next, check the box indicated by the red arrow (see the figure below);  5. Click "Start";
6. Wait;
7. Done. The disk is formatted.
In a similar way, formatting can be done using third party applications, for example, "Acronis Disk Director".
 If it is impossible to use the methods described above, "KS" (Command line) will come to the rescue. With its application, it will take even less time to complete the task.
On a PC with Windows 7, you will need to perform the following sequential steps:
- Run "KS" by typing in the "Run" menu only three letters: "cmd" and clicking "Ok";
 Note for beginners: You can open the "Run" menu through the "Start".
2. Then the format command containing the letter of the drive (which needs to be formatted) before the colon is formatted; 
3. In the example shown in the screenshot above, after pressing "Enter" the disk will be formatted under the letter "H".
Note: In this way, you can format any disk in a PC, and after the command, you can specify the file system in which you want to perform the operation.
 Using the above methods, you can format all computer disks, except for the system one, i.e. without uninstalling Windows 7.
It is advisable to completely remove from the OS partition by formatting the system volume only with a clean reinstallation of the system.
But what to do when you need to format the volume on which the "Seven" is installed without subsequent reinstallation of the operating system? In the second part of this guide Windows users 7 will find the answer to this difficult question.
Part 2: Formatting the system volume on which the OS is installed without removing Windows 7
It will not work to carry out the operation by the above methods, and the system itself simply will not allow it.
 The success of the operation can be ensured by the presence of the following two things:
- Availability of PC access to the World Wide Web to upload information to cloud storage or the presence of an external storage device with sufficient memory;
- You will need bootable media with "Acronis True Image".
Note: If there is no user data in the PC or they are not needed, then the first paragraph can be ignored.

IN last years computer literacy The population has grown slightly. In any case, many people know about programs, and some people can already deal with their home router, since from technical support most domestic providers can not achieve anything sensible.
But still, the vast majority of users do not know anything about the computer that would be more difficult than spending time in in social networks. In particular, in the event of some serious software failures that can only be eliminated complete reinstallation OS, they don't have a clue about how to format a Windows 7 drive.
Of course, such a need does not arise very often, but if a beginner encounters it, then there can be a lot of problems. That is why it will certainly be useful for you to read this article in order to form your own idea of \u200b\u200bthe process.
The essence of formatting. What is it for?
Formatting is the process by which the surface of a hard disk is marked. The most basic - low-level formatting which is produced only at the factory. We are interested in a high-level process that changes logical partitions on disks.
Before formatting a drive with Windows 7, the user must determine the type of file system, cluster size, and others. specifications again created partition. This should not be taken lightly, since the survivability of the media and the amount of free space on it depend on these operations.
What is the best cluster size?
In particular, if you set the maximum possible and store only text documents on such a disk, then you will waste free place. Let's assume that you have defined the volume as 512 KB. That is, by writing only one file to disk text document by 20B, you occupy an entire cluster, 99% of which will be wasted.
How to format the system partition?

If you're a little computer savvy, you'll remember the standard procedure for preparing a new partition. You can right-click on its icon and select context menu item "Format". But there is one problem.
The fact is that system partition(on which the system is installed) you will not be able to format it like that. If you try, you will be warned that this operation cannot be performed. How to be?
Using a boot disk
If there is already a goal to learn how to format a disk with Windows 7, you will have to get the boot disk from which you installed the system. If there is none, you need to make it yourself. To do this, you need to write the image downloaded from the network (or personally created) to
You need to insert it into the drive, restart the computer, and set the BIOS to boot from the CD / DVD drive. How to do this, you will have to find out on your own, since different manufacturers provide different versions"BIOS" with radically different interfaces from each other.
As a rule, all the information you need should be posted on the manufacturer's website. motherboard. So, having learned how to format a disk through the BIOS, you will have to find this information.
So, immediately after booting from the optical drive, you will be taken to the OS installation menu. Since we are talking about Windows 7, even the greenest beginners can relax: everything is so clear (almost at the level of intuition) that even a child can handle it.
Immediately after the first dialog box appears, select the "Install" item in it. Next, the required version of the OS is selected (if you enter the key, the installation program will select the required version itself). After that, disk work appears. Having finally understood how to format the system drive, find out its letter in advance, otherwise you can easily lose your entire collection of music or movies.

It's what we need. Select the desired section by clicking on it with the left mouse button. At the very bottom of the window there should be a link "Disk settings". Once you select it, you will see other options appear. You need the "Format" section. Select the desired file system and click OK. Then you can either continue installing Windows, or install some other operating system.
Since the system itself suggests formatting the disk during installation, in the absence of any experience it is better to leave the settings that are offered by default.
Live CD
If you have ever dealt with system administration, you probably know about Live CDs, which in the case of the Windows OS are often called BartPE. From such a carrier, you can not only boot from under the "BIOS", but also get a fully functional system as a result. Since it will not work to format the system disk from under the working OS (this is not Linux, after all), this option may be the only true one.
Since the system from the "live CD" is loaded into RAM, you can right-click on any drive (including the system drive), and then select "Format" from the context menu. All subsequent actions are no different from those that we have already described in this article.
The same can be done using installation disk with any Linux distribution. As a rule, they all have a Live CD mode, so you don't have to do any console dancing. The same Ubuntu is ideal, the interface of which is as simple and intuitive as possible.
Another variant
But it often happens that two systems are installed on one disk at once. In particular, this happens due to inexperience, when a person mistakenly puts several copies of an identical OS on one physical disk at once.
This cannot be done, because such a combination may well cause problems when loading and running programs. In addition, the human factor cannot be ruled out when users remove from under the first system system files second. Of course, it is not necessary to talk about stable operation in the latter case.
So how to format a drive with Windows 7 then? Everything is much simpler here.
Clearing via the context menu

To do this, go to "My Computer", and then select the disk on which the copy of "Windows" you do not need is installed. Do not worry that the Windows under which you are currently working will fall under the distribution. We have already indicated that in this case the system itself will not allow you to do this.
Next, right-click on the section you need, and then select "Format" from the menu that appears. A dialog box will also appear asking you to specify the file system type. It all depends on your preferences and requirements.
File system selection
The main (and most reliable) is NTFS, but FAT32 is acceptable if necessary. We have already written about determining the size of a standard cluster above. As for the type of formatting, here again everything depends only on you.
But! You need to carefully understand how to format a hard drive NTFS. It should be noted that the reliability of this file system is based on the fact that it creates a sufficiently large recovery partition.
In the case when you are preparing a disk, the volume of which exceeds several hundred GB, this can be sacrificed. But you should not mark up disks of 40 GB and below in this way. However, where can you find such "dinosaurs" now? But if you have a need to prepare the hard drive of some old computer, then our recommendations will certainly be useful to you.
If you check the box "Fast (Cleaning the Table of Contents"), the process will not take much time, but there will still be a chance that the deleted files from the disk can be recovered.

If you are going to sell this hard drive, we recommend that you uncheck this box. After clicking on the "Start" button, all data will be erased from the media, including the operating system installed there. This may take some time, which will directly depend on both the power of your computer and the size of the disk.
Performing a cleanup through Disk Management
This method is somewhat more reliable. Having understood Windows 7 by this method, you must first of all click on the "Start" button, and in the menu that appears, select the "Control Panel" item. In the Panel that opens, look for the "Administration" option.
In the dialog box that opens, select the "Computer Management" shortcut. A window for managing the utility of the same name will open, in which we are interested in the "Memory devices" item. In it, you need to double-click on the "Disk Management" line.
After all these manipulations, a window will open with a list of storage devices installed in the system. Select the disk you need in it, right-click on it. The same context menu will open, in which you should select the "Format" item. You have already been familiarized with further actions above.
Using the command line emulator
So we got to the most "advanced" method, which is used only by the most experienced users. So formatting a disk with Windows 7 is very convenient and fast, but you need to remember or write down all the commands that we will give you in the text below.
It is best to simply copy them to and then paste them into the command line using the right mouse button for this (the “Paste” item).
Once again, pay attention: carefully follow the letter of the drive that you need to format. A mistake can lead to the fact that you lose data that is of considerable value (at least for you).
First you need to run the emulator with administrator rights. This is done simply. First, click on the "Start" button, look for the "Search" field there. You drive into it cmd command, and then press the Enter key. A window with search results will open on the right side, in which you need to right-click on the file of the same name, and select the "Run as Administrator" option in the context menu.
Having decided how to format the disk partition with the system or unnecessary data, first of all write the format Y: command on the command line, where Y should be replaced by the letter of the partition you need. We repeat: make no mistake! There have been cases when absent-minded users have lost all archives with family videos.
After that, you need to press the Enter key, after which the complete formatting of the data will take place. Important! When using command line emulation mode, no warnings about possible loss important data in case of an error is not issued, so be extremely careful when entering commands!
A little about flash drives
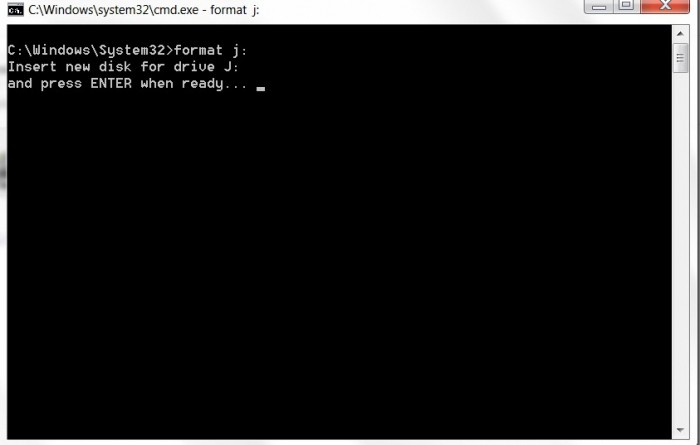
If external drive asks to format it before use, you can also use command line. All steps are exactly the same, but the main command will have a slightly different form: format Y: /Q. As in the previous case, the letter Y is the designation of your disk, which you need to change to the value relevant to your case, and the Q key stands for Quick, which indicates a quick format with a simple cleaning of the table of contents.
What is it for? The fact is that once again you should not completely format flash drives, as this once again reduces the number of rewriting cycles.